Category: guest post

  • Baking with Whole Wheat – Nutrition in Every Slice

    Baking with Whole Wheat – Nutrition in Every Slice

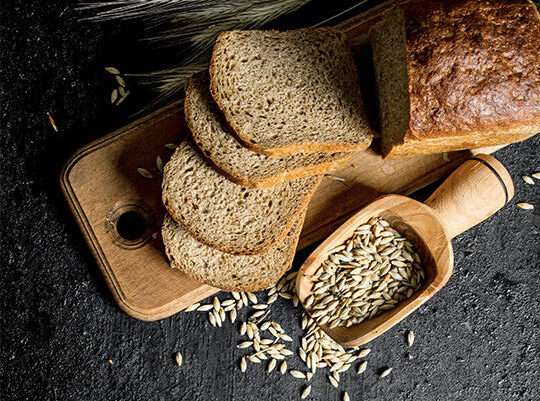
    Baking with whole wheat -Nutrition in every slice is a healthy and tasty brown bread. It is ideal way to enjoy with tea or as an after school snack.  Know more about whole wheat bread in our guest post series.

    We all have, sometimes in our life, followed crazy diets with no results. Some other times, we just left it to the universe to take care of our diet (hopefully nobody follows this diet). But there are some foods that don’t usually come under the category of healthy, for example, bread. But whole wheat bread is a healthy and adaptable supplement to any diet. Whole wheat flour contains the entire wheat kernel, including the bran and germ. Wheat contains the most nutrients, including fibre, B vitamins, iron, folate, potassium, and magnesium. The wheat kernel is left intact, resulting in a less processed, more nutritious bread.

    baking with whole wheat
    whole wheat bread


    Let’s look at some of the ways in which the whole wheat bread benefits us:

    1.  Lowers chances of developing type 2 diabetes – For those who are at risk of developing type 2 diabetes, new research seems promising. According to a study published in the journal Nutrients in 2018, eating more whole-grain foods is linked to a lower risk of type 2 diabetes.
    2. Helps with weight management – Despite the fact that bread has a reputation for causing weight gain, choosing whole wheat bread may have the opposite impact. According to an analysis of evidence from 38 epidemiological research, consuming whole wheat bread does not induce weight gain and may even help with weight management.
    3.  Aids in healthy digestion – Fibre is essential for digestive health. Consuming a high fibre diet, such as whole-grain foods, allows for the growth of beneficial gut flora. This so-called “pre-biotic” impact has been shown to improve colon health and immune system strength.
    4. Helps heart conditions – For good reason, whole grains have long been recommended for heart health. According to a major 2016 study published in the British Medical Journal, consuming more whole grains is linked to a lower risk of cardiovascular disease and coronary heart disease.
    Whole Wheat Bread
    whole wheat bread


    Now that you know of the ways in which whole wheat bread benefits your health, why not look at some ways in which you can keep having bread in your diet without feeling guilty about it. The best way to do that is to bake your own bread or buy it. But you have to be careful when you choose to buy your whole wheat bread. Different brands have different nutritional values and you have to read those carefully to understand and pick which whole wheat bread is best suited for your needs. For example, iD Wheat Sliced Bread is one brand that you can go for. It’s produced with all-natural ingredients including wheat flour that was carefully obtained and ground for iD. It’s made with whole wheat flour (atta), refined wheat flour (maida), sugar, iodized salt, refined sunflower oil, yeast, gluten, malt flour, natural improver, fermented wheat flour and RO-purified water.


    iD Bread is prepared with traditional methods, beginning with specially milled flour, all-natural fermentation, and traditional baking, with no chemicals or additives. When compared to other identical items on the market, these are the most important distinctions. iD offers the finest bread without the use of any artificial preservatives, flavours, or colors, unlike other options on
    the market today. The team at iD spent two years developing an all-natural bread, and now they’ve cracked the code and are ready to give a healthier and tastier alternative choice to their customers.
    So, if you haven’t yet added whole wheat bread to your diet, all you need to do is connect to the internet and buy your ID Whole Wheat Bread Online or go to your nearest store. 

  • Tengalu / Thenkuzhal | Guest Post for Sapana

    Tengalu / Thenkuzhal | Guest Post for Sapana

    Tengalu is a crispy, dry snack usually made during Diwali and Holi. It is popular in Karnataka and Tamil Nadu. It is also known as Thenkuzhal. 


    I have great memories of this snack. During Diwali, chakli and tengalu were often prepared at home in big containers and stored. Usually, Tengalu is made by making the flour at home. It is a week-long process and today, none of us have the time and patience to do. I prefer making the easier method these days as life seems to be busy. Here is the method I use to make Tengalu using ready flour. Here, I bought the urad dal flour from supermarket.

    Tengalu / Thenkuzhal guest post

    Difference between Chakli and Tengalu :

    Chakli and Tengalu are both deep-fried snacks from South India  but chakli is more popular in all regions. Tengalu is made only in some parts of the state. The blade/jali for Tengalu has three or four perforations but the Chakli blade has only perforation. Moreover, different varieties of chakli are prepared.

    This is a guest- post I have written for Sapana. Sapana is an awesome  blogger who blogs at Cooking with Sapana. It is good to be associated with her in this blogging world. Her blog has many dishes from different cuisines. Do check out her blog and the recipe for Tengalu.

    If you ever make this recipe, do take a picture and tag @evergreendishes on Facebook or @evergreendishes on Instagram.

    Subscribe to get all updates and an e-book for free !


  • Tasty Dosa in minutes/ iD  Organic Dosa  Batter

    Tasty Dosa in minutes/ iD Organic Dosa Batter

    Today’s post is slightly different from the usual one. What do you do on a busy and hectic day? You have a long list of pending errands, meeting with client, go to market to buy vegetables and then visit the dentist, later go to school for the meeting. I prefer to bring a ready to cook food at home and make something that is not only tasty but also healthy for the family.

    iD Fresh Food is a leader in breakfast foods in South India. It was started in 2005 by five brothers in a small kitchen in Bangalore. Since then, it has come a long way and are a leading name today in South Indian breakfasts. They have a wide range of natural and organic products which one can easily make at home without any compromise in taste and quality. The variety of products that they have to their belt are Dosa and Idly batter, Vada batter, rawa idly mix, wheat and oats dosa, a range of parathas and a coffee decoction.

    I loved the Organic iD Dosa and Idly batter which is made of pure, organic ingredients. The batter serves a dual purpose, one can either make idly or dosa with it. Plan ahead what you want to make, if it is dosa, you need to add a little quantity of water. Soft, fluffy idly with coconut chutney and piping hot sambar, sound so delicious isn’t it ? It can be made easily with this packet of batter, no hassle of prior soaking and grinding the lentils, it is ready within an hour, just make the side dishes and the breakfast is sorted

    The iD dosa batter is perfect blend of ingredients, I did add a little salt though. I spread a scoopful of batter, put a little oil, smeared a little red chutney after a while and voila, it was beautiful golden brown hued, crispy, the way I often make it at home. I served it with potato sbbji and coconut chutney.


    iD crispy dosa

    It is such a blessing to get these kind of semi-made food that are chemical free, farm fresh and most of all similar to homemade. I could make 13 dosas from one packet, quite sufficient for a family of four for breakfast. The packet comes in a pouch of 1Kilogram and costs Rs80. It is available online at Bigbasket

    Regarding the storage since it is a wet ingredient, it needs to be kept refrigerated. Do not freeze it.

    How to make Dosa with iD Dosa batter:

    Equipments: bowl, ladle, non stick skillet, flipper spatula, small bowl, spoon, plate

    Ingredients:

    • 1 kg iD idly/ dosa batter
    • a little salt
    • water
    • oil /ghee

    Method:

    1. Keep the batter pouch outside, it should be at the room temperature while cooking.
    2. Cut the pouch and remove the batter in a bowl. Add a little salt and water. Make it to the consistency of the usual dosa batter.
    3. Heat the skillet, take a ladleful of batter and put it on the skillet. Spread it inside out to a thin crepe.
    4. Drizzle oil around it and cook it on medium to high for a minute.
    5. Once it golden brown in colour, remove and serve with chutney.

    Serving suggestions:

    • Put a dollop of butter, it tastes heavenly.
    • Spread red onion chutney over thin crepes.
    • You can serve with potato bhaji and coconut chutney.
    • Even uttappa can be made, mix it with finely cut onion and tomato pieces and make small circular dosas.
    • On a lazy day, serve with podi.


    iD organic idly and dosa batter

    You can check the product at www.idfreshfood.com

    I liked this one and will soon be trying other products too. They are ideal for busy days when we are packed with other errands. I love the fact that there are no added preservatives in it.

    Do give a try to this, do check out the online store or at your nearest super market. Feel free to share with us if you ever make any dishes with iD Fresh Food.


  • Tomato and Garlic Focaccia – Guest Post Series

    Tomato and Garlic Focaccia – Guest Post Series

    Focaccia is a type of Italian flatbread which has the basic ingredients yeast, olive oil, salt and herbs added to the dough. The topping can vary from plain just with herbs and oil to meat. This post is  a part of the guest post series that I run on my blog. (more…)

  • Drumstick Leaves Dal with Coconut | Guest Post Series

    Drumstick Leaves Dal with Coconut | Guest Post Series

    Drumstick leaves are healthy and make a good combination in dal. Try this delicious dal for a comfort and quick meal.
    It’s a guest post today and I have Lathiya Shanmugasundaram of Lathiskitchen. Welcome Lathiya to blogspace. Blogging has made me interact with many different indivduals around the globe, Lathiya is one among them, glad to know her in this blogging journey. She has moringa leaf dal for us, I have heard so much about it, do need to search for it in my place.
    Without much ado, it’s over to Lathiya.
    Thank you for having me on your space. Here I present you the healthy, easy and delicious Drumstick Leaves Dal with Coconut.
    Drumstick leaves are packed with lots of nutrients. It’s said that drumstick leaves have anti carcinogenic properties and it is a must to include in your diet. If you haven’t start using it in your meal plan yet, this is the time to start from this dal curry.
    Making this dal is not so complicated. You can make this dal within 30 minutes. The only time consuming part in making this dal is cleaning the drumstick leaves. It’s a tedious job of cleaning drumstick leaves. You have to be careful not to include the sticks and only leaf should be used. I used to clean the drumstick leaves a day before making this dal. So it takes just less than 30 minutes when I make this dal.

    drumstick leaves dal with coconut
    drumstick leaves dal with coconut

    Ingredients 
    • Drumstick leaves – 1 cup tightly packed
    • Dal – 1/4 cup
    • Coconut – 1/4 cup grated
    • Jeera seeds –  1/2 tsp
    • Turmeric powder – 1/4 tsp
    • Red chili powder – 3/4 tsp
    • Shallots – 3 or 4 thinly sliced
    • Mustard seeds – 1/4 tsp
    • Ghee / Coconut oil – 1 tsp
    • Salt – as required
    Method
    1. Clean and wash the drumstick leaves. Keep aside.
    2. Cook dal in pressure cooker till mushy. Keep aside.
    3. Grind coconut with jeera seeds to smooth paste. Keep aside.
    4. Heat 1/2 tsp of oil in a pan. Sauté the drumstick leaves for a minute.
    5. Add the cooked dal in sautéed drumstick leaves. Add little water to cook the drumstick leaves.
    6. Add turmeric powder and red chili powder.
    7. Let it boil in medium flame. Do not over cook the drumstick leaves.
    8. Add the grounded coconut to the dal and drumstick leaves mix with required water. Add required salt.
    9. When the raw smell of coconut goes, remove the pan from the heat.
    10. In another pan, add remaining 1/2 tsp of  ghee or oil. When it is hot, add mustard seeds.
    11. When it crackle, add sliced shallots and sauté till golden .
    12. Add it to the dal. Serve along with hot rice.

    drumstick leaves dal with coconut

    Ingredients
      

    • 1 cup drumstick leaves tightly packed
    • 1/4 cup dal
    • 1/4 cup coconut grated
    • 1/2 teaspoon jeera
    • 1/4 teaspoon turmeric powder
    • 3/4 teaspoon red chilli powder
    • 3 or 4 shallots thinly sliced
    • 1/4 teaspoon mustard
    • 1 teaspoon ghee/coconut oil
    • salt as required

    Method
     

    1. Cook dal in pressure cooker till mushy. Keep aside.
    2. Grind coconut with jeera seeds to smooth paste. Keep aside.
    3. Heat 1/2 tsp of oil in a pan. Sauté the drumstick leaves for a minute.
    4. Add the cooked dal in sautĂ©ed drumstick leaves. Add little water to cook the drumstick leaves. Add turmeric powder and red chili powder. Let it boil in medium flame. Do not over cook the drumstick leaves.
    5. Add the grounded coconut to the dal and drumstick leaves mix with required water. Add required salt. When the raw smell of coconut goes, remove the pan from the heat.
    6. In another pan, add remaining 1/2 tsp of ghee or oil. When it is hot, add mustard seeds. When it crackle, add sliced shallots and sautĂ© till golden .
    7. Add it to the dal. Serve along with hot rice.

    About the author :   Lathiya Shanmugasundaram is the person behind lathiskitchen.org.She was born and brought up in India but now settled in US. She is the mother of two super active kids. She has both Malyali and Tamil recipes on her blog.

    Do connect with  Lathiya on social media

    If you have liked this post, do leave a comment and save it. Subscribe to get a book of handyhints for free.


  • Zucchini Paratha / Thepla | Guest Post Series

    Zucchini Paratha / Thepla | Guest Post Series

    Zucchini Paratha is a tasty and healthy flat bread. It is ideal to treat fussy kids. This is another variety of thepla which  is ideal for lunch, breakfast or one can even pack it in the box.  (more…)

  • Makhana ki kheer/ Lotus seed pudding | Guest Post Series

    Makhana ki kheer/ Lotus seed pudding | Guest Post Series

    Makhana kheer or lotus seed pudding is super easy dessert to prepare especially in navratri fasting time or any time. It is creamy, thick and delicious kheer which is so healthy and filling.

    It’s time to introduce another blogger here on Evergreendishes and it’s a delicacy that I want to try soon, Makhana ki kheer. Today, I have Bhawana Singh of code2cook. A very warm welcome to you Bhawana.

    Blogging has introduced me to many wonderful persons from around the globe who share the same passion, recipes or poetry, whatever it may be, I feel good being with these people around. Bhawana Singh is a software professional turned food blogger. She is  a passionate blogger who loves cooking and styling the food. Do check out her blog www.code2cook.com.

    A few sweet recipes from my blog: Sweet Potato Kheer, Basundi, Komala Payasa

    Over to Bhawana :

    Makhana kheer or lotus seed pudding is super easy dessert to prepare especially in navratri fasting time or any time. It is creamy, thick and delicious kheer which is so healthy and filling.

    Makhana or lotus seeds are also called fox nut in english. They are low in sodium and high magnesium content which make them good for those who are suffering from heart disease, diabetes, high blood pressure and obesity. They have many more medicinal properties which make makhana a healthy and low-calorie snack if consumed in moderation.

    To make this makhana kheer first dry roast the makhana, crush them a little and cook in the milk till it becomes a thick mixture. Adjust sugar as per your taste and add chopped dry fruits. Serve hot or chilled as per the choice. So let see how to make this delicious and lip-smacking Makhana Kheer or Lotus Seed Pudding.

    makhana-kheer
    makhana-kheer

    Ingredients:

    Serves : 4  Measurement: 1 cup =250 ml

    • 2 cups makhana
    • 5 cups of milk
    • 6 tsp sugar or as per taste
    • 3 tbsp dry coconut grated
    • 2 tbsp cut dry fruits like cashew/almond/pista

    for garnish

    • 1 tblsp silvered pista
    • 1 eddible silver leaf

    Method:

    1. First of all dry roast makhana till they became crisp, Remove from the flame and crush them slightly.
    2. Now heat the milk in a heavy bottom pan and when it starts boiling add crushed makhana.
    3. Cook at least for 20 min. Keep stirring it as it gets to burn at the bottom as cooking progressed.
    4. Add cut dry fruits and grated dry coconut. mix well and cook as per your desired thickness.
    5. Remove from the fire garnish with pista and silver leaf.
    6. Server hot or cold. It tastes awesome both ways. we love the chilled one :).

    Bhawana Singh

    Makhana ki kheer/ Lotus seed pudding

    Makhana ki kheer is a delicious, creamy and tasty dessert. It is usually made during Navratris in North India.
    Prep Time 10 minutes
    Cook Time 10 minutes
    30 minutes
    Total Time 20 minutes
    Servings: 4 people
    Course: sweets
    Cuisine: Indian

    Ingredients
      

    • 2 cups makhana
    • 5 cups milk
    • 6 teaspoon sugar
    • 3 tablespoon dry coconut grated
    • 2 tablespoon cut dry fruits like cashew/almond/pista
    • 1 tablespoon silvered pista
    • 1 edible silver leaf

    Method
     

    1. First of all dry roast makhana till they became crisp, Remove from the flame and crush them slightly.
    2.  Now heat the milk in a heavy bottom pan and when it starts boiling add crushed makhana.
    3.  Cook at least for 20 min. Keep stirring it as it gets to burn at the bottom as cooking progressed.
    4. Add cut dry fruits and grated dry coconut. mix well and cook as per your desired thickness.
    5. Remove from the fire garnish with pista and silver leaf.
    6. Server hot or cold. It tastes awesome both ways. we love the chilled one :).

    makhana-kheer
    makhana-kheer

    About Bhawana Singh:

    Bhawana Singh a software professional in the past turned into a food blogger and a happy stay at home mom. Code2cook blog includes vegetarian recipes which are healthy, kids approved, and tasty. It is also a platform to showcase food styling, food photography and writing skills, which are the part of food blogging. A self-taught cook, code2cook includes recipes that are made with readily available and nutritious ingredients. Do visit the blog for more such recipes.

    Subscribe to get all updates and a book of handyhints for free! And before I end my post, just a thought about eating. As the festivals are approaching, do eat moderately and keep working out regularly either by walking or going to the gym.


    book of handyhints
    book of handyhints

    Follow evergreendishes on Twitter, Facebook, Instagram and Pinterest.

  • Mug/ Mag Ni Chutti Daal |Gujarati cuisine| guest post

    Mug/ Mag Ni Chutti Daal |Gujarati cuisine| guest post

    Mug/Mag Ni Chutti Daal is a popular dish from Gujarati cuisine. It is dry sabzi of moong dal which pairs well with rice and kadhi.

    It’s a new week with a new face on my blog. Today, I have my other good friend Jagruti sharing her recipe here. Jagruti, Sapana and myself are three like minded person running a group on facebook since a few months and thus our interactions are on daily basis.

    Jagruti is an excellent cook who can play easily with many cuisines. She is another vegetarian blogger. I love her photography skills. She is a passionate blogger who strives hard to keep herself updated. Do take a look at her blog www.jcookingodyssey.com

    Over to Jagruti:

    How to make Mug ni chutti daal | Mug ni chutti daal is a simple, delicious and homely Gujarati side dish that can be served in a daily Gujarati meal. This daal requires just a handful of ingredients that are easily available in the Indian kitchens. This dish makes a perfect protein-rich dish without using any expensive ingredients.

    BTW Chutti translates Sukhi in Hindi and Dry in English.

    Mug ni chutti daal is a dry preparation of huskless yellow moong daal with basic spices but made without onion and garlic. Usually, this daal is served with Gujarati Kadhi and plain boiled rice. These three dishes go so well when mixed together. Whenever my husband tries this combination together, he describes this as ‘ Pudding’ 🙂

    We Gujarati try to eat a well-balanced meal every day and when we prepare a thali, we make sure that we cook everything making sure that in the one meal, all flavours and nutrients can be found. So for protein, we make at least two dishes, and whenever there is kadhi on the menu, Mug Ni Chutti daal, automatically becomes a side dish in the thali.

    This post is dedicated to all you Gujarati food lovers out there and my lovely friend Jayashree’s readers!

    Hey guys

    How are you all?

    When one passionate foodie meets another passionate foodie, what would you do? You become best pals, don’t you agree? Mine and Jaya’s friendship is not even a year old, but it seems like we know each other for years. I met Jayashree virtually on Facebook through one of the group. We became very close friends since we created our facebook group ‘Desi Bloggers Connect’. She is a dedicated and enthusiastic food blogger who creates delicious, tasty yet easy to prepare recipes. I love all her Karnataka specialities and can’t wait to try them in my own kitchen.

    I was so delighted and honoured when Jayashree request for the guest post and that when I decided to share this delicious and healthy Gujarati daal recipe. A really tasty and protein packed dish that is perfectly suitable for vegan too, also it is made without onion and garlic thus this recipe can be prepared during fasting season when such ingredients onion and garlic are prohibited.

    Thank you Jayashree for giving me this honour to share my recipe with your readers, hope they like it and make it in their own kitchens. Please shoot with any questions and inquiries regarding this recipe

    Let’s look at the recipe

    Mug ni chutti-guest post
    Mug ni chutti daal- guest post

    Mug/Mag Ni Chutti Daal – Gujarati Dry Moong Daal


    Ingredients

    • 1 cup yellow moong daal ( Mug Ni Daal )
    • 2 Tbsp. oil
    • 1/2 tsp. Mustard seeds
    • 1/2 tsp. Cumin seeds
    • Pinch hing
    • 1 red dry chilli
    • 1 tsp. red chilli powder
    • 1/2 tsp. turmeric powder
    • 1/2 tsp. green chilli and ginger minced
    • Lemon juice
    • Fresh coriander leaves to garnish

    Method:-

    1. Clean, wash and soak moong daal in cold water for half an hour.
    2. Discard the water.
    3. Once you are ready to cook the daal, heat oil in a thick bottom pan or kadai.
    4. Add mustard and cumin seeds, once they crackle add hing and dry red chilli.
    5. Then add soaked daal, and minced chilli ginger.
    6. Mix well, then add red chilli powder, turmeric and salt.
    7. Once again mix well.
    8. Add sufficient water to cook daal perfectly.
    9. Don’t add too much water in the beginning, if you need then add later.
    10. Cover the pan with the lid and cook the daal on a low heat.
    11. Daal should not be mushy but cooked well and each daal should be separate.
    12. Once the daal is cooked add lemon juice and mix.
    13. Turn off the heat and garnish the daal with the coriander leaves.
    14. Serve hot with Gujarati Kadhi and Rice in a typical everyday Gujarati thali.Enjoy!

    A few other Gujarati dishes on the blog: Tricolour Dhokla, Methi Khakra, Mamra ladoo

    Jagruti

    Mug ni daal

    Mug ni chutti daal is a dry lentil based accompaniment from Gujarati cuisine. It is one of the essentials in their daily menu.
    Prep Time 15 minutes
    Cook Time 20 minutes
    Total Time 35 minutes
    Servings: 6
    Course: lunch ideas
    Cuisine: Gujarati

    Ingredients
      

    • 1 cup moong dal
    • 2 tablespoon oil
    • 1/2 teaspoon cumin
    • 1/2 teaspoon mustard
    • 1 teaspoon chilly powder
    • 1 red chilly
    • 1/2 teaspoon ginger and green chilly minced
    • lemon juice
    • fresh coriander to garnish

    Method
     

    1. Clean, wash and soak moong daal in cold water for half an hour.Discard the water. Once you are ready to cook the daal, heat oil in a thick bottom pan or kadai.
    2. Add mustard and cumin seeds, once they crackle add hing and dry red chilli. Then add soaked daal, and minced chilli ginger. Mix well, then add red chilli powder, turmeric and salt. Once again mix well. 
    3. Add sufficient water to cook daal perfectly. Don’t add too much water in the beginning, if you need then add later. Cover the pan with the lid and cook the daal on a low heat. Daal should not be mushy but cooked well and each daal should be separate. Once the daal is cooked add lemon juice and mix. Turn off the heat and garnish the daal with the coriander leaves. Serve hot with Gujarati Kadhi and Rice in a typical everyday Gujarati thali.

    yellow-moong-daal-guest-post
    yellow-moong-daal-guest-post

    Mug-ni-chutti-daal-guestpost
    Mug-ni-chutti-daal-guestpost

    About the author:

    She is the owner of Jagruti Cooking Odyssey, a blog of pure vegetarian dishes. She has cooked on IndianTV channels and printed in UK magazines, previously winning the top prize. She loves cooking different cuisines. Follow Jagruti on Facebook, Twitter, Instagram and Pinterest

    Let’s be connected, follow us on facebook, twitter, pinterest and instagram.

    Subscribe to get all updates in your inbox and an e-book for free!

  • Guest Post Chocolate Streaked Mango Icecream

    Guest Post Chocolate Streaked Mango Icecream

    Mango Ice cream is a delightful dessert, best made with fresh alphanso mangoes. But, when chocolate and mango pair together, it’s truly exotic. Time for another guest post, and it’s Chocolate Streaked Mango Icecream. (more…)

  • Guest Post Series- Sparkling Blueberry Lemonade

    Guest Post Series- Sparkling Blueberry Lemonade

    Sparkling Blueberry Lemonade is a refreshing drink to beat the heat. It is the second guest post that I am putting on my blog.
    Continuing with my guest post series, today I have Seema Doraiswamy Sriram of www.mildlyindian.com She is a good friend  and an avid  blogger. Welcome Seema to my little space, so glad to have you here. She has a blueberry lemonade from here repertoire, sounds so good, isn’t it ?

    (more…)