Blog

  • Drumstick Leaves Dal with Coconut | Guest Post Series

    Drumstick Leaves Dal with Coconut | Guest Post Series

    Drumstick leaves are healthy and make a good combination in dal. Try this delicious dal for a comfort and quick meal.
    It’s a guest post today and I have Lathiya Shanmugasundaram of Lathiskitchen. Welcome Lathiya to blogspace. Blogging has made me interact with many different indivduals around the globe, Lathiya is one among them, glad to know her in this blogging journey. She has moringa leaf dal for us, I have heard so much about it, do need to search for it in my place.
    Without much ado, it’s over to Lathiya.
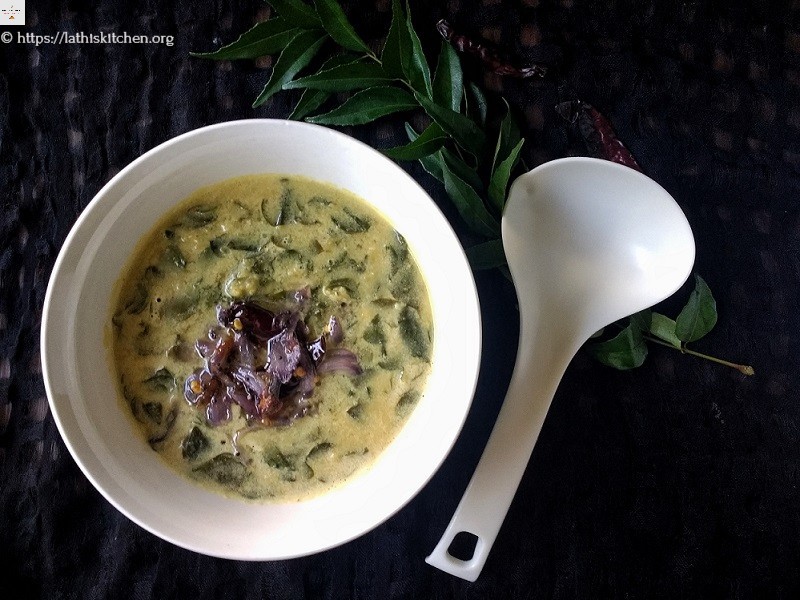
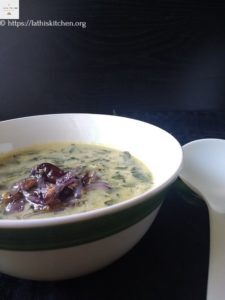
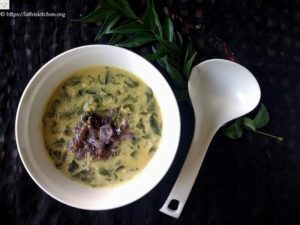
    Thank you for having me on your space. Here I present you the healthy, easy and delicious Drumstick Leaves Dal with Coconut.
    Drumstick leaves are packed with lots of nutrients. It’s said that drumstick leaves have anti carcinogenic properties and it is a must to include in your diet. If you haven’t start using it in your meal plan yet, this is the time to start from this dal curry.
    Making this dal is not so complicated. You can make this dal within 30 minutes. The only time consuming part in making this dal is cleaning the drumstick leaves. It’s a tedious job of cleaning drumstick leaves. You have to be careful not to include the sticks and only leaf should be used. I used to clean the drumstick leaves a day before making this dal. So it takes just less than 30 minutes when I make this dal.
    drumstick leaves dal with coconut
    drumstick leaves dal with coconut
    Ingredients 
    • Drumstick leaves – 1 cup tightly packed
    • Dal – 1/4 cup
    • Coconut – 1/4 cup grated
    • Jeera seeds –  1/2 tsp
    • Turmeric powder – 1/4 tsp
    • Red chili powder – 3/4 tsp
    • Shallots – 3 or 4 thinly sliced
    • Mustard seeds – 1/4 tsp
    • Ghee / Coconut oil – 1 tsp
    • Salt – as required
    Method
    1. Clean and wash the drumstick leaves. Keep aside.
    2. Cook dal in pressure cooker till mushy. Keep aside.
    3. Grind coconut with jeera seeds to smooth paste. Keep aside.
    4. Heat 1/2 tsp of oil in a pan. Sauté the drumstick leaves for a minute.
    5. Add the cooked dal in sautéed drumstick leaves. Add little water to cook the drumstick leaves.
    6. Add turmeric powder and red chili powder.
    7. Let it boil in medium flame. Do not over cook the drumstick leaves.
    8. Add the grounded coconut to the dal and drumstick leaves mix with required water. Add required salt.
    9. When the raw smell of coconut goes, remove the pan from the heat.
    10. In another pan, add remaining 1/2 tsp of  ghee or oil. When it is hot, add mustard seeds.
    11. When it crackle, add sliced shallots and sauté till golden .
    12. Add it to the dal. Serve along with hot rice.

    drumstick leaves dal with coconut

    Ingredients
      

    • 1 cup drumstick leaves tightly packed
    • 1/4 cup dal
    • 1/4 cup coconut grated
    • 1/2 teaspoon jeera
    • 1/4 teaspoon turmeric powder
    • 3/4 teaspoon red chilli powder
    • 3 or 4 shallots thinly sliced
    • 1/4 teaspoon mustard
    • 1 teaspoon ghee/coconut oil
    • salt as required

    Method
     

    1. Cook dal in pressure cooker till mushy. Keep aside.
    2. Grind coconut with jeera seeds to smooth paste. Keep aside.
    3. Heat 1/2 tsp of oil in a pan. Sauté the drumstick leaves for a minute.
    4. Add the cooked dal in sautéed drumstick leaves. Add little water to cook the drumstick leaves. Add turmeric powder and red chili powder. Let it boil in medium flame. Do not over cook the drumstick leaves.
    5. Add the grounded coconut to the dal and drumstick leaves mix with required water. Add required salt. When the raw smell of coconut goes, remove the pan from the heat.
    6. In another pan, add remaining 1/2 tsp of ghee or oil. When it is hot, add mustard seeds. When it crackle, add sliced shallots and sauté till golden .
    7. Add it to the dal. Serve along with hot rice.

    About the author :   Lathiya Shanmugasundaram is the person behind lathiskitchen.org.She was born and brought up in India but now settled in US. She is the mother of two super active kids. She has both Malyali and Tamil recipes on her blog.

    Do connect with  Lathiya on social media

    If you have liked this post, do leave a comment and save it. Subscribe to get a book of handyhints for free.


  • Review of Zerobeli Oats and  Ladoo Recipe

    Review of Zerobeli Oats and Ladoo Recipe

    Breakfast is the most important meal of the day. Start the day with a bowl of oats porridge, it keeps you energised for a long time.

    Recently, I was sent two packets of cereals labelled Zerobeli by Georgia Foods Company to review the products.  Zerobeli Oats is high fiber and protein rich, thus it helps to keep hunger pangs away for a longer time. One feels energized for long hours. It may help in reducing weight.

    Today,  I had Oats porridge  made with Zerobeli for breakfast. It was tasty and cooked so fast.  One needs no additional topping of nuts as it tastes good by itself. Next, shall try making the overnight oats, it is even more simpler, just mix oats in milk with any sweetener of your choice and refrigerate overnight, top with some fruits and it’s ready.

    Many different kind of dishes can be prepared using Zerobeli Oats. I made Oats ladoo and it was yummy. It is ideal to use in the mornings for breakfast or as a mid-day snack. Children are fussy eaters and should be given such healthy food.

    oats ladoo with zerobeli
    oats ladoo with zerobeli

    I had prepared Oats Dhokla too and it was super soft. It’s wonderful to replace our intake with oats in it. A healthy lifestyle begins with what we eat and Zerobeli is the ideal way to start with.  They have other cereal breakfast options too. It is available in outlets around Delhi but one can order online on their website.

    We are happy with the product and will be purchasing the same in the near future.

    Today, I am sharing the recipe of Oats Ladoo. I have tried to keep it healthy, it’s easy to make and can be made in fifteen minutes.

    Oats Ladoo

    Ingredients:
    • 1 cup Zerobeli oats
    • 1 cup peanuts
    • 1 cup white sesame
    • 1 cup desiccated coconut
    • 1 cup jaggery grated
    • 8 dates pitted
    • 1/4 teaspoon cardamom powder
    Method:
    1. Roast the peanuts on a low flame, put it aside on a plate.
    2. Roast the sesame, you get a good aroma and they slightly crackle.
    3. Roast the desiccated coconut, put it aside.
    4. Dry roast the oats for a minute.
    5. Cut the dates, remove the seeds and put them on it.
    6. Grind all ingredients together.
    7. Remove it in a bowl, make them into balls.
    8. Healthy oats ladoo are ready to serve.


    Oats ladoo
    Oats ladoo
    oats ladoo
    oats ladoo
    oats ladoo
    Evergreendishesdev

    Oats Ladoo

    Oats ladoo is a healthy snack to kick start the day.  Give it to adults or children, they are sure to like it. 
    Prep Time 10 minutes
    Cook Time 10 minutes
    Total Time 20 minutes
    Course: Breakfast, midday snack, snack in the jar
    Cuisine: Indian

    Ingredients
      

    • 1 cup oats
    • 1 cup peanuts
    • 1 cup white sesame
    • 1 cup desiccated coconut
    • 1 cup jaggery grated
    • 8 dates pitted
    • 1/4 teaspoon cardamom powder

    Method
     

    1. Roast the peanuts, they should be crunchy and light brown in colour.
    2. Roast the sesame for two minutes, you get a good aroma.
    3. Roast the desiccated coconut for a minute. 
    4. Roast the oats for a minute.
    5. Cut the dates, deseed and put them over the ingredients.
    6. Grind all ingredients together.
    7. Remove in a wide bowl.
    8. Make balls of it. Oats ladoo are ready to serve. 

    Disclaimer:  I was sent two packets of Zerobeli cereals by Georgia Food Company  to review and use the product, but no monetary benefits were given. All views mentioned here are my own and written by myself. 

    If you have liked this post, do share it further. Stay tuned for more interesting recipes.


  • Palak Sev | Spinach Crispies | Namkeen Snack for Diwali

    Palak Sev | Spinach Crispies | Namkeen Snack for Diwali

    Palak Sev is a crunchy and flavoursome dry snack usually prepared during Diwali. It makes a good snack to serve along with other sweets.

    Diwali is round the corner and so much of enthusiasm all around. It’s the festival we look forward to celebrate and enjoy. Many sweets and snacks are prepared and children are happy enjoying the vacation.

    Today, I bring to you Palak Sev or Spinach Crispies. It’s crunchy and flavoursome, makes a good snack with tea.

    Palak Sev
    Palak Sev

    Let’s get to the recipe without much ado

    Ingredients:    Measurement: 1 cup =200 ml

    • 1 cluster spinach
    • 1cup  gram flour
    • 2 teaspoon rice flour
    • salt
    • 2 teaspoon hot oil
    • 5 green chilly
    • 1 inch ginger
    • 1 teaspoon cumin
    • water
    • oil for frying

    Method:

    1. Remove the stalk of spinach leaves.
    2. Cut and blanch it.
    3. When cool, grind it to a paste with chilly, ginger and cumin.  Do not add water.
    4. Remove the paste in a bowl.
    5. Add salt to it. Mix. Heat oil in a pan.
    6. Put rice flour and gram flour to it. Add two tea spoon of hot oil to it. Mix and knead to a dough. Use only as much gram flour as required.
    7. Take a sev maker, smear some oil to it. Take some dough and make it to a cylindrical shape. Put it inside, close and once the oil is hot, press it directly in the oil. Ensure the oil is on low flame while pressing the sev.
    8. Fry on medium high, use a long handled perforated ladle to toss and remove it.
    9. Remove on a tissue paper. Repeat with the rest of the dough.
    10. Once cool, put in a container and keep it.

    Take a tip: Green chilly used were not spicy, hence used 5.

    Palak Sev
    Palak Sev


    Making of Palak Sev
    Making of Palak Sev
    Palak Sev
    Palak Sev
    Palak Sev
    Evergreendishesdev

    Palak Sev / Spinach Crispies

    5 from 4 votes
    Palak sev is a tasty snack to binge with tea or as an accompaniment with any meal.
    Prep Time 15 minutes
    Cook Time 30 minutes
    Total Time 45 minutes
    Servings: 6
    Course: evening snacks, festive treats
    Cuisine: karnataka

    Ingredients
      

    • 1 cluster spinach
    • 1 cup gram flour 1 cup =200ml
    • 2 teaspoon rice flour
    • salt
    • 5 green chilly
    • 1 teaspoon cumin
    • 1 inch ginger
    • 2 teaspoon oil
    • oil for frying

    Method
     

    1. Remove the stalk of spinach leaves. Cut and blanch it. When cool, grind it to a paste with chilly, ginger and cumin.  Do not add water.
    2. Remove the paste in a bowl.
    3. Add salt to it. Mix. Put rice flour and gram flour to it and knead to a dough. Use only as much gram flour as required. Heat oil in a pan, add two teaspoon of hot oil to the dough.
    4.  Take a sev maker, smear some oil to it. Take some dough and make it to a cylindrical shape. Put it inside, close and once the oil is hot, press it directly in the oil. Ensure the oil is on low flame while pressing the sev.
    5. Fry on medium high, use a long handled perforated ladle to toss and remove it.
    6. Remove on a tissue paper. Repeat with the rest of the dough. Once cool, put in a container and keep it. Stays good for more than a week.

    Notes

    • The green chilly used were not hot, so I used 5.
    •  

    My popular snack recipes : Ragi Halbai, Chiwda, Murukku, Ash gourd Halwa, Nippattu

    palak sev
    palak sev

    This post is part of #DiwaliDhamaka at Desi Bloggers Connect. Do check out tasty treats by other bloggers.

    If you have liked this post, subscribe to get all updates and a free e-book of handy hints!

    Follow Evergreendishes on Facebook, Instagram, Twitter and Pinterest

    Other recipes by co-bloggers:

  • Chaler Payesh / Bengali Rice Kheer

    Chaler Payesh / Bengali Rice Kheer

    Chaler Payesh is a traditional rice kheer recipe of Bengali cuisine. It is one of the favourites of the Bong community and is usually prepared during ceremonies and festivals. The kheer is creamy, rich, aromatic and melt in the mouth.

    Kheer usually refers to the sweet prepared by boiling milk and rice. Each region has its own variety of kheer and today I have the Bengali version here.

    Usually Gobindobhog variety of rice is used in preparing Chaler Payesh. If you do not have it, use basmati rice. Bay leaf is added  to the milk while it is cooked, it gives a good aroma. Rich milk is boiled and simmered in soaked rice grains on a low flame, it is then sweetened with sugar and garnished with dry fruits.

    About Bengali cuisine :

    Bengali cuisine is the food served in the state of Bengal. It mainly consists of west Bengal, Tripura and Assam. It is known for the different flavours and the varied desserts.  It is one of the popular cuisines relished for the variety of sabzi too. The Bengali cuisine can be divided into four types of food as charbe, chosya, lehya, and peya. Charbe is the food chewd as rice and fish. Choosya is the food that is thin and usually sucked. Condiments as pickles are usually licked and belong to the category of Lehya. Peya are the ones as milk and tea.  (Source: Wikipedia)

    A few Bengali dishes on blog:Mixed Vegetable, Bandhakopir Torkari, Ghugni Chaat, Komala Payasam

    Other festive sweets : Khaja, ABC halwa, Shenga Holige

    chaler payesh /bengali rice kheer
    chaler payesh / bengali rice kheer

    Chaler Payesh / Bengali Rice Kheer

    Ingredients:

    • 4 cups (1 litre) milk
    • 4 tablespoon gobindobhog or basmati rice
    • 1 bay leaf
    • 1/2 cup sugar
    • 2 teaspoon  + 1 teaspoon ghee
    • cashew
    • almond
    • 1/2 teaspoon cardamom powder

    Method:

    1. Wash the rice and soak in water for fifteen minutes.
    2. Put the milk in a thick bottom pan and keep it to boil. Put bay leaf in it.
    3. Once it boils, discard the water from the rice, smear it with ghee and put in the milk.
    4. Let cook on a low flame. Keep stirring in between.
    5. Once the rice is fully cooked and soft, add sugar. Cook for three minutes.
    6. Add cardamom powder and remove from flame.
    7. Roast the nuts in ghee and garnish it.
    chaler payesh
    chaler payesh
    chaler payesh /bengali rice kheer
    Evergreendishesdev

    Chaler Payesh / Bengali Rice Kheer

    Chaler Payesh is a popular, delicious and  creamy dessert from Bong community. Gobindobhog rice is cooked in milk and sweetened with sugar and garnished with dry fruits. 
    Prep Time 15 minutes
    Cook Time 30 minutes
    Total Time 45 minutes
    Servings: 6 people
    Course: Dessert, traditional sweets
    Cuisine: Bengali, Indian

    Ingredients
      

    • 4 cups milk
    • 4 tablespoon gobindobhog or basmati rice
    • 1 bay leaf
    • 1/2 cup sugar
    • 2 +1 teaspoon ghee
    • cashew
    • almond
    • 1/2 teaspoon cardamom powder

    Method
     

    1. Wash the rice and soak in water for fifteen minutes.
    2. Put the milk in a thick bottom pan and keep it to boil. Put bay leaf in it. 
    3. Once it boils, discard the water from the rice, smear it with ghee and put in the milk.
    4. Let cook on a low flame. Keep stirring in between.
    5. Once the rice is fully cooked and soft, add sugar. Cook for three minutes.
    6. Add cardamom powder and remove from flame.
    7. Roast the nuts in ghee and garnish it.

    Notes

    • Gobindobhog rice is usually used here, if it is not available use basmati rice.
    • Soak the rice for atleast fifteen minutes. 

    This post is part of 54 Healthy Wealthy Cuisines where the theme is “Mishti Dussehra at HW”

    Other Bengali dishes by co-bloggers

    If you have liked this post, do share it further. Follow evergreendishes on Twitter, Pinterest, Instagram and Facebook

    Pin it for later:

    a bowl of chaler payesh garnished with nuts
    Chaler Payesh | Bengali Rice Kheer

    If you ever make Chaler Payesh, do take a picture and share with me by tagging @foodiejayashree on Instagram or @evergreendishes on Facebook. Subscribe to get all updates and an e-book for free.

  • Chocolate Chia Seed Pudding

    Chocolate Chia Seed Pudding

    Chocolate chia seed pudding is a tasty, easy to make, high fiber, protein packed ideal for breakfast. It can be made in fifteen minutes with a little preparation.  (more…)

  • Ulli Theeyal / Kerala Shallot Curry

    Ulli Theeyal / Kerala Shallot Curry

    Ulli theeyal/ kerala shallot curry is a tasty accompaniment with hot steamed rice. It is often prepared in daily cooking in Kerala cuisine.

    Kerala is a state in the south western region of India, a beautiful state and a tourists pride. As one enters the state, palm lined beaches and backwaters, a network of canals and estates of spices, tea and coffee are witnessed and mesmerising. It is called as “Gods Own Country” and  ” Land of Spices”

    But the recent devastation has taken a toll of the life of most people. It was one of the severe floods that the state has witnessed in last hundred years.  Many people lost their lives while some are left homeless and still struggling. My heart goes out to these poor souls.

    Shhhhh Secretly Challenge group has now reached Kerala where we are paired and given two ingredients to prepare dish of a particular selected state. I was paired with Vidya Narayan who blogs at Masala Chilli and she gave me shallots and tamarind as the secret ingredients. Do visit her blog www.masalachilli.com for delicious dishes.

    The recipe that I have chosen to prepare is the Ulli Theeyal, a kerala style onion curry. It is tasty and pairs well with hot steamed rice. A mixture of spices are roasted and powdered, the shallots are cooked in seasoning and then tamarind pulp is added to it along with the spice mix.

    As every cuisine, Kerala cuisine too is unique, different and tasty. Fresh grated coconut is one of the essentials in their cooking. Spices as cumin and pepper are regularly. Vegetables of many kind are consumed. Shallots are commonly used in this cuisine. The oil generally used is coconut oil. Now, let’s get cooking Ulli Theeyal

    ulli theeyal
    ulli theeyal

    Ulli Theeyal / Kerala Shallot Curry

    Ingredients:

    For the curry: 
    • 300 grams shallots
    • 4 cloves garlic
    • 2 tablespoon coconut oil
    • 1/2 teaspoon mustard seeds
    • 1/2 teaspoon chilli powder
    • small lemon ball sized tamarind
    • salt
    For the paste:
    • 1/2 cup fresh coconut
    • 1 tablespoon coriander seeds
    • 1/2 teaspoon cumin seeds
    • 4 dry red chilly
    • 1/4 teaspoon fenugreek seeds
    • 2 tablespoon coconut oil
    • 1/2 teaspoon mustard seeds
    For the tempering:
    • 1 teaspoon coconut oil
    • 1/4 teaspoon mustard seeds
    • curry leaves
    • 2 dry red chilly

    Method:

    1. Remove the skin of the shallots.
    2. Soak tamarind in water.
    3. Dry roast the spices for a few minutes, put them aside, then dry roast the coconut until it is golden in colour and you get a good aroma.
    4. Let cool. Grind all ingredients to a paste with water.
    5. Take oil in a pan, add the mustard seeds, as it crackles put turmeric powder and the shallots. Let cook for four to five minutes.
    6. Extract the pulp from the soaked tamarind.
    7. Add the pulp to the shallots, let cook for ten minutes.
    8. Put the ground paste and salt to it. Let cook for two minutes.
    9. Make seasoning, heat coconut oil, add the mustard seeds, as it cracles put the dry red chilly and curry leaves. Pour it over the curry.
    10. Ulli Theeyal is ready to serve.

    Take a tip:

    1. I have not made it very spicy, add two more dry chilly while roasting if you want.
    2. Shallots can be easily peeled by putting in water.
    3. Oil may be added while roasting the ingredients but I have not used.
    4. Use coconut oil for a good taste of the dish.


    making of ulli theeyal
    making of ulli theeyal
    ulli theeyal
    Evergreendishesdev

    Ulli Theeyal / Kerala Shallot Curry

    Ulli Theeyal is a spicy curry of shallots cooked in paste of roasted coconut and other spices along with tamarind extract. It pairs well with hot steamed rice. 
    Prep Time 10 minutes
    Cook Time 20 minutes
    Total Time 30 minutes
    Servings: 6 people
    Course: dinner, lunch, lunch ideas, Side Dish
    Cuisine: kerala, south india

    Ingredients
      

    For the curry
    • 300 grams shallots/ small onions
    • 4 cloves garlic
    • 2 tablespoon coconut oil
    • 1/2 teaspoon mustard seeds
    • 1/2 teaspoon chilli powder
    • tamarind small lemon size ball
    • salt to taste
    For the paste
    • 1/2 cup fresh coconut
    • 1 tablespoon coriander seeds
    • 1/2 teaspoon cumin
    • 4 dry red chilli
    • 1/4 teaspoon fenugreek seeds
    For the tempering
    • 2 teaspoon coconut oil
    • 1/4 teaspoon mustard
    • 2 dry red chilli
    • a few curry leaves

    Method
     

    1. Remove the skin of shallots.
    2. Soak tamarind in water.
    3. Dry roast the spices for a few minutes. Put them aside.
    4. Dry roast the coconut until light brown in colour. 
    5. When cool, grind the ingredients to a paste. 
    6. Heat oil in a pan, add mustard seeds, as it crackles put the shallots and garlic cloves in it. Let cook for sometime. 
    7. Extract tamarind pulp.
    8. Put the pulp to it, let cook for ten minutes.
    9. Add the ground masala, chilly powder and salt to it. Let cook for sometime.
    10. In a small pan, make the tempering. Heat oil, add mustard seeds, as it crackles, thrown in red chilly and curry leaves. Pour it over ulli theeyal curry. 

    Notes

    Take a tip:
    1. I have not made it very spicy, add two more dry chilly while roasting if you want. 
    2. Shallots can be easily peeled by putting in water. 
    3. Oil may be added while roasting the ingredients but I have not used. 
    4. Use coconut oil for a good taste of the dish. 
     

    If you have liked this post, do pin it for your reference. If you ever recreate this dish, do share it on Instagram, tag @foodiejayashree, it will be nice to see your creation.

    Have you subscribed to get all updates and an e-book for free?

    Follow Evergreendishes on Facebook, Twitter, G+, Instagram and Pinterest


    shhhhh secret cooking challenge
    shhhhh secret cooking challenge
  • Ragi Halbai / Finger Millet Fudge

    Ragi Halbai / Finger Millet Fudge

    Jump to Recipe Print Recipe

    Ragi Halbai or Finger millet fudge is a tasty, soft, chewy fudge made of finger millet, coconut and jaggery. It is a healthy sweet.  It is a dish from South Canara region of Karnataka. Here, the whole grain of finger millet is used by soaking and then grinding and cooking it.

    The use of millets is more so now than ever as the benefits one reap is abundant. It is nutritious and high in fibre. I prefer using ragi at home since it is liked by all.  Do check these breakfast recipes Ragi Idli, Ragi Thalipeeth, Ragi Khichu

    South Canara cuisine is delicious and coconut is one of the main ingredients in their cooking. The coconut used is fresh one and it is usually ground to a paste and used in most dishes.

    With many festive days ahead, you can try this recipe soon.

    What is Ragi ?

    Ragi is popularly known as Finger millet or Nachni. Finger millet or Elusine Coracana is an annual herbaceous plant widely grown as a cereal crop in the arid and semi -arid areas in Africa and Asia.  It came to India around 2000 BC and since then its been consumed in different ways.

    Nutrients in Ragi

    Ragi is a whole grain that is gluten free and staple in South India. It is rich in fiber that helps with weight loss and diabete. It is packed with calcium, good carbs amino acids and Vitamin D. The nutrition per 100 grams is as below: ( Source: Wikipedia)

    • Protein 7.6 g
    • Fat 1.5 g
    • Carbs 88g
    • Calcium 370 mg
    • Vitamin A 0.48 mg
    • Thiamine 0.33 mg
    • Riboflavin 0.11 mg
    • Niacin 1.2 mg
    • Fiber 3g

    Benefits of Ragi :

    1. Rich in calcium – It is one of the best non- dairy sources of calcium when compared to other grains. Dr. Anju Sood, a nutrionist from Bangalore says, ” It is extremely beneficial for growing kids and can be given in the form of porridge”
    2. Help in controlling diabetes: The grains seed coat is abundant in polyphenol and dietary fibre. The low glycemic index lessens food cravings and helps maintain blood sugar.
    3. Relax the body: The regular usage of finger millet has found to help stress  related disorders as insomnia, depression and anxiety.
    4. Helps in weight loss: The high of dietary fibre helps one to keep full for a long time, thus the cravings are less.
    5. Battles anemia: It is rich source of natural iron and thus a boon for anaemic patients. Once it is sprouted, the Vitamin C level increases and leads to easy absorption of iron into the bloodstreams.
    6. Reverts skin ageing: methionine and lysine present in it  make tge skin tissue less prone to wrinkles and sagging.
    ragi halbai

    Now, getting on to the recipe without further ado:

    Ragi Halbai / Finger Millet Fudge

    Ingredients:

    • 1 cup ragi
    • 1 cup jaggery
    • 1 cup fresh coconut
    • 2 tablespoon ghee
    • 2.5 cup water
    • 1/2 teaspoon cardamom powder
    • a few cashew

    Method:

    1. Soak  ragi for five hours.
    2. Grate the coconut.
    3. Discard the water, grind the ragi to a fine paste along with coconut by adding little water.
    4. Strain the liquid through a sieve, press the residue  with a spoon Grind it again with some water. I used one and half cup of water to grind.
    5. Grease a plate with a little ghee.
    6. Take the jaggery and melt it with a cup of water. Filter it to remove impurities.
    7. Put the melted jaggery and the strained puree in a thick bottom pan. Let it cook. Add some ghee, keep stirring, otherwise it will stick to the bottom of the pan.
    8. Put the remaining  ghee, once it thickens to a mass and leaves the side, put cardamom powder, mix and pour it over the greased plate.
    9. Cut it into squares.  Decorate with roasted cashews. Ragi Halbai is ready to serve.

    Pre- requirements:

    Ragi are small red grains, one needs to clean it properly as tiny specks of impurities are seen. It is usually soaked in water and then the water is slowly discarded. The grains are then put to dry and used.


    Evergreendishesdev

    Ragi Halbai / Finger Millet Fudge

    5 from 7 votes
    Ragi halbai is a twist to the usual one that is prepared using rice. It is tasty and healthy. Finger millet, coconut and jaggery are cooked together to form a delicious fudge. 
    Prep Time 5 hours
    Cook Time 20 minutes
    Total Time 5 hours 20 minutes
    Servings: 15 pieces
    Course: festive treats, healthy snacks, traditional sweets
    Cuisine: dakshina kannada, karnataka

    Ingredients
      

    • 1 cup ragi
    • 1 cup jaggery
    • 1 cup fresh coconut
    • 2 tablespoon ghee
    • 2.5 cup water
    • 1/2 teaspoon cardamom powder
    • a few cashew for topping

    Method
     

    1. Soak ragi for five hours.
    2. Grate the coconut.
    3. Discard the water, grind ragi and coconut to a fine paste by adding little water.
    4. Strain the liquid through a sieve, press the residue with the back of a spoon to extract the liquid. Grind it again with some water, and again strain it. I used one and half cup of water for grinding. 
    5. Smear some ghee on a plate. 
    6. Take the jaggery and melt it with a cup of water. Strain to remove impurities. 
    7. Now, put the jaggery and the strained mixture in a pan and lett it cook. Add some ghee to it. Keep stirring, otherwise, it will stick to the pan. 
    8. Add the remaining ghee, once it foerms a mass and leaves the side, put cardamom powder, mix and spread it over the greased plate. 
    9. Cut it into squares, decorate with roasted cashews. 

    Notes

    • Ragi needs to be cleaned well before using. Small impurities are present that can damage organs of the body, thus it is highly recommended to clean it properly before using. 
    • It is usually rinsed in water and gently the water is displaced, the impurities are seen lying at the bottom. 
    • While grinding, check the amount of water that you are utilising, it is important you use the recommended amount.
    • While  cooking, keep stirring the liquid. 

    If you have liked this post, do share it further.

    ragi halbai

    This post is part of the #HWCuisine with Ragi as the theme. Here are the other Ragi recipes by my co-bloggers

    About the event :

    Sending this post to Foodies_Redoing Old Post_113. It is a fortnightly event where we work on an old post either by changing the picture, text, formatting or anything else related to the post. Here, I have changed the pictures.This is an old post which I had written in 2018, now I have changed it with better pictures.


    If you ever make this ragi halbai  or any of my other dishes,  do take a picture and tag @foodiejayashree on Instagram or @evergreendishes on Facebook or Twitter. I will be glad to see your creation and share it further. Let’s be connected, do follow on social media platforms. Until next time, let’s stay connected.  Subscribe to get all updates and an e-book for free. Check out my e-books on Amazon.  Happy Cooking !

  • Zucchini Paratha / Thepla | Guest Post Series

    Zucchini Paratha / Thepla | Guest Post Series

    Zucchini Paratha is a tasty and healthy flat bread. It is ideal to treat fussy kids. This is another variety of thepla which  is ideal for lunch, breakfast or one can even pack it in the box.  (more…)

  • Krackjack Sev Puri / Fun Activity

    Krackjack Sev Puri / Fun Activity

    Krackjack Sev Puri is a fun activity for kids. With a couple of holidays around, children are soon bored. Get them to do this snack, they will enjoy doing and relishing it.

    Krackjack biscuits are product of Parle. I have used the salted crackers here.

    Since I have put it as a fun activity for kids, I would like to inform that children under five years cannot do this. Kids over five need to have all vegetables boiled and cut. Do not allow the children to use sharp instruments without adult supervision.

    The author is not responsible for any accidents happened thereafter.


    krackjack sev puri
    krackjack sev puri

    Krackjack Sev Puri

    Ingredients:
    • 15 salted biscuits
    • 2 boiled potatoes
    • 1 onion finely cut
    • 1/2 teaspoon chilly powder
    • 1/2 teaspoon chat masala
    • 1 teaspoon tomato ketchup
    • 1 tomato finely cut
    • 1/4 cup small sev
    Method:
    1. Take the boiled potato, mash it, add onion and all other ingredients ( except sev and tomato) to it. Mix well. Keep it aside.
    2. Arrange the krackjack biscuits in two plates, take some potato mixture, flatten it between palms, put it on one biscuit, repeat for the others.
    3. Top with tomato piece and sev. Serve immediately.


    Other easy recipes for kids to get involved: Choco Marie,

    krackjack sev puri
    Evergreendishesdev

    Krackjack Sev Puri

    Krackjack sev puri is a quick snack to make with salted crackers. Arranging and topping makes a fun activity for children during holidays. 
    Prep Time 15 minutes
    Total Time 15 minutes
    Servings: 2 people
    Course: chats, evening snacks, kids favourite
    Cuisine: Indian

    Ingredients
      

    • 15 salted biscuits
    • 2 boiled potatoes
    • 1 onion finely cut
    • 1/2 teaspoon chilly powder
    • 1/2 teaspoon chat masala
    • 1 teaspoon tomato ketchup
    • 1 tomato finely cut
    • 1/4 cup small sev

    Method
     

    1. Take the boiled potato, mash it, add onion and all other ingredients ( except sev and tomato) to it. Mix well. Keep it aside.
    2. Arrange the krackjack biscuits in two plates, take some potato mixture, flatten it between palms, put it on one biscuit, repeat for the others.
    3. Top with tomato piece and sev. Serve immediately.

    Notes

    • Give chopped and boiled vegetables for small children. 
    • It is risky to allow children to chop veggies by themself. 


    If you ever make this, do share your creation with us. Tag @foodiejayashree on Instagram or @evergreendishes on Twitter.

    Do leave a comment below, it motivates me to write more.

    Follow evergreendishes on  social media : Facebook, Twitter, Pinterest, Instagram, G+

    Subscribe to get a book of handy hints for free!

  • Neer Dosa | How to make neer dosa| South Canara

    Neer Dosa | How to make neer dosa| South Canara

    Neer dosa is a popular crepe from South Canara region  of Karnataka. It is soft, fluffy, lacy, tasty and makes one of the finest breakfast ever. Serve it with vegetable stew and a variety of chutney for a yummy weekend breakfast.

    South India is famous for the variety of dosa galore one can endlessly enjoy. Masala dosa, rava dosa, onion uttapam, neer dosa, adai, benne dosa, set dosa are some of them. South Canara was  the region of the present day Dakshina Kannada and Udupi of Karnataka.

    What is Neer Dosa?

    Neer Dosa is another variety of dosa from Karnataka. It is popular in South Kanara region. It is made using only rice, no lentil is used here. Fresh coconut is used, but one can avoid it. Neer means “water” in Kannada. The batter is made as thin as water, thus the name.

    If the batter is thin, can we make it into a crepe?

    Yes, you can make it. Heat a skillet. Take a ladle full of batter, hold the handle of the skillet in one hand and pour the batter with the other. Once you pour the batter, just turn it around and the batter spreads.

    Can anyone make it?

    It does need a little practice, but you can make it. Use a non-stick skillet for best results.

    neer dosa
    neer dosa

    My other South Canara recipes on the blog: Moongdal payasam, Sweet Potato Kheer, Rice Porridge

    What goes in Neer Dosa ?

    • Rice : Raw rice is the main ingredient. Use the regular sona masuri rice. Wash it well and soak for eight hours.
    • Fresh coconut : The other ingredient essential in making neer dosa is fresh coconut. The fresh grated coconut gives a good taste to it.
    • Water : It is needed for grinding and adjusting the consistency of the batter.
    • Oil: You may use any oil but I insist on using coconut oil. It lends a good flavour.
    • Salt: Adjust accordingly.


    How to make the perfect Neer Dosa ?

    The consistency of the batter should be thin. The handle of the skillet is held in one hand and the batter is poured and immediately it is turned around. This helps in getting the required shape. Drizzle oil and cover it with a lid. Once it is done, slowly remove it from the edges. Fold it into a quarter and serve hot with chutney or stew. For best results, I suggest you to use a non-stick dosa tawa.

    Can I store the remaining batter ?

    Keep the remaining batter in the refigerator and use it the next day. Throw away the water which is settled on top. Adjust the consistency and make it.


    neer dosa
    Evergreendishesdev

    Neer Dosa

    Neer Dosa is a popular crepe from South Canara region of Karnataka. 
    Prep Time 15 minutes
    Cook Time 30 minutes
    Total Time 45 minutes
    Servings: 12 crepes
    Course: Breakfast
    Cuisine: dakshina kannada, karnataka, mangalore

    Ingredients
      

    • 1 cup raw rice
    • 1/2 cup fresh coconut
    • water
    • salt
    • oil

    Method
     

    1. Grate the coconut.
    2. Grind the rice with little water, add coconut to it.
    3. Remove the batter in a wide bowl. Add salt to it.
    4. Heat a skillet, take some batter in another bowl, add water to it.
    5. Take a ladleful of batter, hold the handle of skillet in one hand, pour it over and immediately turn it around. Drizzle some oil around it.
    6. Close a lid and let it cook on medium flame. Once it is cooked, slowly scrape it from the side and fold it. Serve hot with chutney or stew.

    Notes

    • Adding of coconut is optional, but it gives a good taste.
    neer dosa
    neer dosa


    If you have liked this post, subscribe to get a book of handy hints for free!

    Follow evergreendishes on other social media, Facebook, twitter and @foodiejayashree on  instagram

    If you ever recreate this dish tag @foodiejayashree on instagram, or @evergreendishes on twitter. I will be glad to see your work.