Category: sabzis and gravies

  • Kohlrabi Stir Fry | Navilakosu Palya | No Onion Garlic Recipe

    Kohlrabi Stir Fry | Navilakosu Palya | No Onion Garlic Recipe

    Jump to Recipe

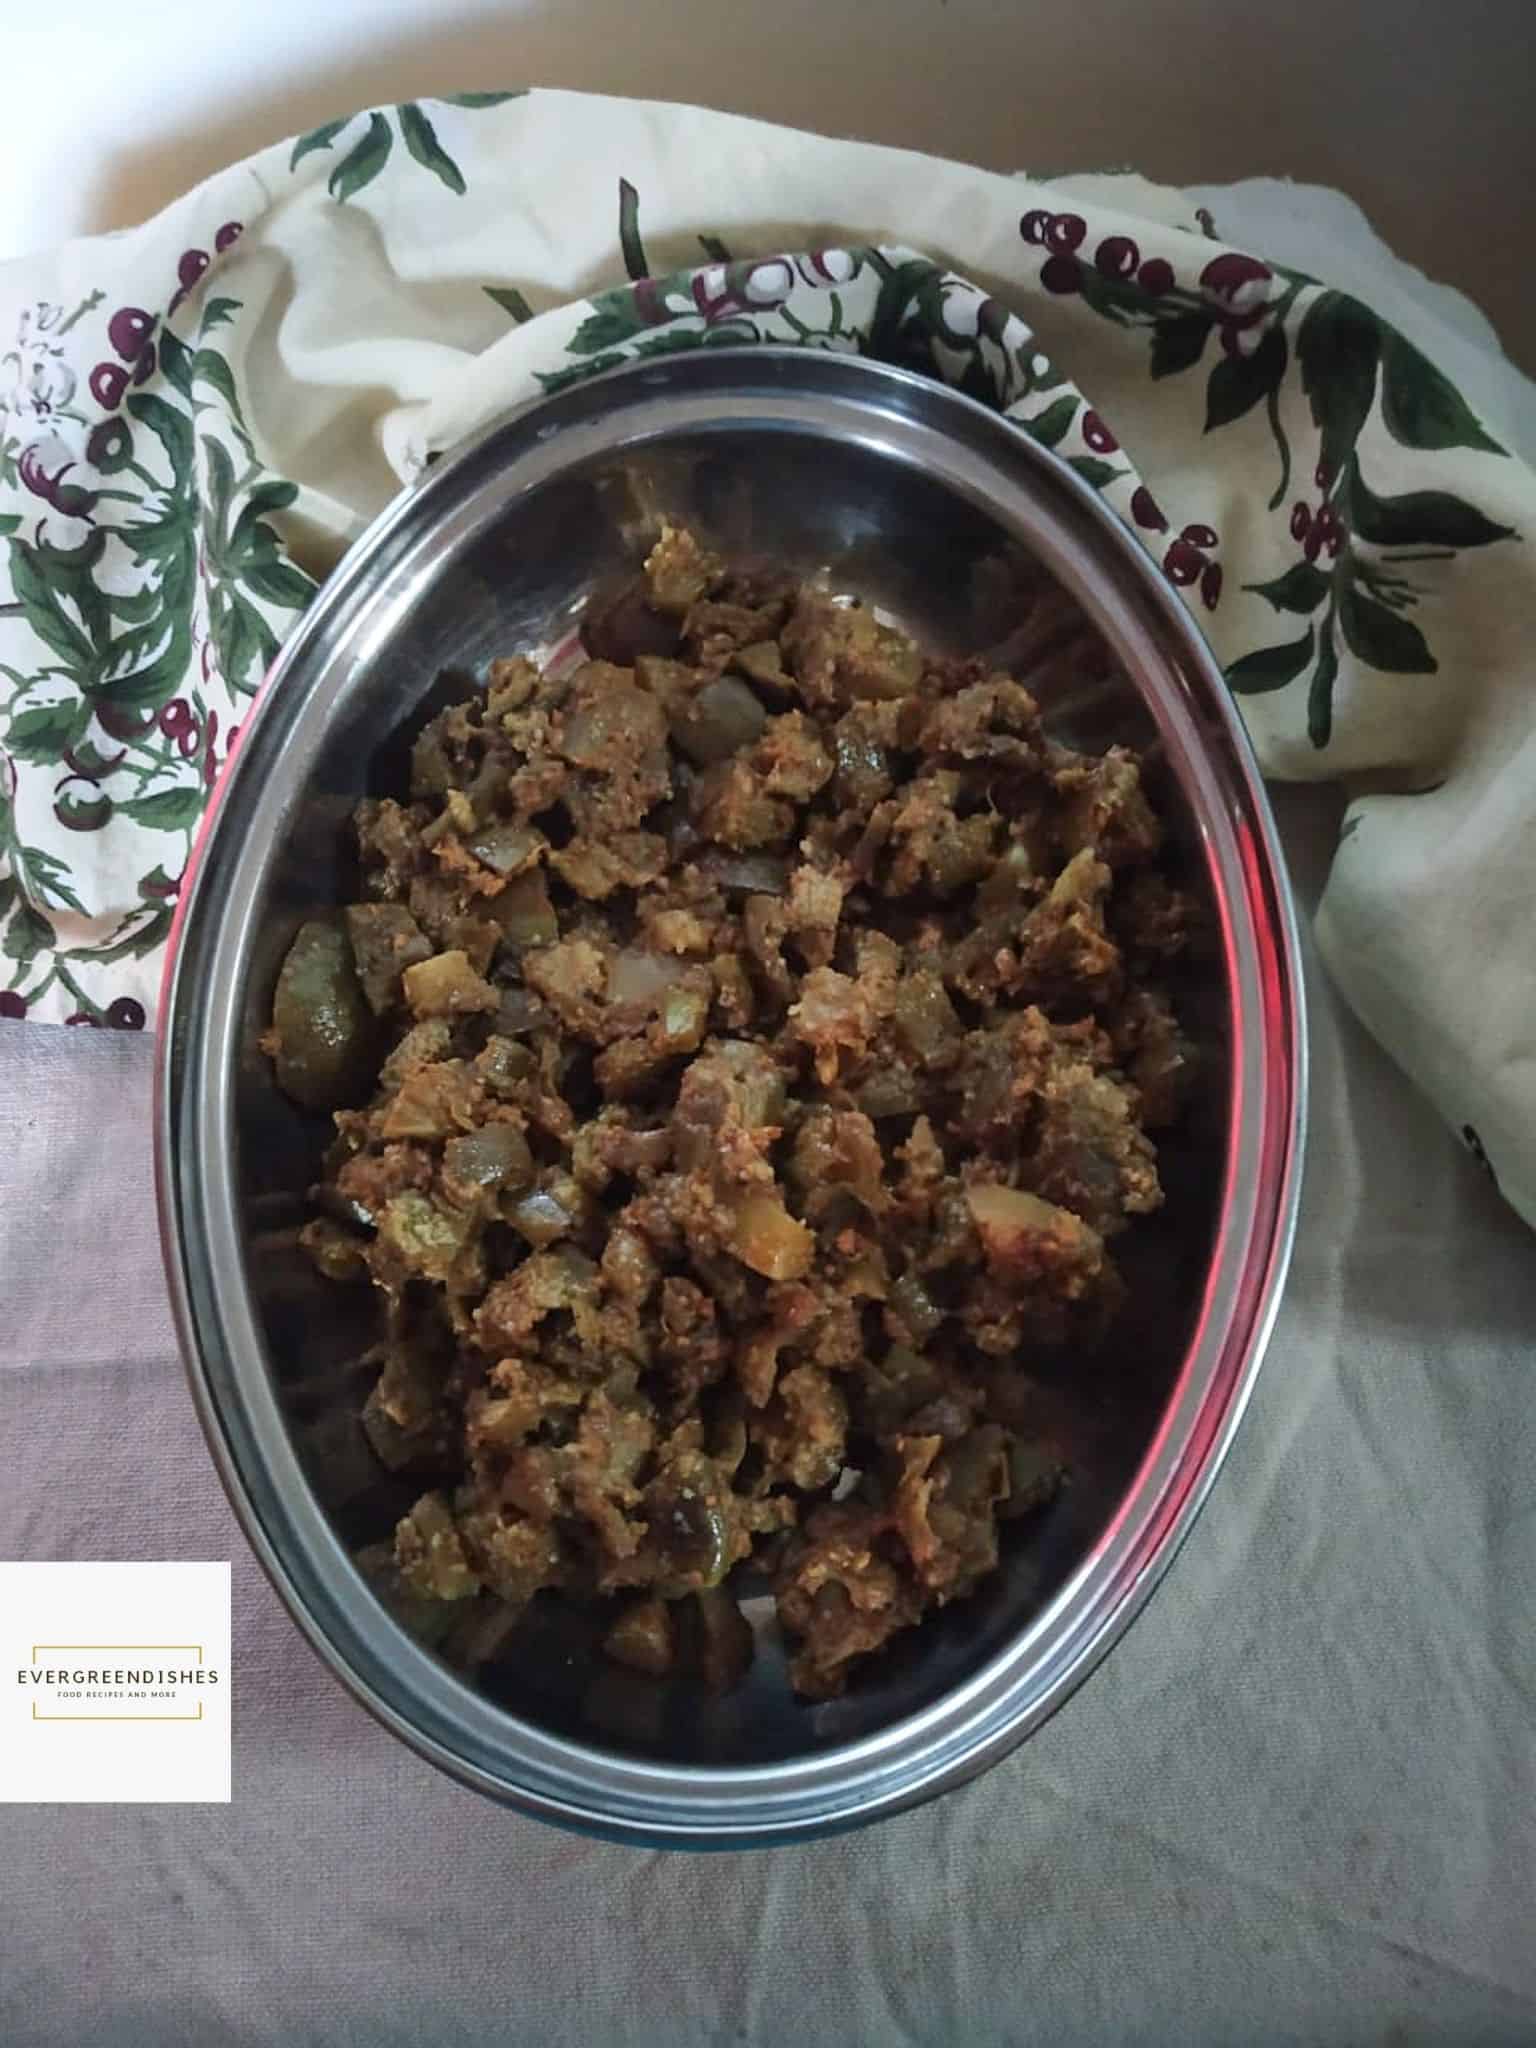
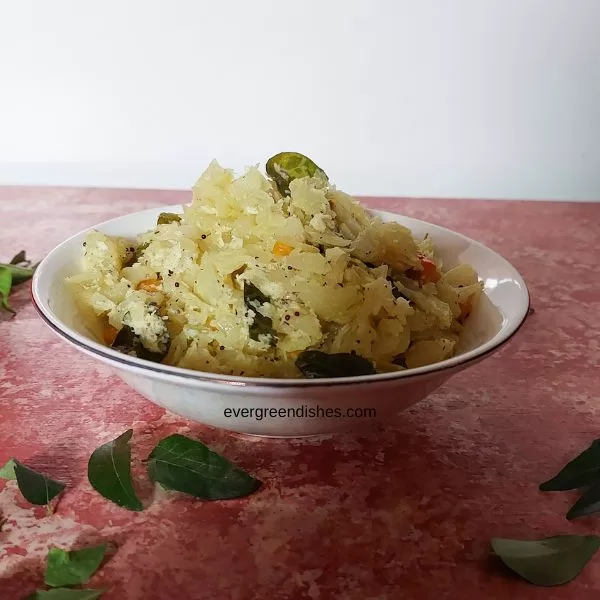
    kohlrabi stir fry | navilakosu palya | 

    Kohlrabi stir fry is a simple, tasty, healthy  side dish for daily lunch menu. You can pair it with sambar, rice and a stir fry. It tastes good with chapathi or jowar roti too. It is vegan and a low calorie dish. 

    Some days we avoid using onion and garlic for religious or personal interests. Today’s recipe is a no onion recipe

    Kohlrabi or German Turnip is a cruciferous vegetable and  belongs to the family Brassica Oleracea, same species as cabbage, cauliflower and brussel sprouts. It grows above the ground and looks like a turnip, but it is neither a root vegetable nor belongs to the turnip family. It has long leafy stems as an alien and a round bulb which may be purple, light green or white. The inside is whitish green . The bulb as well as the leaves are used in cooking. It is eaten both in cooked and raw form. Kohlrabi lends a different taste on cooking which is different from cabbage. 

    The stalk is used in salads. The leaves are used in dal and stir fry. The vegetable can be used in different dishes as stir fry, sambar and chutney. 

    Knolkhol is a good source of nutrients as Vitamin C, B6, potassium and magnesium. It is also a good source of anti-oxidants. 

    Kohlrabil is called by different names in different regions. It is Navilkosu in Kannada, Navalkol in Maharashtra, monj hakh in Kashmiri and Su Hao in Bengali. 

    kohlrabi stri fry
    a bowlful of kohlrabi stir fry


    How to use kohlrabi in cooking:

    Wash the vegetable, remove the leaves if any. Here, we are not using the greens in any way. Remove the skin and chop it. The middle portion is hard and discarded. 


    What goes in the stir fry ? 

    • Kohlrabi : It is the star ingredient here. You can chop it unevenly as it is usually done or cut into small bits. The way you cut the vegetable alters the taste of the vegetabel.
    • Oil : Any cooking coil may be used. 
    • Seasoning : All the usual ingredients of seasoning are needed. They are mustard seeds, asafoetida, bengal gram, urad dal. 
    • Chilli : For that spicy flavour
    • Fresh coconut : Essential but no compulsion.
    • Ginger : You may add a small piece of grated ginger in the seasoning.
    • Curry leaves : Essential in south indian cooking. It gives a distinctive flavour.
    • Coriander : for garnishing


    Making the stir fry : 

    The kohlrabi has a thick outer covering. It needs to be removed slowly. Wash and then peel the skin. Chop it and keep it aside. Make the seasoning and add the chopped vegetable. Sprinkle a little water and put salt. Allow to cook. Once it is tender, add grated coconut and fresh coriander to it.. 


    A few South Indian no onion garlic recipes :

    lemon rasam
    lemon rasam
    instant raw mango pickle
    instant raw mango pickle


    cucumber stir fry
    cucumber stir fry
    Print Recipe

    Kohlrabi Stir Fry

    5 from 11 votes
    Kohlrabi stir fry is a simple yet tasty side dish with any meal.

    Ingredients
      

    • 2 tablespoon oil
    • 1/2 teaspoon mustard
    • 1/4 teaspoon asafoetida
    • 1/4 teaspoon turmeric powder
    • 1 teaspoon bengal gram
    • 1 teaspoon urad dal
    • 4 green chilli
    • a few curry leaves
    • 1/2 kilogram kohlrabi
    • salt to taste
    • 1/2 cup fresh coconut

    Equipment

    • 1 pan with lid
    • 1 plate
    • 1 ladle
    • 1 bowl

    Method
     

    1. Wash, peel the skin  and chop the vegetable.
    2. Take oil in a pan. Add mustard seeds, as it crackles, put bengal gram, urad dal, turmeric powder and asafoetida. Now, add green chilli to it along with a few curry leaves.
    3. Put the chopped kohlrabi to it along with a little salt.
    4. Sprinkle a little water to it.
    5. Allow it to cook for sometime. Close a lid, it helps in proper cooking.
    6. Once it is cooked, add grated coconut and fresh coriander to it.
    7. Kohlrabi stir fry is ready to serve.

    About the event : 

          Priya Iyer suggested  “No Onion Garlic Stir Fry or Curry ” at Shhh Secretly Cooking Challenge for the month of September. Priya has prepared a delicious gravy dish Sweet Corn Masala for the theme,  do check it out. 

    Here, we are paired with a parter, exchange two ingredients and the dish is prepared using those ingredients. Later, it is put in the group for guessing. It is a fun way to  engage with like minded individuals. I was paired with Mayuri Patel. She is a versatile cook  whom I have closely seen in my blogging journey. I discussed about my plan to prepare kohlrabi stir fry and she gave me kohlrabi and urad dal as the secret ingredients. Mayuri Patel wanted to make Methi Corn Malai and I suggested jaggery and cumin accordingly. It is something which my children will relish, will be making it soon. 

    kohlrabi stir fry kohlrabi stir fry

    If you ever make Kohrabi Stir Fry  in your kitchen, take a picture and tag @foodiejayashree on Instagram or evergreendishes on Facebook.  Until next time, Happy Cooking ! Be happy and cheerful. 

  • Brinjal Stir Fry | Badanekayi Palya

    Brinjal Stir Fry | Badanekayi Palya

    Brinjal Stir Fry / Badanekayi palya  is a simple, vegan stir fry with a spice mix from Karnataka. The roasted spice mix lends a good taste to it. It is ideal to serve with chapati or jowar roti.

    Fresh vegetables are available in winter and brinjal is one of them. In Kannada it is called as badanekayi, baingan in Hindi and Gujarati, Kathirikai in Tamil, Vankaya in Telugu and Begun in Bengali. It is more popular as egg plant in England and aubergine in Germany and  France.

    Not everyone likes the taste of brinjal. But most people, who tend to like it are greats fans of this vegetable. It is versatile to use and stir fry and raita are quite common dishes. Sometimes, it is also added in Sambar. Vangi Bhat is a popular rice dish from Maharashtra.

    Sadly, I have not shared any recipe using brinjal. So, today I thought of posting this stir fry recipe which we regularly prepare at home.  Makar Sankranti is round the corner. The day prior is celebrated as Bhogi. It is a harvest festival and all fresh grown grains and vegetables are used. Sajje rotti and brinjal stir fry are usually prepared in most households of Karnataka.  The other dishes on the platter  are Khara pongal and gojju.

    Brinjal comes in different varieties. The medium sized purple and light green coloured brinjals  are the ones I regularly use. Here, I have used the green variety, they are tender and cook very well. The spice mix is usually available at home. You can make a small quantity and use it for the stir fry.

    Brinjal strir fry / Badane kayi palya
    Brinjal Stir fry / badane kayoi palya is a simple and tasty side dish from Karnataka. It makes a good accompaniment with any meal.

    Let’s get to the recipe of Brinjal Stir Fry | Badanekayi Palya

    Ingredients:

    • 2 tablespoon oil
    • 1/2 teaspoon mustard
    • 1/4 teaspoon asafoetida
    • 1/4 teaspoon turmeric powder
    • 1/2 kilogram brinjal
    • salt
    • a little water
    • 3 teaspoon vegetable spice mix
    • 1/2 teaspoon chilli powder (optional)

    Method:

    1. Cut the brinjal into small pieces. Put them in water to avoid discolouration.
    2. Take oil in a pan, add mustard seeds. As it crackles, tip in turmeric powder an asafoetida. Discard the water and put the brinjal pieces to it.
    3. Put salt and sprinkle some water to it. Close a lid and allow it to cook. Give a stir in between.
    4. Once the brinjal is cooked, give a stir and mash it lightly with the ladle.
    5. Put the spice powder to it. Depending on the taste, use chilli powder.
    6. Let cook for a minute.
    7. Remove and serve with hot chapati or phulka. Brinjal Stir Fry is also used with hot steamed rice.

    Take a tip:

    • The spice mix stays good for two months. Store it in an air-tight container.
    • You can use the spice mix in other dishes as well.

    Brinjal strir fry / Badane kayi palya
    Evergreendishesdev

    Brinjal Stir Fry / Badane kayi palya

    5 from 11 votes
    Brinjal stir fry / Badane kayi palya is a simple, tasty side dish. It is ideal to serve with any meal.
    Prep Time 10 minutes
    Cook Time 15 minutes
    Total Time 25 minutes
    Course: dinner, lunch
    Cuisine: karnataka

    Ingredients
      

    • 2 tablespoon oil
    • 1/2 teaspoon mustard
    • 1/4 teaspoon asafoetida
    • 1/4 teaspoon turmeric powder
    • 1/2 kilogram brinjal
    • salt
    • a little water
    • 3 teaspoon vegetable spice mix
    • 1/2 teaspoon chilli powder optional

    Method
     

    1. Cut the brinjal into small pieces. Put them in water to avoid discolouration.
    2. Take oil in a pan, add mustard seeds. As it crackles, tip in turmeric powder an asafoetida. Discard the water and put the brinjal pieces to it.
    3. Put salt and sprinkle some water to it. Close a lid and allow it to cook. Give a stir in between.
    4. Once the brinjal is cooked, give a stir and mash it lightly with the ladle.
    5. Put the spice powder to it. Depending on the taste, use chilli powder.
    6. Let cook for a minute.
    7. Remove and serve with hot chapati or phulka. Brinjal Stir Fry is also used with hot steamed rice.

    Notes

    Cut the vegtable into small pieces.
    Allow to cook with a lid closed over it.
    Spice mix can be freshly made. Check the recipe.

    Pin it for later :

    Brinjal Stir fry is a tasty side dish from Karnataka. It is usually made along with sajje roti.
    Brinjal Stir Fry / Badane kayi palya


    If you ever make this recipe,  do take a picture and tag @foodiejayashree on Instagram or @evergreendishes on Facebook or Twitter. I will be glad to see your creation and share it further.   

    Subscribe to get all updates and an e-book for free. Check out my e-books on Amazon.  Happy Cooking !

  • Kadai Paneer | Easy Kadai Paneer Recipe

    Kadai Paneer | Easy Kadai Paneer Recipe

    Jump to Recipe Print Recipe

    Kadai Paneer is a delicious side dish from North Indian cuisine. It is ideal to pair with Indian flatbreads as tandoori roti, naan, chapati or phulka. 

    Kadai Paneer is a popular side dish made with cubes of paneer and capsicum, served in a small, beautiful metal pot (known as kadai in Hindi) with two handles in most restaurants. The kadai masala is prepared  using a few spices but here I have a quick, semi-dry version with the addition of whole spices.  I have lightly roasted the coriander and ground them coarsely.  This tasty North Indian sabzi is ready in 30 minutes from scratch. You can serve it with kulcha or roomali roti too. 

    Paneer, commonly called as cottage cheese, is loved by most people and finds a place in many dishes. It is a rich source of milk protein . It is commonly used in gravies. snacks  and many kind of sweets. It is made by curdling milk.  Today, many brands have ready to eat which you can just simmer and eat with hot rotis or phulka. We recently had these paneer indie bowl and they were tasty. 

    Kadai Paneer
    Kadai Paneer

    Why should you make this Kadai Paneer recipe ?

    • easy to prepare
    • tasty
    • ideal to serve for lunch
    • loved by both kids and adults
    • goodness of paneer

    Kadai Paneer Recipe 

    Ingredients:

    200 grams paneer
    2 tablespoon oil
    2 sticks of one inch cinnamon
    2 cloves
    2 bay leaf
    2 red chillies broken into half
    2 tablespoon coriander seed 
    1 large onion
    10 cloves garlic
    2 pieces of ginger
    1 teaspoon coriander powder
    1/2 teaspoon turmeric powder
    1 teaspoon red chilli powder
    2 capsicum
    5 tomato
    salt to taste


    Method: 

    1. Dry roast the coriander seed and grind it coarsely. 
    2. Grind ginger and garlic to a paste.
    3. Cut onion and tomato finely.
    4. Heat oil in a pan, add cinnamon, cloves, red chillies and half the quantity of coriander seed powder. Saute for sometime.
    5. Add onion pieces and saute for a minute. Put ginger garlic paste and  saute it for sometime.  Put the capsicum pieces into it and let them cook for a while
    6. Put coriander powder, chilli powder, turmeric powder and mix them well. 
    7. Add tomato and salt. Mix and let them cook until they are mushy and the oil separates. 
    8. Keep the paneer ready to use by thawing them in warm water and cutting into small pieces.
    9. Put the paneer pieces and half a cup of water to it.
    10. Let cook for sometime. Garnish with coriander leaves. 
    11. Kadai Paneer is ready to serve.

    Take a tip: 

    • You may add a few fried cashew pieces.
    • It is best to consume paneer dishes soon after preparation. 
    Kadai Paneer
    Evergreendishesdev

    Kadai Paneer

    Kadai Paneer is a popular side dish from North Indian cuisine. It pairs well with roti, naan, phulka or chapati.
    Prep Time 15 minutes
    Cook Time 15 minutes
    Total Time 30 minutes
    Servings: 6 people
    Course: Main Course, Side Dish
    Cuisine: Indian, north indian

    Ingredients
      

    • 200 grams paneer
    • 2 tablespoon oil
    • 2 sticks of one inch cinnamon
    • 2 cloves
    • 2 bay leaf
    • 2 red chillies broken into half
    • 2 tablespoon coriander seed
    • 1 large onion
    • 10 cloves garlic
    • 2 pieces of ginger
    • 1 teaspoon coriander powder
    • 1/2 teaspoon turmeric powder
    • 1 teaspoon red chilli powder
    • 2 capsicum
    • 5 to mato
    • salt to taste

    Method
     

    1. Dry roast the coriander seed and grind it coarsely.
    2. Grind ginger and garlic to a paste.
    3. Cut onion and tomato finely.
    4. Heat oil in a pan, add cinnamon, cloves, red chillies and half the quantity of coriander seed powder. Saute for sometime.
    5. Add onion pieces and saute for a minute. Put ginger garlic paste and  saute it for sometime.  Put the capsicum pieces into it and let them cook for a while
    6. Put coriander powder, chilli powder, turmeric powder and mix them well.
    7. Add tomato and salt. Mix and let them cook until they are mushy and the oil separates.
    8. Keep the paneer ready to use by thawing them in warm water and cutting into small pieces.
    9. Put the paneer pieces and half a cup of water to it.
    10. Let cook for sometime. Garnish with coriander powder.
    11. Kadai Paneer is ready to serve.

    Notes

    • You may add a few fried cashew pieces.
    • Paneer dishes should be consumed soon after preparation.

    If you ever make this Kadai Paneer recipe, do take a picture and tag @foodiejayashree on Instagram or @evergreendishes on Facebook or Twitter. I will be glad to see your creation and share it further. Let’s be connected, do follow on social media platforms. Until next time, let’s stay connected.  Subscribe to get all updates and an e-book for free. Check out my e-books on Amazon.  Happy Cooking!

    Pin it for later : 


    Kadai Paneer
    Kadai Paneer


  • Tuvar and Capsicum Masala

    Tuvar and Capsicum Masala

    Jump to Recipe Print Recipe

    Tuvar and Capsicum Masala is a winter treat, ideal to pair with chapati or phulka. It is vegan and gluten-free. It makes a good side dish for lunch, brunch or dinner.

    Tuvar lilva or fresh pigeon peas in a winter crop, it is commonly used in Gujarati households to make a variety of dishes. I love using it to make a curry. I also make a kachori but it has not made to the blog yet.

    Tuvar lilva is the fresh form which is later dried to make lentil we consume daily to make dal.

    Today, before I proceed further I want to discuss the difference between vegan and vegetarian.

    What is Vegan diet?

    Vegan is a type of vegetarian diet which  excludes dairy products, eggs, meat and any other animal derived ingredient. These include gelatin, honey, casein, pepsin, carnine, whey, carmine   Thus vegans use substitutes as almond milk, soy milk .

    Difference between vegetarian and vegans

    Vegetarians and vegans differ in their beliefs regarding the use of animal products. Vegetarians consume animal- derived products such as milk and curd but vegans avoid them totally. They use other form of substitutes.

    What are the different kind of milk substitutes for vegans.

    The most widely used non-dairy milks are hazelnut, cashew, soy, almond, oat and even hemp. Different kind of nuts can be used by soaking overnight, blending and straining. These are good substitutes to use in cooking also.


    tuvar and capsicum masala
    tuvar and capsicum masala

    Let’s  get to the recipe of Tuvar and Capsicum Masala

    Ingredients:
    • 1 cup tuvar
    • 8 cashew
    • 1 tablespoon oil
    • 1/2 teaspoon cumin
    • 1 capsicum
    • salt to taste
    • little kasuri methi


    Onion Paste:
    • 1 onion


    Masala paste:
    • 3 tomato
    • 4 cloves garlic
    • 5 green chilli
    • 1/2 bunch coriander
    • 2 cloves
    • 2 cardamom

    Method:

    • Boil tuvar along with cashew pieces. A pinch of salt may be added to it.
    • Make onion paste and keep it aside.
    • Blanch the tomatoes. Once it is cool, make a paste with the listed ingredients under “Masala Paste”.
    • Cut capsicum into small pieces.
    • Take oil in a pan, add cumin. As it splutters, put the onion paste. Saute it for a minute, now throw in the capsicum pieces. Continue to saute for sometime.
    • Now, add the masala paste to it and saute it. Let cook for sometime.
    • Add the cooked tuvar  along with the water in it.
    • Add salt. Adjust the consistency of the gravy.
    • Finally, sprinkle kasuri methi to it. Let the flavours imbibe for two minutes.
    • Tuvar and capsicum masala is ready to serve.

    Take a tip:

    • Boil the cashew with tuvar, it gives a good taste to the curry. The bland taste of tuvar is changed.
    • Kasuri methi is dried fenugreek leaves, available in any super market. It gives a good aroma to the dish.
    • Reduce the number of green chilli if you want it less spicy.
    • Smaller and dark coloured capsicum are spicy while the larger and light coloured are perfect for using in curries.

    Tuvar and Capsicum Masala

    uvar and capsicum masala makes a tasty side dish with chapati or phulka. It is vegan and gluten-free.

    Ingredients
      

    • 1 cup tuvar
    • 8 cashew
    • 1 tablespoon oil
    • 1/2 teaspoon cumin
    • 1 capsicum
    • salt to taste
    • little kasuri methi
    • Onion Paste:
    • 1 onion
    • Masala paste:
    • 3 to mato
    • 4 cloves garlic
    • 5 green chilli
    • 1/2 bunch coriander
    • 2 cloves
    • 2 cardamom

    Method
     

    1. Boil tuvar along with cashew pieces. A pinch of salt may be added to it.
    2. Make onion paste and keep it aside.
    3. Blanch the tomatoes. Once it is cool, make a paste with the listed ingredients under “Masala Paste”.
    4. Cut capsicum into small pieces.
    5. Take oil in a pan, add cumin. As it splutters, put the onion paste. Saute it for a minute, now throw in the capsicum pieces. Continue to saute for sometime.
    6. Now, add the masala paste to it and saute it. Let cook for sometime.
    7. Add the cooked tuvar  along with the water in it.
    8. Add salt. Adjust the consistency of the gravy.
    9. Finally, sprinkle kasuri methi to it. Let the flavours imbibe for two minutes.
    10. Tuvar and capsicum masala is ready to serve.

    Pin it for later:

    Tuvar and capsicum masala makes a good accompaniment with any Indian flat bread. It is vegan and gluten free.
    Tuvar and Capsicum Masala

    About the event :

    Sending this to Veganuary month at Foodies+Bloggers Community on Facebook.  A few more vegan recipes from my blogger friends.


    If you ever make this recipe, take a picture and share it by tagging @foodiejayashree on Instagram or @evergreendishes on Facebook. I will be glad to see and share your creation further.
    Check out my e-books on Amazon. Do not miss any post, subscribe to get all updates and an e-book for free !

  • Tuvar Sabzi / Winter Special

    Tuvar Sabzi / Winter Special

    Tuvar Lilva is a winter vegetable, it is abundantly available. It makes a good accompaniment with chapati or jowar roti. Kachoris are often made and they taste good. It is often used in sambar along with other vegetables. 

    Tuvar  is mainly cultivated as a legume and is the primary food for the majority of the Indian population. Dal makes a good accompaniment with rice and chapati.

    Today, I have a stir fry and it can be made in 15 minutes if  peeled and kept ready.  What do you make with it? I had shared another variety earlier. 

    Tuvar is known as green pigeon pea and commonly called as Togare kalu in Karnataka and in Kerala as Tomara Payaru. In Europe, it is known as Congo Pea.

    tuvar sabzi
    tuvar sabzi

    Do you know the best way to store green pea and tuvar? Pour them in a zip lock bag, lock and deep freeze it. It stays good for atleast one month. If you keep it longer, the taste may not be all that good.

    To store green pea for a longer time, it is blanched, dried and then put in deep freezer. 

    Here is another recipe using Tuvar, ideal with chapati. 

    And here is the recipe of Tuvar Sabzi that I am sharing 

    Ingredients:

    • 1 cup tuvar lilva
    • 2 onion
    • 2 tomato
    • 1 tablespoon oil
    • 1/2 bunch coriander
    • 1 inch ginger
    • 6 green chilly
    • 4 cloves garlic
    • 6 cashew
    • salt

    Method:

    • Grind coriander, green chilly, ginger and garlic to a paste.
    • Cook tuvar lilva in pressure cooker with a little water.
    • Take oil in a pan, add onion and saute it.
    • Once it is light pink in colour, cashew pieces to it.
    • Then, add tomato and let cook for sometime.
    • Put turmeric powder to it.
    • Put the paste and the required salt.
    • Now, put the boiled peas to it and let cook for sometime.
    • Tuvar lilva stir fry is ready to serve.
    tuvar sabzi

    Tuvar Sabzi

    Tuvar Sabzi makes a quick and tasty accompaniment with chapati or jowar roti. It can be prepared in 15 minutes.
    Course: curry, vegetable
    Cuisine: Indian, Vegan,

    Ingredients
      

    • 1 cup tuvar lilva
    • 2 onion
    • 2 to mato
    • 1 tablespoon oil
    • 1/2 bunch coriander
    • 1 inch ginger
    • 6 green chilly
    • 4 cloves garlic
    • 6 cashew
    • salt

    Method
     

    1. Grind coriander, green chilly, ginger and garlic to a paste.
    2. Cook tuvar lilva in pressure cooker with a little water.
    3. Take oil in a pan, add onion and saute it.
    4. Once it is light pink in colour, cashew pieces to it.
    5. Then, add tomato and let cook for sometime.
    6. Put turmeric powder to it.
    7. Put the paste and the required salt.
    8. Now, put the boiled legumes to it and let cook for sometime.
    9. Tuvar Sabzi is ready to serve.

    If you ever make this recipe, take a picture and share it with us by tagging @foodiejayashree on Instagram or @evergreendishes on Facebook. It will be nice to see your creation. 

    You Tube Update:

    I have posted Strawberry Yoghurt on YouTube, do check it out.  Do like and subscribe to the channel. 

    Before I end my post, if you are not eating seasonal vegetables and fruits, I urge you to try tasting them. The fruits and vegetables  are good in quality, available in abundance and the price is less expensive. Buy from the local suppliers, they too are striving hard to make a living.

    Pin this for later:

    Tuvar Sabzi Winter Special
    Tuvar Sabzi Winter Special


    Subscribe to get a book of handyhints for free ! 


  • Vegetable Curry / Rajasthani Cuisine

    Vegetable Curry / Rajasthani Cuisine

    Jump to Recipe Print Recipe

    Vegetable curry from Rajasthani cuisine is a blend of unique vegetables. Raw tomato and long cucumber along with a medley of other vegetables and spices makes a tasty side dish.

    The love for trying different dishes from various cuisines landed me to this dish which I had jotted in my book many years back. Yes, a crazy soul, who loves to save these. We had raw tomatoes and thus made this and it was good.

    Raw tomatoes are still available and hope you will try making it. I loved the fact that rare veggies as long cucumber and raw tomato are used in it. Moreover, it is a no onion garlic recipe. This vegetable curry pairs well with any Indian flat bread.

    I had earlier shared a chutney using raw tomato, it stays good for 2-3 days if refrigerated.

    vegetable curry

    Vegetable Curry | Rajasthani cuisine

    Ingredients:

    • 1 large cucumber
    • 1/4 kilogram raw tomato
    • 1/2 cup peas
    • 2 capsicum
    • 1 tablespoon oil
    • 1/2 teaspoon cumin seed
    • 1/4 teaspoon asafoetida
    • 1/4 teaspoon turmeric powder
    • 1 tablespoon coriander seed powder
    • 1 teaspoon cumin powder
    • 1/2 teaspoon garam masala
    • 1 teaspoon chilli powder
    • salt

    Method:

    1. Peel and cut the cucumber into small cubes.
    2. Cut raw tomato and capsicum into small pieces.
    3. Take oil in a pan, add cumin, asafoetida, turmeric powder to it. Put capsicum and peas to it, let cook for sometime.
    4. Now add raw tomato and cucumber pieces, mix and let cook on a low flame until the moisture is absorbed completely.
    5. Add salt, chilli powder, coriander powder and cumin powder. Mix it well.
    6. Finally, sprinkle garam masala and give a stir.
    7. Vegetable Curry is now ready to serve.
    Take a tip:
    • Check the bitterness of the cucumber. Otherwise, it may spoil the dish.
    • Use raw tomatoes, not the slightly ripened ones.
    • Use fresh green peas. if it is not available, use the frozen ones.
    • Quantity of capsicum may be increased to three.
    • Capsicum of the larger variety are not spicy and ideal for cooking.
    Evergreendishesdev

    Vegetable Curry

    5 from 6 votes
    The vegetable curry is different and tasty. It makes use of raw tomatoes and long cucumber along with a few other veggies. It pairs well with chapati.
    Prep Time 10 minutes
    Cook Time 15 minutes
    Course: lunch ideas, Side Dish
    Cuisine: rajasthani,

    Ingredients
      

    • 1 large cucumber
    • 1/4 kg raw tomato
    • 1/2 cup green peas
    • 2 capsicum
    • 1 tbsp oil
    • 1/2 tsp cumin seed
    • 1/4 tsp asafoetida
    • 1/4 tsp turmeric powder
    • 1 tbsp coriander powder
    • 1 tsp cumin powder
    • 1/2 tsp garam masala
    • 1 tsp chilli powder
    • salt

    Method
     

    1. Wash and peel the skin of the cucumber, cut it into cubes.
    2. Cut capsicum and raw tomato into small pieces.
    3. Take oil in a pan, add cumin, asafoetida and turmeric powder to it. Put capsicum and peas to it, let cook for sometime.
    4. Now add raw tomato and cucumber pieces, mix and let cook on a low flame until the moisture is absorbed completely.
    5. Add salt, chilli powder, coriander powder and cumin powder. Mix it well.
    6. Finally, sprinkle garam masala and give a stir.
    7. Vegetable Curry is now ready to serve.

    Notes

    • Use fresh green peas, if they are not available use frozen ones.
    • Check bitterness of cucumber. Otherwise, it may spoil the dish.
    • Use firm, raw tomatoes.
    • One can increase the quantity of capsicum to three. 
    Vegetable Curry

    A few other Rajasthani dishes that I have on the blog are all easy to make Moong Dal Bada, Imli Ka Amlana, Gatte ki Sabzi

    If you have liked this dish, do leave a comment below.

    Let’s be connected : Facebook, Twitter, Instagram, You Tube, Pinterest

    If you ever make this dish, take a picture and share it on Facebook or Instagram by tagging me, I will be glad to share it further.

    Do not miss any recipes, subscribe to get all updates and an e-book for free !


  • Chana Masala (Authentic Chick Pea Curry)

    Chana Masala (Authentic Chick Pea Curry)

    Chana Masala is a favourite side dish of one and all. It is from North Indian cuisine but popular in all regions of India. It pairs well with rice as well as any Indian flat bread.

    Chana Masala is made in various ways, some make it without onion and garlic while a few like it dry as Pindi Chana.

    Today’s recipe is an authentic chick pea curry , the masala is prepared and used in it. Thus, it is flavoursome with the fragrance of fresh spices.

    chana masala
    chana masala
    chana masala

     Chana Masala / Authentic Chick Pea Curry

    Ingredients:

    • 1 cup Chana or Chick Pea
    • 2 onion
    • 4 tomato
    • 1 inch ginger
    • 4 cloves garlic
    • 1 tablespoon oil
    • 1/2 teaspoon cumin
    • 1/2 teaspoon turmeric powder
    • 1 teaspoon chilly powder
    • 1 teaspoon coriander powder
    • 1/2 teaspoon anardana
    • salt

    For the chana masala powder:

    • 1/2 teaspoon pepper
    • 2 black cardamom
    • 4 cloves
    • 2 bay leaf
    • 1/4 inch cinnamon

    For garnishing:

    • fresh coriander
    • lemon pieces

    Method:

    1. Soak chana for 8-10 hours or overnight.
    2. Cut onion, blanch the tomato.
    3. Pressure cook chana with a tea bag in it.
    4. Dry roast the spices under “For the Chana Masala Powder” for two minutes on a low flame. Keep tossing them.
    5. Once it cools, grind to a powder.
    6. Make a puree of tomato, onion, ginger and garlic.
    7. Take oil in a pan, add cumin. Once it splutters, put tomato puree and saute it.
    8. After sometime, add turmeric powder, chilly powder, anardana, coriander powder and the spice mix. Put a little water and mix thoroughly. Let the flavours amalgamate
    9. Add salt and water to it. Adjust the quantity of water as per the desired consistency.
    10. Once the pressure releases, remove the boiled chana. Mash a few of them.
    11. Put the boiled chana and the mashed mixture to it. This gives volume to the gravy.
    12. Let boil for sometime.
    13. Garnish with fresh coriander.
    14. Chana Masala is ready to serve.
    Evergreendishesdev

    Chana Masala (Authentic Chick Pea Curry)

    5 from 3 votes
    Chana Masala is tasty and makes a tasty meal anytime. The flavours of fresh pound spices makes it delicious.
    Prep Time 15 minutes
    Cook Time 45 minutes
    Soaking time 10 hours
    Total Time 11 hours
    Servings: 6 people
    Course: Breakfast, brunch, lunch box, lunch ideas
    Cuisine: north indian

    Ingredients
      

    • 1 cup chana / chick pea
    • 2 onion
    • 4 tomato
    • 1 inch ginger
    • 4 cloves garlic
    • 1 tbsp oil
    • 1 tsp cumin
    • 1/2 tsp turmeric powder
    • 1 tsp chilli powder
    • 1 tsp coriander powder
    • salt
    For Chana Masala Powder
    • 1/2 tsp pepper
    • 2 black cardamom
    • 4 clove
    • 2 bay leaf
    • 1/4 inch cinnamon

    Equipment

    • pressure cooker
    • pan
    • perforated ladle
    • plain ladle

    Method
     

    1. Soak chana for 8-10 hours or overnight.
    2. Pressure cook chana for three whistles with a tea bag in it.
    3. Cut onion, blanch the tomato
    4. Dry roast the spices under "For the Chana Masala Powder" for two minutes on a low flame. Keep tossing them.
    5. Once it cools, grind to a powder.
    6. Make a puree of tomato, onion, ginger and garlic.
    7. Take oil in a pan, add cumin. Once it splutters, put tomato puree and saute it.
    8. After sometime, add turmeric powder, chilly powder, anardana, coriander powder and the spice mix.
    9. Put a little water and mix thoroughly. Let the flavours amalgamate.
    10. Add salt and water to it. Adjust the quantity of water as per the desired consistency.
    11. Once the pressure releases, remove the boiled chana. Mash a few of them.Put the boiled chana and the mashed mixture to it. This gives volume to the gravy.Let boil for sometime.Garnish with fresh coriander. Chana Masala is ready to serve.

    Here is the video recipe of Chana Masala, do like and subscribe to this channel.

    If you have liked this recipe, do leave a comment. If you ever make this recipe, take a picture and tag me @evergreendishes on Facebook or @foodiejayashree on Instagram, shall share it further.

    You can even pin it for further reference.

    chana masala


    Did you like this recipe? Do share it further, with your family and friends. If you ever make this dish, take a picture and share it with us by tagging @foodiejayashree on Instagram or @evergreendishes on Facebook

    Subscribe to get a book of handy hints for free ! Do check out my e-books on Amazon

  • Dhaba style Kala Chana

    Dhaba style Kala Chana

    Dhaba style Kala Chana makes a tasty accompaniment with chapati or phulka. One of the tasty accompaniments, it makes a good snack also. It is ideal to pack in the lunch box too.

    It is vegan and gluten free.  (more…)

  • How to make Alu Palak / easy steps inside

    How to make Alu Palak / easy steps inside

    Alu Palak is a popular and tasty accompaniment from North Indian cuisine. Spinach puree is cooked with various spices makes a delectable side dish. Boiled potato cubes or fried potato pieces simmered in it gives added flavour. (more…)

  • Raswali Alu / Quick Potato Curry

    Raswali Alu / Quick Potato Curry

    Raswali Aloo or Potato Curry makes a tasty accompaniment with any meal. Iy is ideal to pack in the lunch box, it is semi-dry, tasty and easy to prepare.

    I remember the days when I had to pack lunch boxes for children, it used to be a well planned  out preparation for the next day. It used to be a dry snack for short break and chapati for lunch.Children are fussy eaters and be assured they will not eat if they do not like it. They might exchange the box with classmates or just set it aside. Raswali Aloo was one of the dishes I packed along with chapati. It is easy to prepare and tasty, gets ready in thirty minutes, more easier if you have the pre-cooked potatoes and the dough in the refrigerator. I prefer cooking each day fresh. 

    Potato is a versatile veggie, we can use it for anything and I usually make it atleast once in a week. Here are some of the other potato dishes from the blog: Alu Jeera, Dum Aloo, potato and pea paratha, alu 65, grilled baby potato

    This is part of 4th week   Blogging Marathon 96 that I have joined under the event, ” Kids Event” under the theme ” Lunch Box Ideas in 30 minutes”


    raswali aloo

    Raswali Aloo

    Ingredients:

    raswali aloo
    raswali aloo
    • 1/2 kilogram potato
    • 2 onion
    • 3 tomato
    • 5 cashewnut
    • 1 tablespoon oil
    • 1/2 teaspoon cumin
    • 1/4 teaspoon turmeric powder
    • 1/2 teaspoon cumin powder
    • 1/2 teaspoon coriander powder
    • 1/2 teaspoon garam masala
    • 1/2 teaspoon chilli powder
    • salt
    • water

    Method:

    • Wash potato and cook them in a pressure cooker.
    • Blanch the tomato, make a puree of it.
    • Soak cashew in hot water.
    • Take oil in a pan, add cumin, as it crackles put the onion to it. Let cook for sometime, until it is translucent.
    • Add the tomato puree to it. Let cook for sometime.
    • Add turmeric powder, coriander powder, chilli powder, cumin powder and garam masala.
    • Let cook for sometime. Add salt to it.
    • Remove the skin of the potato and cut them into cubes.
    • Put some water into the cooked masala, we need a gravy here.
    • Now, add the potato cubes into it.
    • Let cook for sometime.
    • Garnish with fresh coriander leaves.

    Take a tip: 

    • Having boiled potatoes in refrigerator quickens the process.
    • If one keeps only potatoes in the pressure cooker, it cooks faster.
    • Cut the potatoes and put them in water while cooking instead of keeping the whole one. They cook properly. 
    • The gravy  for the dish can be made until the pressure releases, once you are able to, peel the skin, cut and put them into it. 
    Evergreendishesdev

    Raswali Aloo

    Raswali Aloo is a stir fry made with  potatoes in gravy, it is tasty and pairs well with chapati, phulka or roti. 
    Servings: 4 people
    Course: accompaniments, dinner ideas, lunch box, lunch ideas
    Cuisine: north indian

    Ingredients
      

    • 1/2 kilogram potato
    • 2 onion
    • 3 tomato
    • 5 cashew nut
    • 1 tablespoon oil
    • 1/2 teaspoon cumin
    • 1/4 teaspoon turmeric powder
    • 1/2 teaspoon cumin powder
    • 1/2 teaspoon coriander powder
    • 1/2 teaspoon garam masala
    • 1/2 teaspoon chilli powder
    • salt
    • water

    Method
     

    1. Wash potato and cook them in a pressure cooker.
    2. Blanch the tomato, make a puree of it.
    3. Soak cashew in hot water.
    4. Take oil in a pan, add cumin, as it crackles put the onion to it. Let cook for sometime, until it is translucent.
    5. Add the tomato puree to it. Let cook for sometime.
    6. Add turmeric powder, coriander powder, chilli powder, cumin powder and garam masala.
    7. Let cook for sometime. Add salt to it.
    8. Remove the skin of the potato and cut them into cubes.
    9. Put some water into the cooked masala, we need a gravy here.
    10. Now, add the potato cubes into it.
    11. Let cook for sometime.
    12. Garnish with fresh coriander leaves.

    If you have liked this post, leave a comment. Pin it for later here: 

    Raswali aloo pin
    Raswali aloo

    If you ever recreate this dish, take a picture and tag @foodiejayashree on instagram, I will be glad to see your creation. 

    More recipes to come on blog, stay tuned. Follow evergreendishes on Facebook, Twitter, Instagram and Pinterest

    raswali aloo
    raswali aloo

    Sending this post to #BM96 for Srivalli’s Kids event, hosted by Bhawana, under the theme, “Lunch Box Ideas in 30 minutes”


    BMLogo Check out the Blogging Marathon page for the other Blogging Marathoners doing this BM#96

    Pin it for later: 

    Raswali aloo
    Raswali aloo

    If you have liked this post, do pin and share it. Do try the recipe and share a picture with us by tagging @evergreendishes on Facebook or @foodiejayashree on Instagram

    Let’s be connected !

    Subscribe to get a book of handy hints for free !