Category: accompaniments

  • Ambua mango dish/ Himachal cuisine

    Ambua mango dish/ Himachal cuisine

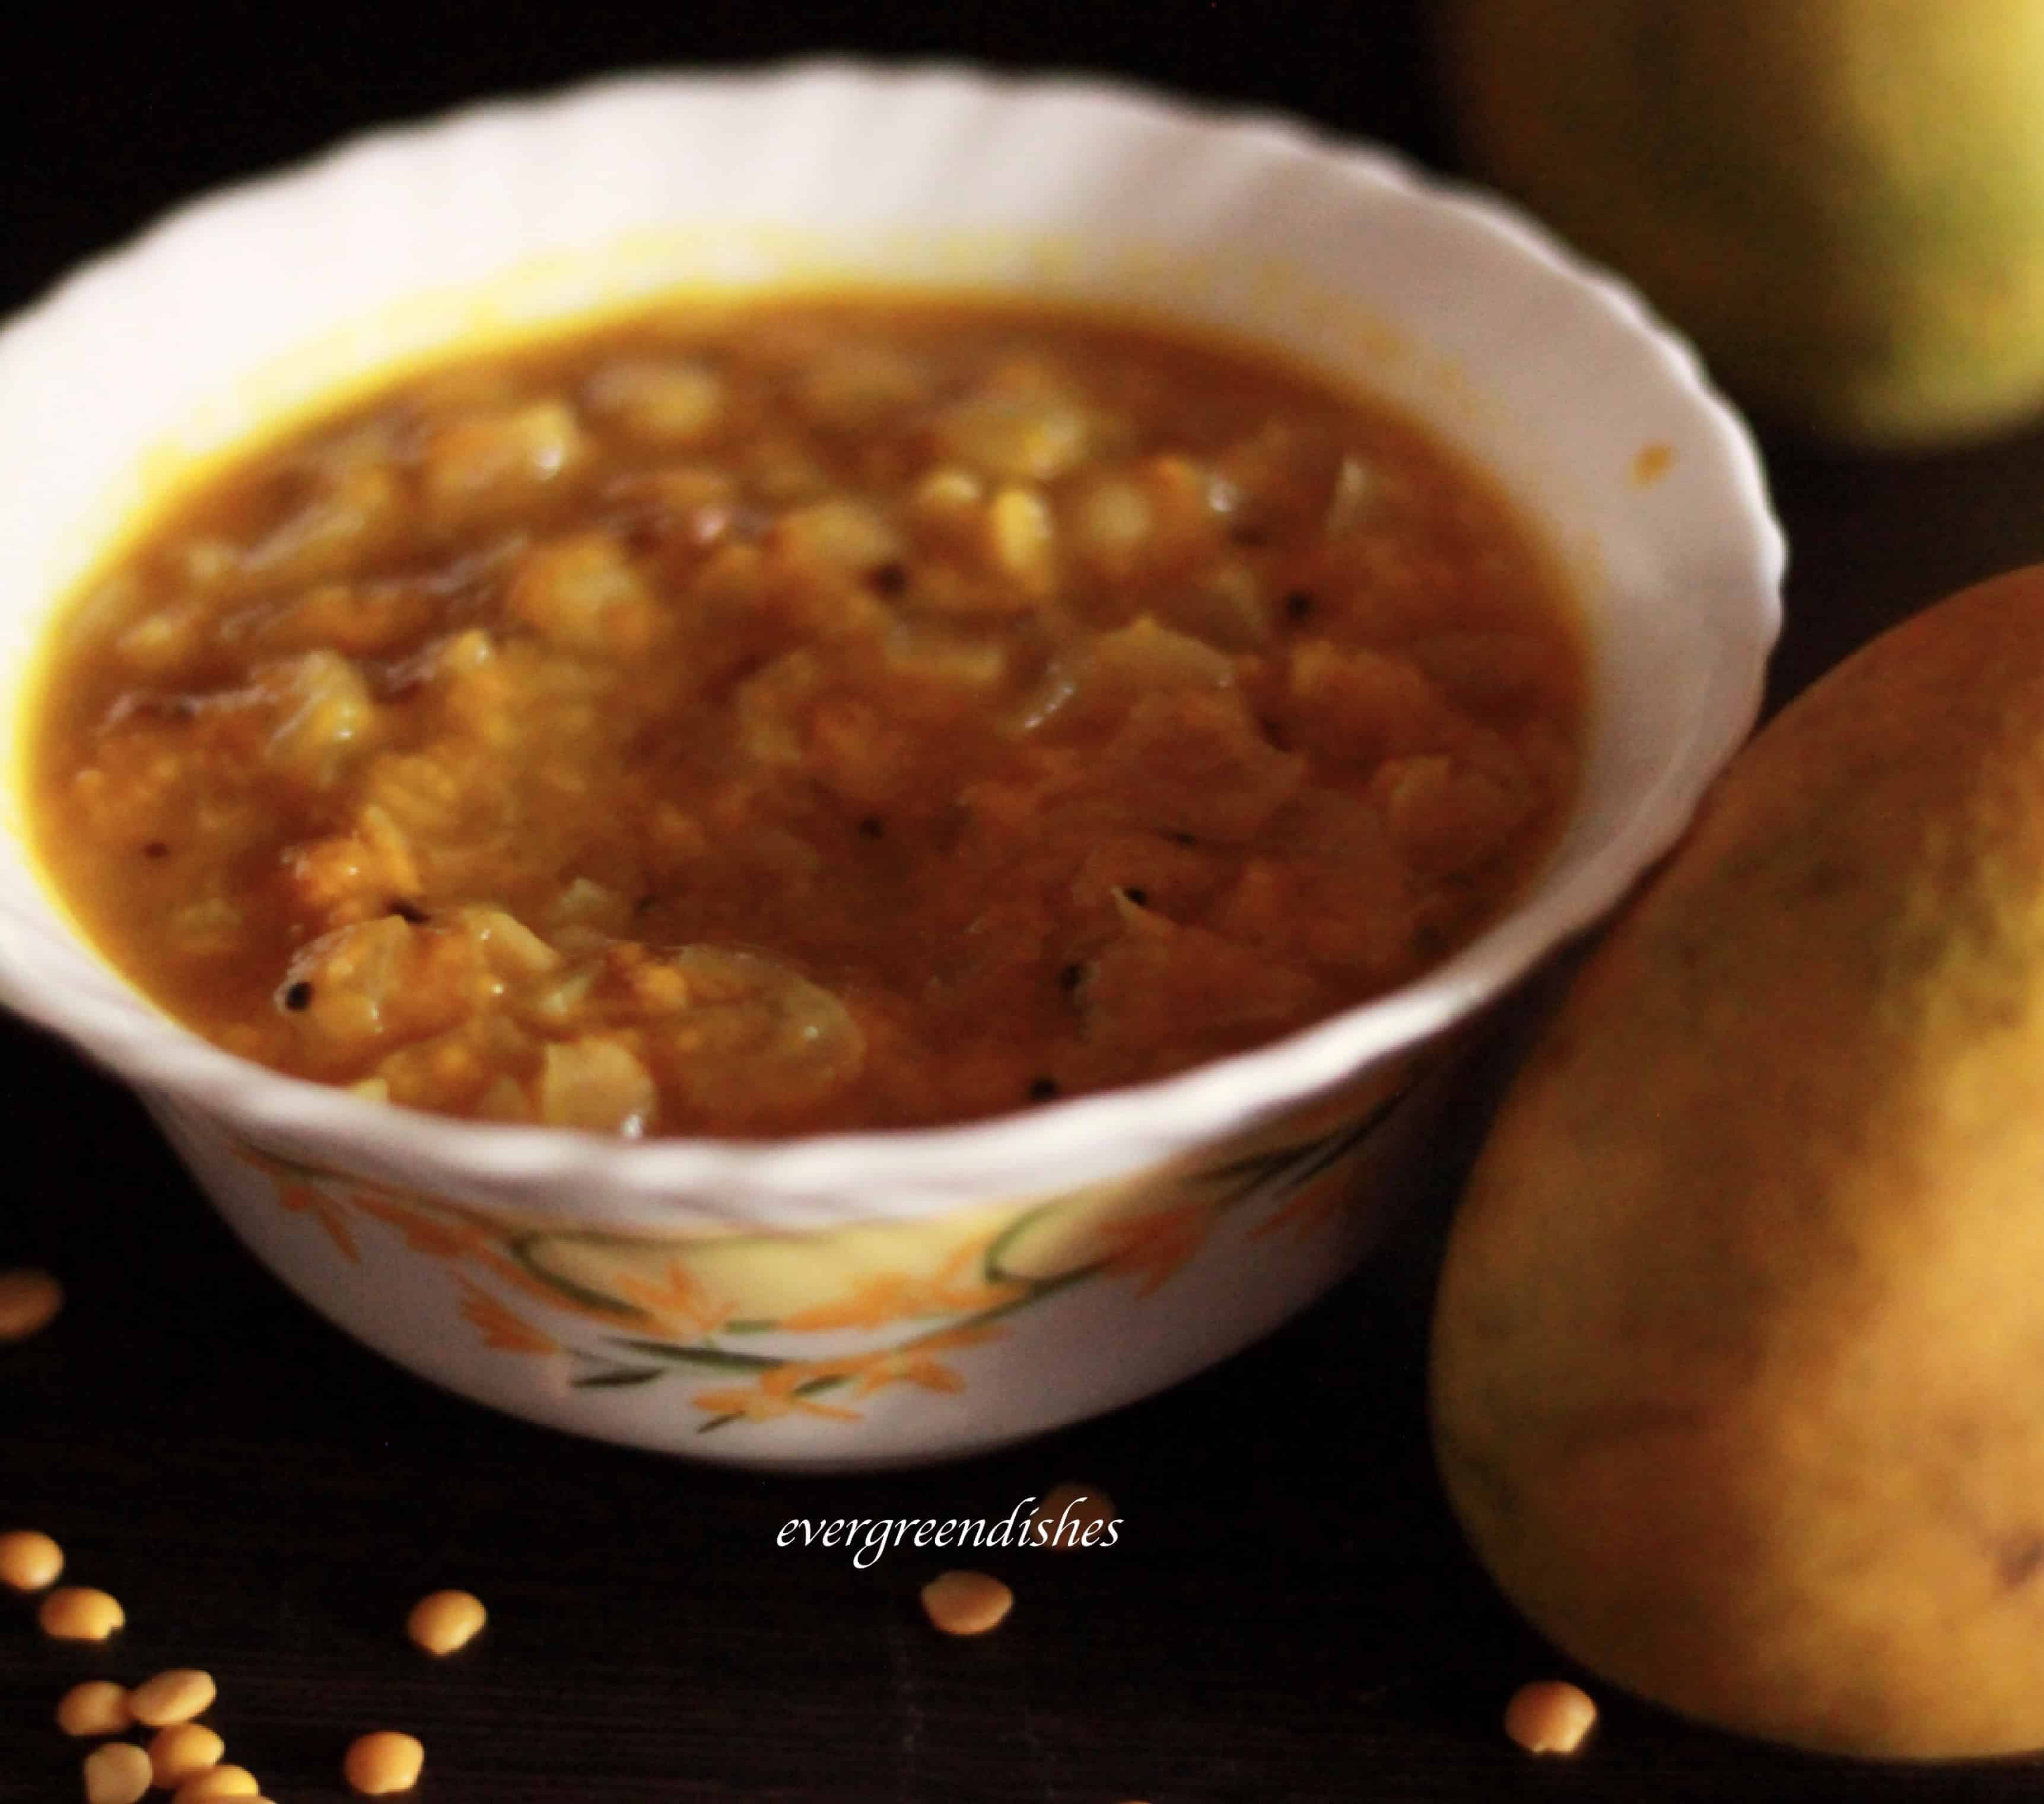
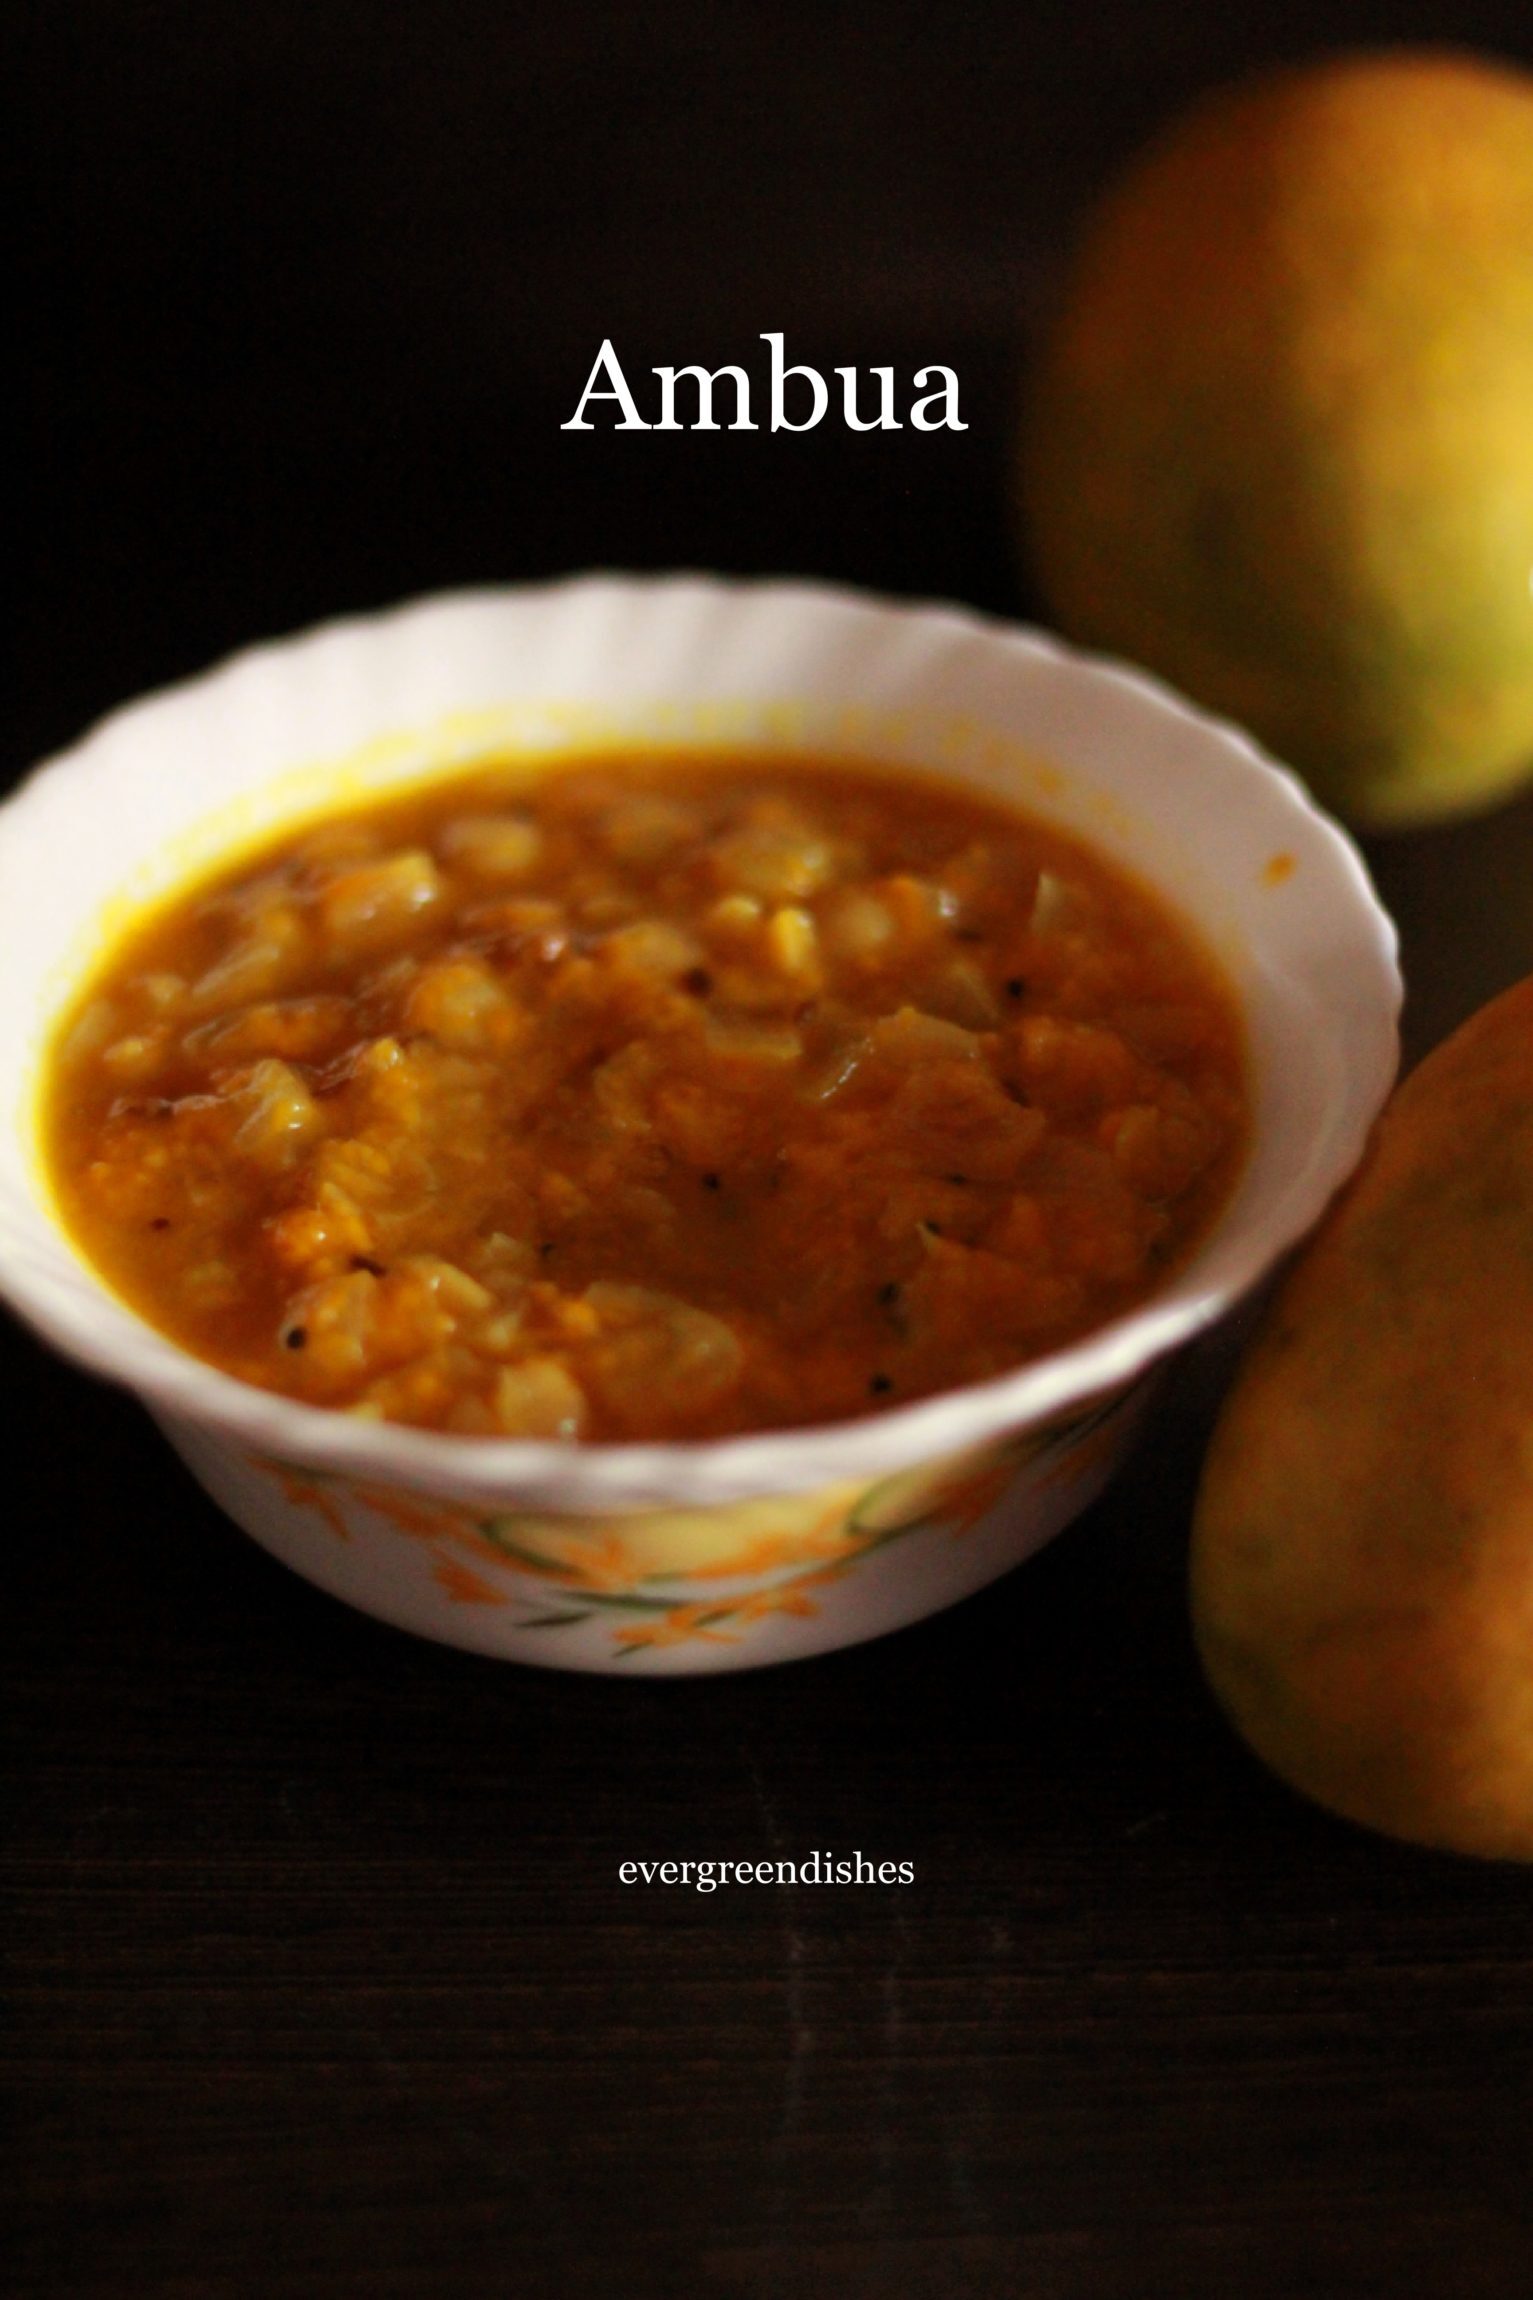
    It’s the season of mangoes and here is another  tasty dish,  Ambua. It is a delicious sweet and sour dish from the Kangra district of Himachal Pradesh. It pairs well with hot steamed rice.

    It’s that time of the month when we learn and enjoy cooking a new dish from regional cuisine. Shhhhh Cooking Secretly Challenge group has reached the beautiful land of Himachal Pradesh now. Like any other state, they have a simple meal of lentils, vegetable, flat bread  and rice on a daily basis. The food is similar to the other states of North India but here, non -vegetarian food is preferred. Thick and rich gravy with aromatic spices is used in abundance as the base of many dishes. Some of the specialities of Himachal include Manee, Madira, Pateer, Chouck, Bhagjery and chutney of til.

    My partner for this month is Mayuri Patel of mayuris-jkoni.com, she is an enthusiastic person who loves to try new dishes. She has a wide range of food delicacies and bakes from India and Kenya. Do check her blog.  The two secret ingredients given to me where mango and ginger, thankyou Mayuri, thoroughly enjoyed making this dish.

    Ambua is a delicious sweet and sour dish from the Kangra district of Himachal Pradesh. We really enjoyed this dish. I checked in through various recipes, but no ginger was used. I have used ginger here, thus using it is optional.

    ambua mango cuisine/ himachal cuisine
    ambua mango dish / himachal cuisine

    Ambua

    Ingredients:

    • 3 mangoes
    • 1 tablespoon arhar dal
    • asafoetida
    • 1/2 teaspoon chilly powder
    • 1/2 teaspoon mustard seeds
    • 1/2 teaspoon turmeric powder
    • 1/4 teaspoon methi
    • 1 inch ginger grated (optional)
    • 3 cloves garlic
    • 1 small onion
    • 1 tablespoon mustard oil

    Method:

    1. Peel mangoes and pressure cook with dal along with a glass of water.
    2. Allow to cool and squeeze the pulp.
    3. Heat oil in a pan, add mustard seeds, as it splutters, put asafoetida and methi, after a few seconds add ginger and  garlic. Saute and then put the onion pieces. Let cook for sometime until it is pink and translucent.
    4. Add the mixture of mango pulp and dal to it. Put salt. Let cook for 15 minutes.
    5. Serve hot with rice or any flatbread.
    ambua mango dish / himachal cuisine
    ambua mango dish/ himachal cuisine

    Evergreendishesdev

    Ambua

    Ambua is a sweet and sour dish from Himachal Pradesh. It tastes good with hot steamed rice. 
    Prep Time 10 minutes
    Cook Time 30 minutes
    Total Time 40 minutes
    Servings: 2 people
    Course: lunch ideas, Main Course, Side Dish
    Cuisine: Himachal Pradesh, Indian, summer treats, Vegan,

    Ingredients
      

    • 3 mango sweet and sour
    • 1 tablespoon arhar dal
    • 1 small onion cut finely
    • 1 tablespoon mustard oil
    • 1/2 teaspoon mustard seeds
    • 1/4 teaspoon asafoetida
    • 1/4 teaspoon turmeric powder
    • 2 cloves garlic
    • 1 inch ginger
    • 1/2 teaspoon chilly powder
    • 1/2 teaspoon fenugreek (methi seeds)

    Method
     

    1. Wash and peel the skin of mango. Put it in a bowl along with arhar dal. Add one cup water and cook it in the pressure cooker.
    2. Once the pressure releases, let cool, mash the mangoes and extract the pulp. 
    3. Take oil in a pan. Make the seasoning, add the mustard seeds, as it crackles put asafoetida and turmeric powder. Next, put the methi seeds and then throw in the ginger and garlic. Saute for a few seconds. 
    4. Add the mashed mixture to it. Put salt and simmer for fifteen minutes.
    5. Serve hot with rice or chapati.

    If you have liked this post, do leave a comment. The  little words of appreciation are big boosters for any blogger.

    If you ever recreate this dish, do tag me on Instagram @foodiejayashree, would love to see your creation.

    Like my Facebook page and get instant updates.

    Follow evergreendishes on Pinterest, Twitter and G+

    Subscribe to get updates of new posts in your inbox + a book of handyhints for free!

  • How to make tasty green chutney

    How to make tasty green chutney

    Green chutney is one of the essential accompaniments with any evening snack. It is spicy, tasty and versatile in its use.

    Green chutney is perfect match for sandwich. It goes well with any paratha.  It makes a perfect accompaniment   with snacks such as  samosa, cutlets, kachori etc. It is quintessential for chats as bhelpuri and sevpuri. (more…)

  • Hariyanvi Dal / how to make mixed dal

    Hariyanvi Dal / how to make mixed dal

    Hariyanvi mixed dal is a tasty accompaniment with any meal. One can serve it with hot phulkas or parathas. Serve it with hot steamed rice and you have a soul food. (more…)

  • Palak Corn | Spinach Corn Sabzi

    Palak Corn | Spinach Corn Sabzi

    Palak Corn  is a delicious spinach side dish with corn kernels in it. It pairs well with roti or paratha.

    Those who read me regularly know that I love using spinach in my daily cooking. It is versatile, can be used in a wide range of dishes and most of all, everyone likes it at home. Spinach makes a good accompaniment with any Indian flat bread. Corn Palak is one such sabzi that I make sometimes.

    Nutrients in Spinach:

    Spinach is rich in niacin, zinc, protein, fibre, vitamin A, C,E, K, thiamin, vitamin B6, folate, calcium, iron, magnesium, phosporous, potassium, copper and manganese. It is low in fat and cholestrol.  With so much of nutrients and we being vegetarians, I find it good  to use this green leaf often.


    The other dishes of Spinach on blog are

    Over to the recipe of Palak Corn | Spinach Corn Sabzi

    palak corn

    Ingredients:

    • 2 clusters Spinach
    • 1 bowl corn kernels
    To make a paste:
    • 1 onion
    • 1 tomato
    • 2 green chilly
    • 1 inch ginger
    • 8 cloves garlic
    • 8 cashews
    • 1 tablespoon melon seeds
    Other ingredients:
    • 2 teaspoon oil
    • 1/4 cup fresh cream ( I used homemade)
    • 1/4 teaspoon turmeric powder
    • 1/2 teaspoon cumin
    • 1/4 teaspoon garam masala powder
    • 1/2 teaspoon chilly powder

    Method:

    1. Remove the stalk of spinach leaves, coarsely cut, wash and blanch it. Once it is cool, make a paste of it.
    2. Soak cashew and melon seeds for sometime.
    3. Grind ingredients under “to make a paste”
    4. Thaw the frozen corn and boil with a little salt.
    5. Heat oil in a pan, add cumin and put the paste into it. Put a little turmeric powder to it. Saute for sometime. Add garam masala and the chilly powder.
    6. Once the raw smell is gone, add the spinach puree to it.
    7. Put salt and corn kernels to it.
    8. Let boil for sometime.
    9. Blend the cream well and mix it. Corn Palak is ready to serve.
    10. Serve hot with phulka, roti or naan.

    Take a tip: If you are using fresh corn, cook them in the pressure cooker.

    Subscribe to get a book of handyhints for free!

    Follow evergreendishes on other social media

    palak corn
    Evergreendishesdev

    Palak Corn

    Palak Corn makes a good dish with any Indian flat bread. It is tasty and lip smacking good. 
    Prep Time 10 minutes
    Cook Time 15 minutes
    Total Time 25 minutes
    Servings: 4 people
    Course: accompaniment, kids favourite, lunch ideas, Main Course, sabzi
    Cuisine: north indian

    Ingredients
      

    • 2 clusters spinach
    • 1 cup corn kernels
    To be made to a paste
    • 1 onion
    • 1 tomato
    • 1 inch ginger
    • 8 cloves garlic
    • 2 green chilly
    • 6 cashew
    • 1 tbsp melon seed
    Other ingredients
    • 2 teaspoon oil
    • 1/4 cup cream
    • 1/4 tsp garam masala
    • 1/2 tsp chilly powder
    • 1/2 tsp cumin
    • salt

    Method
     

    1. Remove the stalk of the spinach leaves, wash and blanch them. When cool grind to a puree.
    2. Thaw the corn kernels. If using, fresh corn, boil them for sometime.
    3. Grind the ingredients under “To  be made to a paste”
    4. Heat oil in a pan , add cumin, as it splutters, put the paste to it. Saute for sometime until the raw smell goes. Add turmeric powder, garam masala, chilly powder and salt to it. Mix well and let the flavours imbibe.
    5. Put the corn kernels to it. Let boil for a minute. Add the cream to it, mix and serve with any indian flat bread. 

    Notes

    • I have used frozen corn. If using fresh corn, cook them in the pressure cooker with a little salt.
    • Soak cashew and melon seeds in water for sometime, it eases grinding.

    A few spinach recipes from my co-bloggers:

    Pin it for later :

    palak corn
    Palak corn


    Subscribe  to get a book of handy hints for free !

    book of handyhints


  • Sukhi Arbi/ colocosia/ how to make dry arbi stir fry

    Sukhi Arbi/ colocosia/ how to make dry arbi stir fry

    Arbi is a root vegetable that is usually available in winter. The other names that that one can resonate with are colocasia, arvi, taro root, shyavi gadde. Sukhi arbi/colocasia makes a tasty accompaniment with any meal.

    It is a powerhouse of nutrients. It is rich in dietary fibre and nutrition. It has other minerals as zinc, potassium ands magnesium.The leaves too are used in making a different kind of fritter, patrode, that is very tasty.

    Today, is the beginning of another new year. Stepping into 2018 with a lot of good thoughts and positivity. Wishing one and all a Happy New Year. May the year be filled with peace and happiness.

    Here is a sukhi arbi/ colocasia recipe for you. It can be eaten as a snack also.

    sukhi arbi
    sukhi arbi

    Sukhi Arbi/ Colocasia

    Ingredients:

    • 1/2 kilogram arbi/ colocasia / arvi/ taro root
    • 2 tablespoon oil
    • 1/2 teaspoon mustard
    • 1/4 teaspoon turmeric
    • a pinch of asafoetida
    • 2 teaspoon chilly powder
    • salt to taste

    Method:

    1. Wash the arbi well by changing water.
    2. Steam it in a pressure cooker or in a pan. It should be moderately cooked.
    3. Peel the skin and cut into small circles.
    4. Heat oil in a thick bottom pan. Add mustard seeds, as it splutters, put asafoetida and turmeric powder, then add the cut pieces.
    5. Cook on a slow flame until it is done and crispy.
    6. Add salt and chilly powder, heat for a few more minutes, remove and serve.

    Take a tip: The cooked arbi tends to give an itch to the hands on peeling the skin. Apply oil to the palms.

    arbi
    arbi


    sukhi arbi
    sukhi arbi

    Sukhi arbi/ colocasia is ready to serve.

    Take a tip:

    • Apply oil to the hands before peeling, it does give a itching sensation sometimes.
    • Add a little more oil if needed while cooking, this tends to use more oil.
    • Do not pressure cook with whistle. Mushy ones cannot be cooked here.
    • Arbi needs to be well roasted, it gives irritation to the throat if not cooked well.


    sukhi arbi
    Evergreendishesdev

    Sukhi arbi/ colocasia/ taro

    Sukhi arbi or dry colocasia stir fry makes a good accompaniment with any meal. Kids love to binge it as a snack
    Prep Time 20 minutes
    Cook Time 1 hour
    Total Time 1 hour 20 minutes
    Servings: 4 people
    Course: accompaniment, dry sabzi, Side Dish
    Cuisine: Indian, South Indian

    Ingredients
      

    • 1/2 kilogram arbi
    • 2 tablespoon oil
    • 1/2 teaspoon mustard seeds
    • 1/4 teaspoon asafoetida
    • 1/4 teaspoon turmeric powder
    • 2 teaspoon chilly powder
    • salt to taste

    Method
     

    1. Wash the arbi by changing the water a couple of times.
    2. Boil it until it is tender.
    3. Peel the skin, cut into circular discs.
    4. Heat oil in a thick bottom pan. Make the seasoning, put the mustard seeds, as it splutters, put asafoetida and turmeric. Put the cut pieces into it. 
    5. Cook on a low flame. Keep stirring at constant intervals so that it does not get burnt.
    6. The arbi should be crisp on the outside and well cooked. 
    7. Put salt and chilly powder, mix and allow to cook for a few more minutes.
    8. Serve it as an accompaniment with rice or chapati.

    Notes

    • Cook it on a low flame, keep doing other chores while this is getting ready.
    sukhi arbi/ taro/arvi
    sukhi arbi/taro/arvi

    Have you got the recipe app Quick and Easy South Indian Snacks? At the click of button, you can browse the recipes.

    Let’s be connected on other social media

    Twitter, facebook, Instagram, G+

    A few arbi recipes by co-bloggers


  • Tuvar lilva masala curry| Green pigeon peas curry| Togare kalu curry

    Tuvar lilva masala curry| Green pigeon peas curry| Togare kalu curry

    Winter brings its own blessings, fresh vegetables are available. There is no dearth for greens. Green pigeon peas are the fresh form of tuvar dal and is available in winter. Tuvar lilva masala curry is a tasty and easy to make accompaniment that can be paired with chapati or phulka.

    The other names for Tuvar lilva are green pigeon peas and togare kalu

    Tuvar lilva masala curry
    Tuvar lilva masala curry

    The green pigeon peas can be shelled and stored in refrigerator for a few days.

    You can have easy access to our recipes. We are now available on mobile app, you can download it here from the playstore

    https://play.google.com/store/apps/details?id=com.gembox.info.evergreendishes

    Let’s get cooking Tuvar Lilva Masala Curry

    Ingredients:

    • 1 bowl green pigeon peas ( 1 bowl= 200 ml)
    • 2 teaspoon oil
    • 1/2 teaspoon cumin
    • 1/2 teaspoon turmeric powder
    • salt to taste

    Grind to a paste:

    • 2 onion
    • 2 tomato
    • 1/2 inch ginger
    • 3 cloves garlic

    Grind to a paste:

    • 1 bowl coriander leaves
    • 1 green chilly
    • 1tablespoon pumpkin seeds

    Method:

    1. Boil green pigeon peas with a little salt. Alternatively, you can pressure cook.
    2. Soak pumpkin seeds for half an hour in some water.
    3. Blanch the tomatoes. Make a paste of onion, tomato, ginger and garlic.
    4. Make a paste of coriander, green chilly and pumpkin seeds.
    5. Take oil in a pan, add cumin, as it splutters put the onion and tomato puree. Saute it well for a few minutes.
    6. Add the green paste to it. Put salt. Let cook for two minutes.
    7. Now, add the cooked pigeon peas, mix and simmer for sometime.
    8. Tuvar lilva curry is ready to serve.
    Tuvar lilva masala curry
    Tuvar lilva masala curry

    Take a tip:

    • Add more green chilly if you want it spicy.
    Tuvar lilva masala
    Evergreendishesdev

    Tuvar lilva masala curry

    Tuvar lilva masala curry is a tasty accompaniment that can be made during winters.
    Prep Time 10 minutes
    Cook Time 15 minutes
    Total Time 25 minutes
    Servings: 4
    Course: accompaniment, curry, gravy, Side Dish
    Cuisine: Indian, Vegan,

    Ingredients
      

    • 1 cup tuvar lilva 1 cup =200 ml used
    • 2 teaspoon oil
    • 1/2 teaspoon cumin
    • 1/2 teaspoon turmeric powder
    Grind to a paste
    • 2 onion
    • 2 tomato
    • 1 inch ginger
    • 3 cloves garlic
    Grind to a paste
    • 1 green chilly
    • 2 tablespoon coriander
    • 1 tablespoon pumpkin seeds

    Method
     

    1. Boil  tuvar lilva with a little salt. Alternatively, you can pressure cook it.
    2. Soak the pumpkin seeds in water for half an hour.
    3. Blanch the tomatoes, peel the skin and grind all the ingredients together.
    4. Grind pumkin seeds along with coriander and green chilly to a paste. 
    5. Take oil in a pan. Add cumin, as it splutters, put the onion and tomato paste. Saute it for sometime. Put turmeric powder  and mix it well. 
    6. Add the green paste and salt to it. Let cook for sometime.
    7. Then, add the cooked green pigeon peas. Let simmer for five minutes. Green pigeon peas curry is ready to serve.

    Notes

    Add an extra green chilly if you want it spicy.
    Tuvar lilva masala
    Tuvar lilva masala

    Other tuvar liva recipes from my co-bloggers Fresh Toor Curry  Fresh Tuvar Curry

    If you have liked this post, do comment and share it. Follow evergreendishes on Pinterest, Twitter, Facebook and Instagram.

  • Spring onion stir fry | tasty accompaniment

    Spring onion stir fry | tasty accompaniment

    Jump to Recipe Print Recipe

    Spring Onion Stir Fry makes a good accompaniment with chapthi and jowar roti.  It is an easy dish which you can make in fifteen minutes

    Two years back, it was after some thought I decided to make a spring onion stir fry. It’s a sort of compulsive buying for me, I simply end up buying some things. The firm, unblemished and bright green leaves are a lovely sight and make good dishes. Well, that’s one of the reasons I buy these beauties.  The spring onion stir fry was a hit and since then, it’s become a routine every now and then.

    Spring onions are used along with other veggies in fried rice and other Indo-Chinese dishes. It enhances the taste of the dish.

    Stir fry is made using spring onion and gram flour as the main ingredient. It tastes good with chapathi and jowar roti.

    You may also like to check the spring onion and corn pulao.

    spring onion stir fry

    Spring Onion Stir Fry Recipe :

    Ingredients:

    • 2 cluster spring onion
    • 1 tablespoon oil
    • 1/4 teaspoon mustard seeds
    • 1/4 teaspoon asafoetida
    • 1/4 teaspoon turmeric powder
    • 2 teaspoon chilly powder
    • 1 tablespoon gram flour
    • salt to taste

    Method:

    1. Take the spring onion, remove the onion bulbs and cut the greens into small pieces.
    2. Discard the skin of the bulb and cut into small pieces.
    3. Immerse in water and wash it well.
    4. Put it in a colander.
    5. Take oil in a pan, add the mustard seeds, as it crackles put asafoetida and turmeric powder. Put the washed vegetable into it.
    6. Add salt and let cook for sometime. Add chilly powder and mix well.
    7. Finally put the gram flour over it and mix it well.
    8. Allow to cook for a few minutes.
    9. Remove and serve.
    spring onion stirfry
    Evergreendishesdev

    Spring onion stirfry

    Spring onion stirfry
    Prep Time 10 minutes
    Cook Time 10 minutes
    Total Time 20 minutes
    Servings: 4 people
    Course: accompaniment, Side Dish, stirfry, vegetable
    Cuisine: Indian

    Ingredients
      

    • 2 clusters spring onion
    • 1 tablespoon oil
    • 1/4 teaspoon mustard seeds
    • 1/4 teaspoon asafoetida
    • 1/4 teaspoon turmeric powder
    • 1 tablespoon gramflour
    • salt to taste
    • 2 teaspoon chilly powder

    Method
     

    1. Take the cluster of spring onion, remove the onion bulbs and cut the greens into small pieces.
    2. Remove the skin of the onions and cut it into small pieces. 
    3. Put the chopped veggie into water and wash it well. Then, put it in a colander.
    4. Take oil in a pan, add the mustard seeds, as it crackles, put turmeric powder and asafoetida to it. Put the chopped greens to it. Add salt and allow to cook.
    5. Add chilly powder and mix it well. 
    6. Now, add gram flour to it,  mix and allow to cook for sometime. 
    7. Spring onion stir fry is ready to serve.

    About the event :

    This is an old post which I have redone with better pictures. Sending it to Foodies _Redoing Old Posts 92.  It is a group where we work on old posts once in a fortnight. Sometimes, we just change the picture, text or at times both of them. The post Spring Onion Stir Fry | Tasty Accompaniment was first published on 06’12/2017. It was redone on 14/1/23

    Pin it for later :

    Spring Onion Stir Fry
    Spring Onion Stir Fry

    A few recipes using spring onion from my co-bloggers Spring onion kadhi Peyaazkoli Aloo Bhaja

    If you have liked the recipe, do share it with your family and friends.

    Subscribe to get a book of handy hints for free.

    Linking it to the event below :

  • Gongura chutney/ Pundi chutney / Sorrel leaves cooking

    Gongura leaves are widely used in cooking, the tangy flavour does makes the dishes delicious. Gongura chutney or pundi chutney is commonly prepared in South India.It makes a good accompaniment with jowar roti.

    Varied names of Sorrel

    Different regions call it by different names.The English name is Sorrel or Kenaf. It is popular as  Gongura in Andhra Pradesh, Pundi palya in Karnataka, Pulich keerai in Tamil, Ambaadi In Marathi, Pitwa in Hindi, Kotrum in Jharkhand, Amaari in Chattisgarh, Kotrum in Jharkhand and Mestapat in Bengali.

    Health Benefits of Sorrel leaves

    The sorrel leaves are rich source of iron, vitaminB6, folic acid and anti-oxidants essential for human nutrition. The iron and vitamins present in it help in preventing conditions such as osteoporosis.

    Different culinary uses of Sorrel leaves in India

    Sorrel leaves are used along with lentils to give a flavoursome accompaniment with rice. The chutney is a popular dish churned out of it. It is one of the daily essentials in Andhra cuisine. A variety of pickle is also made using these leaves.

    Ingredients:

    For the  gongura/ sorrel leaves chutney

    • 2 clusters of sorrel leaves
    • 6 green chilly
    • 1 teaspoon methi seeds
    • 2 teaspoon oil
    • a liitle asafoetida
    • salt to taste

    For the seasoning:

    • 2 teaspoon oil
    • 1/4 teaspoon mustard
    • 1/4 teaspoon asafoetida
    • 1/4 teaspoon turmeric powder

    Method:

    1. Separate the leaves from the stalk, wash and put them to dry on a cloth.
    2. Cut the leaves.
    3. Take oil in a pan, roast the methi seeds and the green chilli, put them aside.
    4. In the same oil, add asafoetida and the sorrel leaves along with salt.
    5. Let cook for sometime.
    6. Remove from flame.
    7. When it cools, grind it.
    8. Take a pan and make the seasoning. Add mustard seeds, as it crackles, put asafoetida and turmeric powder. Turn of the gas. Put the chutney in it and mix well.
    9. Gongura chutney is ready to serve.

    Take a tip:

    • Garlic may be added along with green chilly while sautéing.
    • Raw onions are added to the chutney by some people.
    • Chutney stays good for a couple of days if kept in refrigerator.
    • Tastes good with jowar roti along with stuffed brinjal as an accompaniment.
    • It can be mixed with hot steamed rice along with ghee.
    • The leaves are slimy, thus do not chop and wash them.
    Evergreendishesdev

    Gongura/ Pundi/ Sorrel leaves chutney

    Gongura chutney is a popular accompaniment from South India. It makes a good accompaniment with jowar roti. 
    Prep Time 10 minutes
    Cook Time 10 minutes
    Total Time 20 minutes
    Servings: 1 bowl
    Course: accompaniment, chutney,, Side Dish
    Cuisine: Indian, karnataka, southindian

    Ingredients
      

    • 2 cluster sorrel leaves
    • 6 green chilly
    • 1 teaspoon methi
    • 2 teaspoon oil
    • salt to taste
    For the seasoning
    • 2 teaspoon oil
    • 1/2 teaspoon mustard seeds
    • 1/4 teaspoon turmeric powder
    • 1/4 teaspoon asafoetida

    Method
     

    1. Remove the stalk of the sorrel leaves, wash and put it to dry on a cloth. Cut the leaves. 
    2. Take oil in a pan, add fenugreek seeds and green chilly. Roast them, put them aside.
    3. In the same pan, add asafoetida and the sorrel leaves along with salt. 
    4. Let cook until tender. Remove and keep it aside.
    5. When cool, grind the fenugreek and green chilly together. Then add the sorrel leaves to it and blend altogether. 
    6. Make seasoning in another pan. Add mustard seeds to the oil, as it splutters, put asafoetida and turmeric powder. Put chutney to it and mix it well. Gongura chutney is ready to serve.

    Notes

    • You may add garlic along with green chillies while roasting. 
    • Finely cut onion pieces can be put in the seasoning and sauted for sometime. 
    • This chutney tastes good with jowar roti.
    • It can also be served with hot steamed rice along with a dollop of ghee. 
    • This chutney can be stored in refrigerator. Put seasoning and use it.
    Gongura chutney
    Gongura chutney


    Other chutney recipes on the blog

    And here are a few from my co-bloggers Raw mango with garlic Tomato Onion Chutney Lal mirch ki chutney Coconut and flax seed chutney Gur imli ki chutney Mango Kottu 

    If you have liked this post, do comment and share it further. Subscribe to get updates of new posts in your inbox, also a free e-book of handyhints.


  • Kurkuri bhindi | 2 ways crispy okra fry

    Kurkuri bhindi | 2 ways crispy okra fry

    Kurkuri Bhindi Fry or crispy bhindi fry  is a tasty accompaniment with any meal. Serve it with any meal as an accompaniment, it is loved and relished by all.

    It is assured that I need okra at least once in a week, usually sabzi but sometimes I do fry.  Here is another kind of fry that is tasty and crispy.

    Kurkuri Bhindi Crispy Bhindi Fry

    Ingredients:

    • 1/2 kilogram bhindi
    • salt to taste
    • 1/2 teaspoon turmeric powder
    • pinch of asafoetida
    • 1/2 teaspoon pepper powder
    • 1/2 teaspoon chat masala
    • 2 teaspoon chilly powder
    • 1  teaspoon cumin powder
    • 1 teaspoon coriander powder
    • 2 tablespoon fresh coriander chopped
    • 2 tablespoon gram flour
    • oil for frying

    Method:

    1. Wash the bhindi and pat dry.
    2. Cut it vertically into four strips. If the bhindi are large in size, cut them into two.
    3. Add salt, asafoetida, turmeric powder, chilly powder, amachur powder, coriander powder, cumin powder, chopped coriander and mix it.
    4. Sprinkle  gram flour and mix it. Keep the mixture to marinate for twenty minutes.
    5. Heat oil in a pan. Put a few pieces of the marinated mixture into oil.
    6. Deep fry on medium heat for sometime.
    7. Turn them with a ladle. Once they are crisp and brown, remove them on a tissue paper.
    8. Repeat for the rest of the mixture.
    9. Serve with rice as an accompaniment.
    kurkuri bhindi
    kurkuri bhindi
    bhindi pieces
    bhindi pieces
    making of kurkuri bhindi in steps
    making of kurkuri bhindi in steps
    kurkuri bhindi
    Evergreendishesdev

    Kurkure Bhindi

    Kurkure bhindi is a okra deep fried by coating it with a mixture of spices. It makes a good accompaniment with any meal.
    Prep Time 15 minutes
    Cook Time 30 minutes
    Total Time 45 minutes
    Servings: 4 people
    Course: Side Dish
    Cuisine: Indian, north indian, Vegan,, Vegetarian

    Ingredients
      

    • 1/2 kilogram bhindi/okra/ladiesfinger
    • salt to taste
    • 1/2 teaspoon turmeric powder
    • 1/4 teaspoon asafoetida
    • 1/2 teaspoon chat masala
    • 1/2 teaspoon pepper powder
    • 2 teaspoon chilly powder
    • 1 teaspoon coriander powder
    • 1 teaspoon cumin powder
    • 2 tablespoon gramflour
    • 2 teaspoon coriander leaves
    • oil for frying

    Method
     

    1. Wash the bhindi and pat dry. Cut them vertically into thin strips. If the bhindi are big in size, divide them into two.
    2. Add salt, turmeric powder, asafoetida, chilly powder, coriander powder, cumin powder, pepper powder, chat masala and coriander leaves to it. Mix it well.
    3. Sprinkle gram flour to it and mix. Allow the mixture to marinate for 15-20 minutes
    4. Heat oil in a frying pan. Add a few pieces of the marinated pieces.
    5. Deep fry on medium heat. Turn it to the other side with a ladle. It should be crisp and light brown in colour.
    6. Remove it on a tissue paper. Repeat for the rest of the mixture.
    7. Serve with rice as an accompaniment.

    Notes

    • Bhindi should be dry.
    • Use tender bhindi for better taste. 


    Other bhindi recipes on my blog

    Bhindi fry Stuffed Bhindi Okra Stirfry

    To make in the air fryer :

    Ingredients :

    • 1/4 kilogram bhindi
    • salt to taste
    • 1/4 teaspoon turmeric powder
    • pinch of asafoetida
    • 1/4 teaspoon pepper powder
    • 1/4 teaspoon chat masala
    • 1.5  teaspoon chilly powder
    • 3/4  teaspoon cumin powder
    • 1 teaspoon coriander powder
    • 1 teaspoon gram flour
    • 2 tablespoon of olive oil

    Method :

    1. Wash the bhindi and pat dry.
    2. Cut the okra into half and slit them in between.
    3. Take oil in a bowl, add all the spice powders into it and mix it.
    4. Put the cut okra slices into it, toss it well and keep it aside for sometime.
    5. Pre-heat the air fryer.
    6. Put the parchment butter and place the okra slices on it. Cook at 300 degree Fahrenheit for five minutes initially. Toss in between. Again put it for another five minutes.
    7. Now, check and cook for two more minutes, Crispy okra is ready to use.

    crispy okra fry 2 ways

    About the event :

    This is an old post which I have edited now. Earlier, I had written only the stove top method, now I have included the air fryer recipe in it. Sending it to Foodies_Redoing Old Post 105, a fortnightly event. Through this group, I have redone many of posts with better pictures now.

    Pin it for later :


    crispy bhindi 2 ways
    kurkuri bhindi

    If you have liked this post, do share it further. Subscribe to get a book of handy hints for free!


  • Crispy Bhindi Fry | okra fry

    Crispy Bhindi Fry | okra fry

    Crispy Bhindi Fry makes a tasty accompaniment with any meal. It is loved by one and all.

    Bhindi is the common name for ladies finger or okra. It is a versatile vegetable which can be turned into crispy fried savouries or as a stir fry. The stuffed okra is simply irresistible. The weather calls for fried food and I ended up frying it, Tasty Bhindi Fry is on the blog today. I like this recipe for it’s simplicity, no extra dressings or garnishing; but yet, it is tasty and loved by all.

    Bhindi fry

    It makes a good accompaniment  with hot steamed rice, a dollop of ghee elevates the taste. The best way is to eat it along with rice and sambar.

    My other bhindi recipes: okra stir fry, stuffed bhindi

    Let’s get over to the recipe of Bhindi Fry

    Ingredients:

    • 1 kg ladys finger/okra/ bhindi
    • salt to taste
    • 3 teaspoon chilli powder
    • oil for frying

    Method:

    1. Wash and dry the okra. Cut them into thin pieces.
    2. Take oil in a pan.
    3. Heat it.
    4. Once it it is hot, slowly put a bowl of it.
    5. Deep fry on medium flame, after sometime, keep it on high for sometime. Keep stirring with a ladle.
    6. Once it is light brown in colour, remove it on a tissue paper.
    7. Put the next batch to fry.
    8. Take the fried ones and put them in a bowl. Add a little salt and chilly powder (1/2 teaspoon). Mix it well.
    9. You need to repeat this step every time.
    10. Store in a air tight container.

    Take a tip:

    • Cut into thin slices.
    • Be careful while frying. Once, it is golden, remove it on a tissue paper. It does not taste good if it gets darker.
    • Add salt and chilly powder accordingly.
    • Close the lid once it is cool.
    Evergreendishesdev

    Bhindi Fry | Okra fry | Ladies finger Fry

    Bhindi fry is a tasty accompaniment that can be used with any meal. 
    Prep Time 15 minutes
    Cook Time 11 minutes
    Total Time 26 minutes
    Servings: 6 people
    Course: Side Dish
    Cuisine: Indian, karnataka, South Indian

    Ingredients
      

    • 1 kilogram bhindi/okra/lady’s finger
    • 3 teaspoon chilly powder
    • salt to taste
    • oil for frying

    Method
     

    1. Wash and pat dry the okra. Cut them into thin pieces.
    2. Heat oil in a pan. 
    3. Once it is heated, add handful of cut pieces slowly into the oil.
    4. Deep fry on medium flame. After a few minutes, fry on high flame for one minute.
    5. Once it is light brown in colour, reduce the flame and remove it on a tissue paper.
    6. Put the next badge of okra pieces to fry.
    7. Put the fried okra in a bowl. Add a little salt and chilly powder to it. Mix it. It is ready to serve.
    8. Repeat for the rest of the cut pieces.

    Notes

    • Cut okra into thin pieces.
    • Add salt and chilly powder accordingly.

    About the event:

    This is an old post which I have redone with  better pictures. Sending it to Foodies_Redoing Old Post 30, a fortnightly event, where we work on a old post. Here I have changed the pictures.

    crispy bhindi fry

    If you have liked this post, do share it with your family and friends. If you ever make this, take a picture and share it by tagging @foodiejayashree on Instagram or @evergreendishes on Facebook or Twitter.