Author: Evergreendishesdev

  • South Indian Vegetable Spice Mix | Palyada Pudi

    South Indian Vegetable Spice Mix | Palyada Pudi

    Jump to Recipe Print Recipe

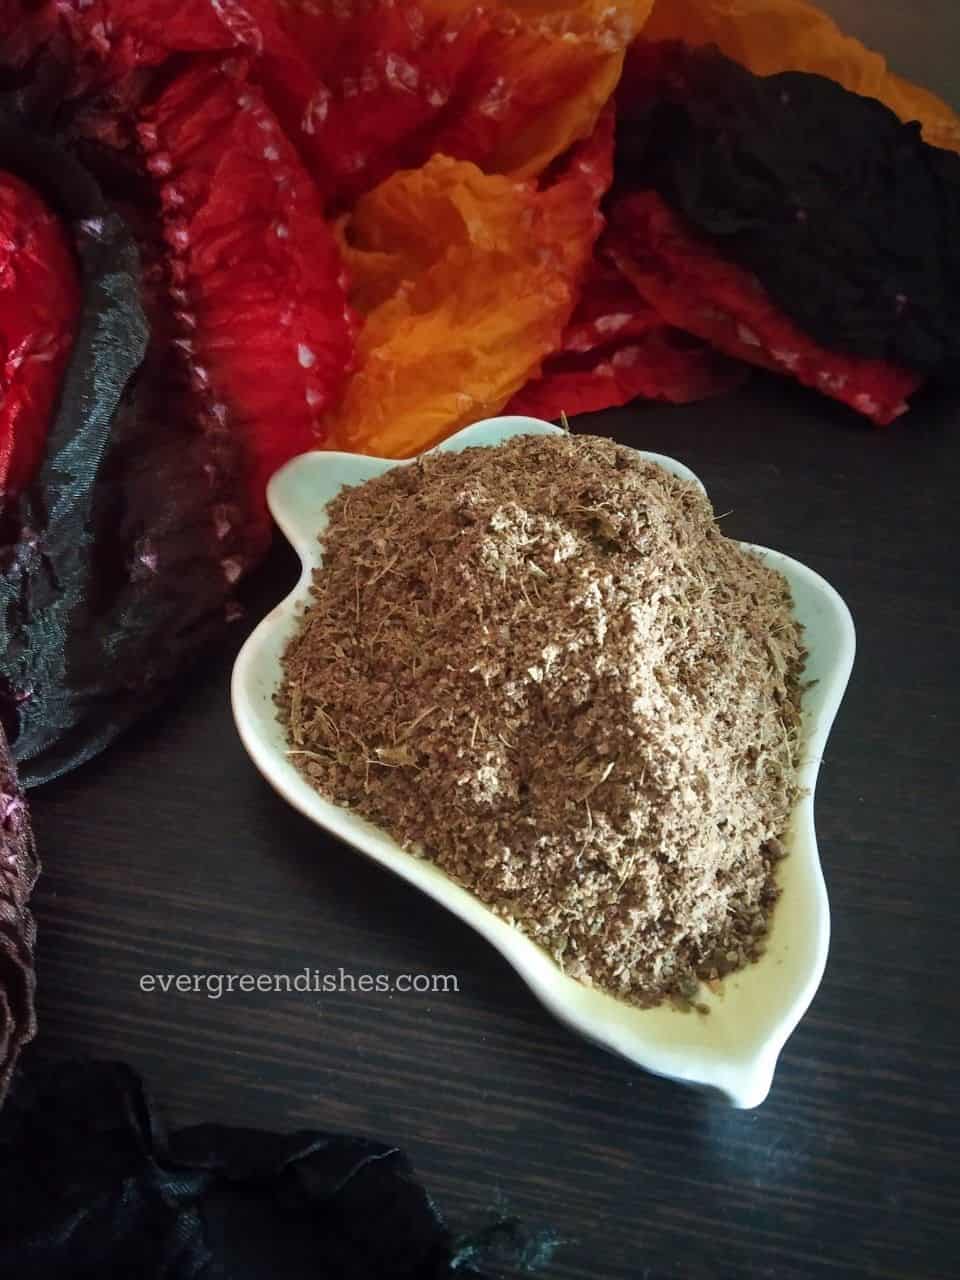
    Vegetable Spice Mix/ Palyada Pudi is one of the essentials in any South Indian kitchen. It is versatile to use, may be used in simple stir fry to dals cooked with green leaf.

    Palya is the kannada word for stir fry. Pudi is dry condiment which we normally use. Thus it is a vegetable spice mix. 

    The ingredients needed are simple and easily found in the kitchen. South Indian cooking revolves around these spice mix, most households keep them ready to use.Today, I am sharing a vegetable spice mix. It is usually added to vegetables as cucumber and brinjal. It is also used as filling in stuffed vegetables.

    The ingredients used here are :


    Coriander seeds: Make use of fresh ones. Be careful while you roast them, do not burn them.
    Curry leaves– Wash them and pat dry them. There is should be no moisture in it.
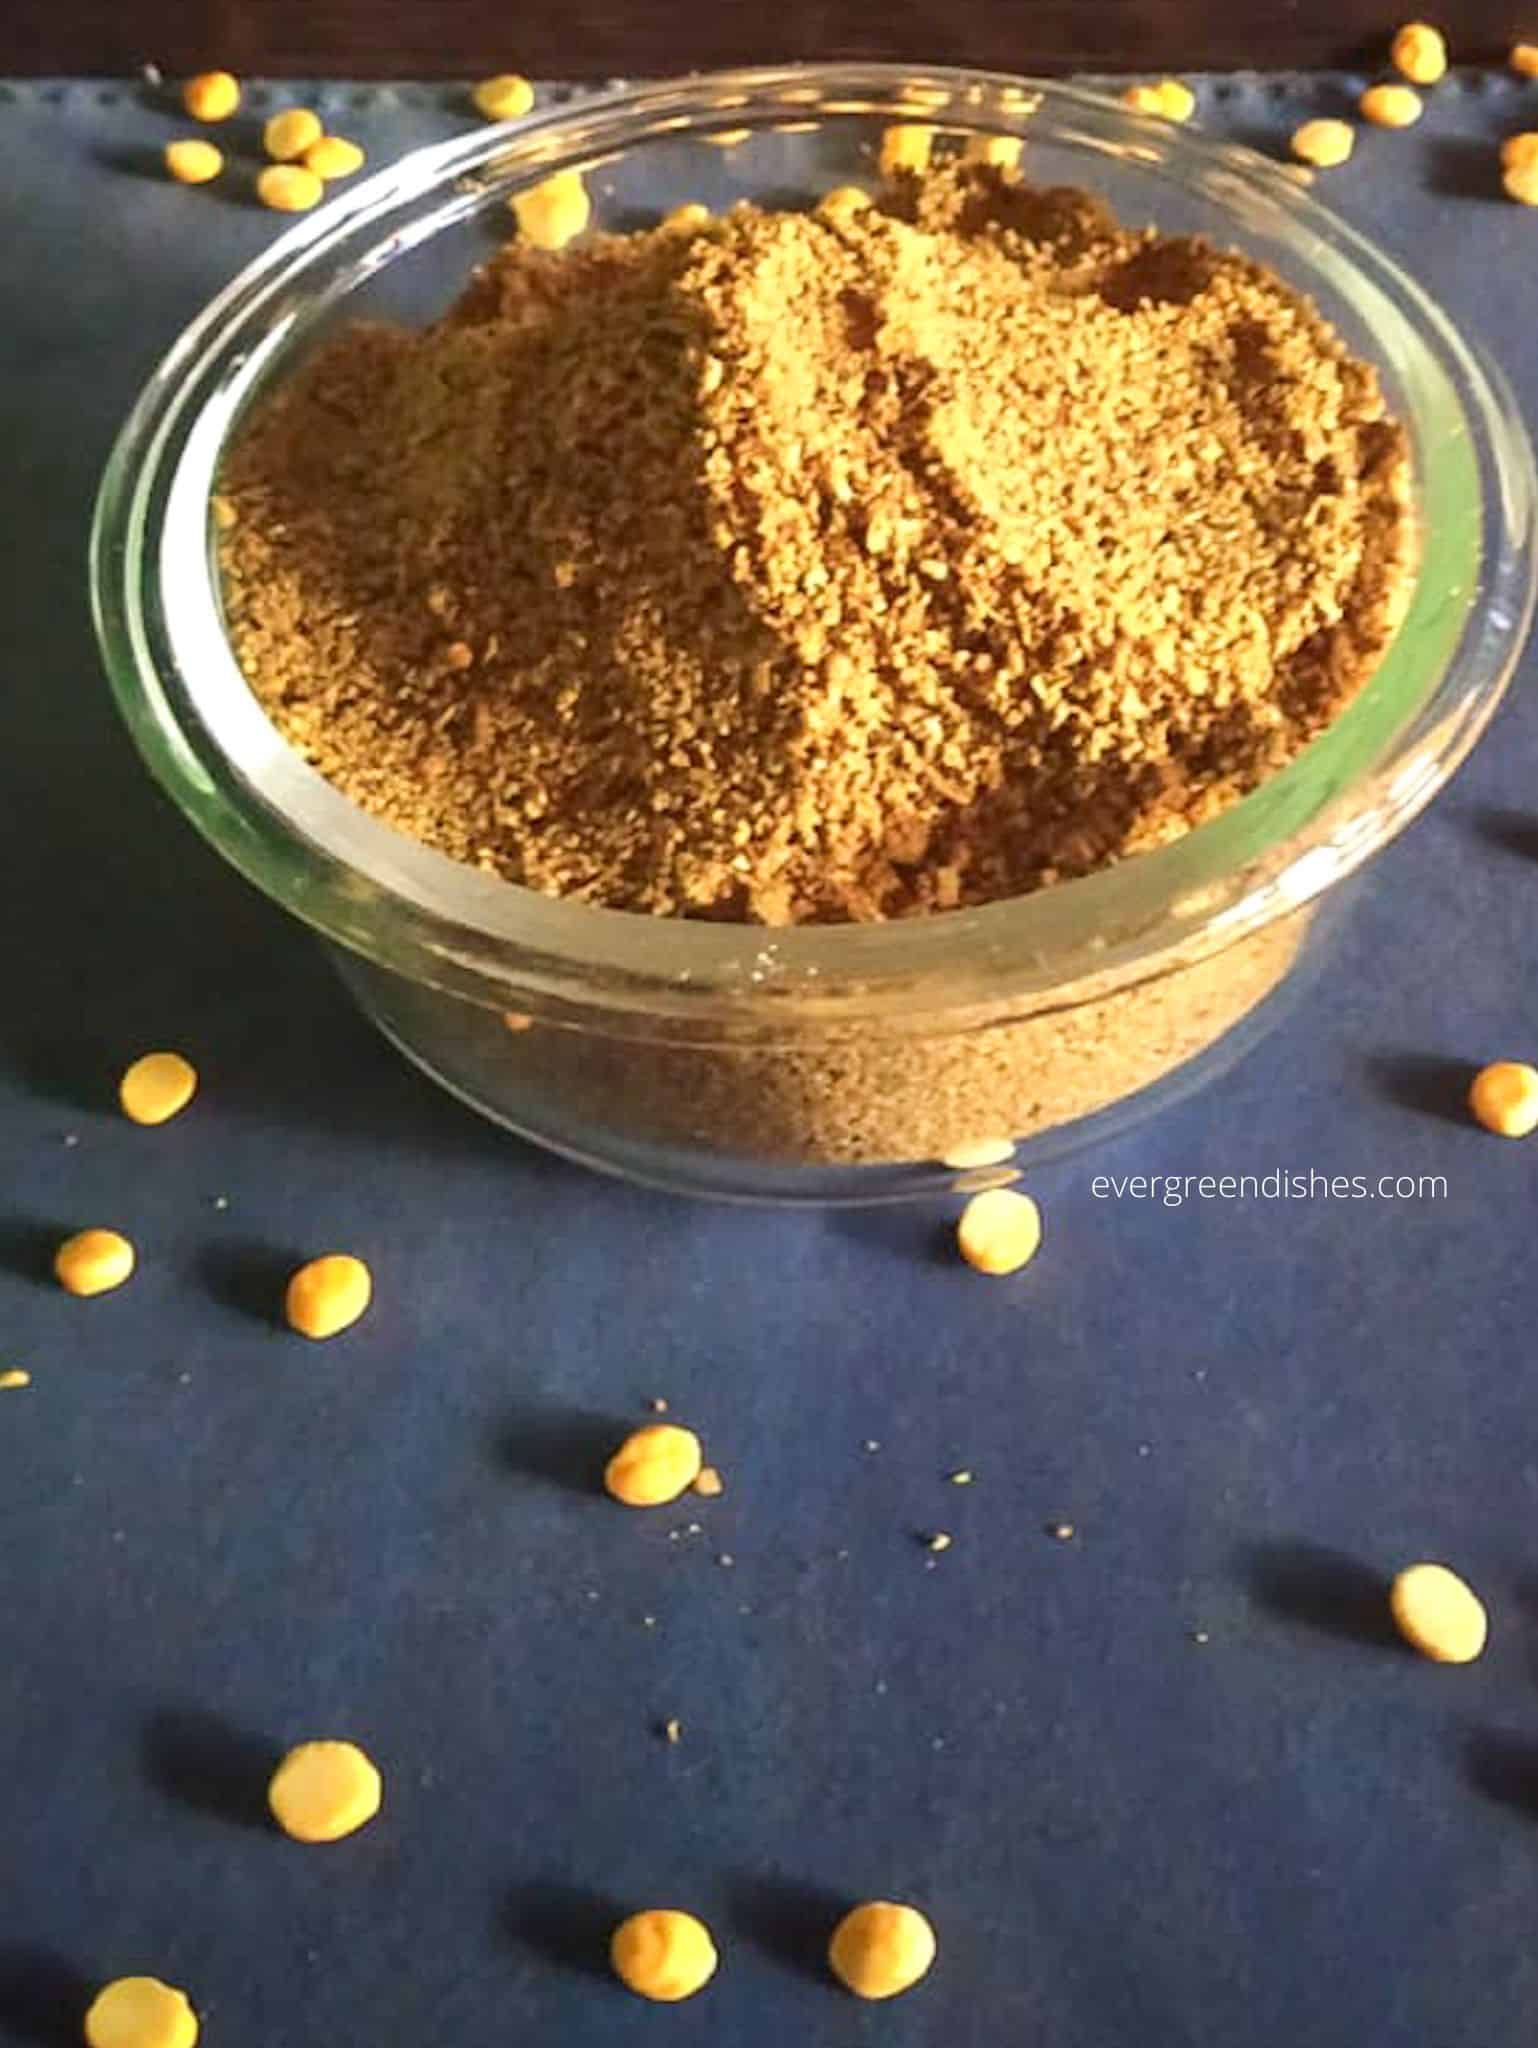
    Bengal gram– It is one of the essentials in south indian cooking. It gives a good taste and texture to the stir fry.
    Urad dal– It is another essential ingredient. To make it quicker, roast bengal gram for a few seconds, later tip in the urad dal.
    Dessiccated coconut – We cannot cook without coconut. It is used in most of the dishes in some or the other form. Grated or finely cut? It is a personal choice, but ensure you roast them well.
    Red Chilli– Dry red chilli or chilli powder may be used. I prefer using these dry red chilli.


    South Indian Vegetable Spice Mix | Palyada Pudi 


    Ingredients:

    • 3 cup coriander seed
    • 1 cup curry leaves
    • 1 cup urad dal
    • 1 cup bengal gram
    • 1 cup desiccated coconut
    • 15 red chilli
    • oil            

    Method:

    1. In a thick bottom pan,roast the coconut. It should be golden brown in colour.
    2. In the same pan, add a teaspoon of oil and roast the coriander seed along with curry leaves. Keep tossing them, the tiny seeds get easily burnt.
    3. Now you need yo roast the lentils. Add a little oil and roast bengal gram. Once it is slightly done, put the urad dal in it. Roast both of them together.
    4. Finally, roast the chillies with a little oil.
    5. Once, all the ingredients are at room temperature, grind them. At first, grind the lentils, then add red chilly to it. Finally, add coconut and coriander seed to it and give a pulse.
    6. Vegetable Spice mix is now ready to use.Store it in a dry, air tight container.
     
    south indian vegetable spice mix
    south indian vegetable spice mix


    Vegetable Spice Mix | Palyada Pudi

    Vegetable Spice Mix is one of the essentials in South Indian households. It is versatile to use. 3 cup coriander seed
    Prep Time 10 minutes
    Cook Time 20 minutes
    Total Time 30 minutes
    Course: condiments, spice mix
    Cuisine: karnataka

    Ingredients
      

    • 3 cup coriander seed
    • 1 cup urad dal
    • 1 cup bengal gram
    • 1 cup desiccated coconut
    • 15 red chilli
    • oil
    • 1 cup curry leaves

    Method
     

    1. In a thick bottom pan,roast the coconut. It should be golden brown in colour.
    2. In the same pan, add a teaspoon of oil and roast the coriander seed along with curry leaves. Keep tossing them, the tiny seeds get easily burnt.
    3. Now you need yo roast the lentils. Add a little oil and roast bengal gram. Once it is slightly done, put the urad dal in it. Roast both of them together.
    4. Finally, roast the chillies with a little oil.
    5. Once, all the ingredients are at room temperature, grind them. At first, grind the lentils, then add red chilly to it. Finally, add coconut and coriander seed to it and give a pulse.
    6. Vegetable Spice mix is now ready to use.

    Notes

    Once cool, store in a clear, air-tight container.

    If you ever make this vegetable spice mix recipe,  do take a picture and tag @foodiejayashree on Instagram or @evergreendishes on Facebook or Twitter. I will be glad to see your creation and share it further. Let’s be connected, do follow on social media platforms. Until next time, let’s stay connected.  Subscribe to get all updates and an e-book for free. Check out my e-books on Amazon.  Happy Cooking!

    Pin it for later:


    South Indian Vegetable Spice Mix is a flavoursome condiment to store at home. it can be used in stir fry, dal and even rice dishes.
    South Indian Vegetable Spice Mix
  • Multi Millet Dhokla | How to make multi-millet dhokla

    Multi Millet Dhokla | How to make multi-millet dhokla

    Multi millet dhokla is soft, spongy and tasty. It is ideal to serve as an evening snack or breakfast. It is a healthy twist to the usual dhokla. 

    With the awareness of the benefits of millets, each one is trying to include them in every possible. These days, I make jowar roti at least once a week. Ragi dosa is loved by all and I make it regularly at home. Ragi idli is healthy and ideal for quick breakfast. 

    The love for dhokla is never ending. Although I love the fermented ones, I still make these instant dhokla also. They are a quick fix, ready in thirty minutes and most of the times, my dinner is sorted. Earlier, I have shared are  corn dhokla, oats dhokla and rava dhokla

    Multi millet flour is easily available in super markets. It is a good way to get the benefit of various millets. Here, is a multi-millet thalipeeth ideal for breakfast. 


    multi millet dhokla
    multi millet dhokla

    Ingredients for Multi- Millet Dhokla 

    • 1 cup millet flour
    • 1 cup gram flour
    • 1 cup curds
    • salt
    • ginger green chilli paste
    • water 

    For seasoning:

    • 2 teaspoon oil
    • 1/2 teaspoon mustard seed
    • asafoetida
    • 1 green chilli 
    • 1 teaspoon curd with 1 tablespoon water

    The method of making the dhokla is shown in the video clearly. 


    1. In a bowl, add millet flour and gram flour. Take curds and  mix it. Add a little water if needed.
    2. Put salt and ginger- green chilli paste to it. Keep it aside for ten minutes.
    3. Set the steamer ready. Grease a plate. Add eno fruit salt to it, mix pour into the plate and put it in the steamer.
    4. Initially, keep on medium flame, after sometime, put it on a low flame. On checking, the inserted knife should come out clean.
    5. After sometime, cut it.Make the seasoning, pour it over it along with some buttermilk.
    multi millet dhokla
    Evergreendishesdev

    Multi millet dhokla

    Multi millet dhokla is soft, spongy, savoury snack ready in an hour. It is healthy twist to the usual dhokla.
    Prep Time 10 minutes
    Cook Time 20 minutes
    Resting time 10 minutes
    Total Time 40 minutes
    Course: breakfast, lunch, snack, dinner
    Cuisine: Gujarati

    Ingredients
      

    • Ingredients:
    • 1 cup millet flour
    • 1 cup gram flour
    • 1 cup curds
    • salt
    • ginger green chilli paste
    • water
    • 1/2 teaspoon eno fruit salt
    • For seasoning:
    • 2 teaspoon oil
    • 1/2 teaspoon mustard seed
    • asafoetida
    • 1 green chilli
    • 1 teaspoon curd with 1 tablespoon water

    Method
     

    1. In a bowl, add millet flour and gram flour. Take curds and  mix it. Add a little water if needed.
    2. Put salt and ginger- green chilli paste to it. Keep it aside for ten minutes.
    3. Set the steamer ready. Grease a plate. Add eno fruit salt to it, mix pour into the plate and put it in the steamer.
    4. Initially, keep on medium flame, after sometime, put it on a low flame. On checking, the inserted knife should come out clean.
    5. After sometime, cut it.Make the seasoning, pour it over it along with some buttermilk.

    Pin it for later: 

    Multi millet dhokla is a healthy twist to the usual one. It is ideal to serve as a snack or breakfast dish.
    multi millet dhokla

    If you ever make this multi millet dhokla recipe or any of my other dishes,  do take a picture and tag @foodiejayashree on Instagram or @evergreendishes on Facebook or Twitter. I will be glad to see your creation and share it further. Let’s be connected, do follow on social media platforms. Until next time, let’s stay connected.  Subscribe to get all updates and an e-book for free. Check out my e-books on Amazon.  Happy Cooking !

  • Sabudana Kheer / Sabakki Payasam

    Sabudana Kheer / Sabakki Payasam

    Sabudana Kheer / Sabakki Payasam is a tasty and easy to make Indian dessert. Tapioca pearls are used to make a delicious kheer, ideal for fasting days. 

    Sabudana is called as sago, rabia and saksak in different parts of the world. It is a starch extracted from the pith of tropical palm trees. The making of sago pearls is an exhaustive process. It is used mainly as a fasting food. Here is another kind of dish you can enjoy with sabudana. I have many good memories associated with this dish. Sabudana kheer is ideal on fasting or festive days. It is good to serve for fussy children. It is a sweet dish one can prepare without any hassle. 

    Unlike the other payasam, the method involved is slightly different. The soaked sabudana are cooked in water and later milk is added to it and sweetened with sugar. The prior cooking helps in softening the sago pearls.

    Sabudana Kheer is ideal for:

    • fasting days
    • festive time
    • as a dessert for family time
    • for fussy children who refuse to eat
    • make ahead sweet for get-together
    sabudana kheer / sago payasam is a delicious, easy to make Indian dessert. Tapoica pearls are cooked in milk to make a tasty kheer. Give a try to this sweet dish.
    Sabudana Kheer / Sago Payasam

    Ingredients:


    1/2 cup sago   (measurement: 1 cup= 250 ml)
    1/2 cup water
    1/2 cup milk
    1/2 cup sugar
    10 almonds
    1/4 teaspoon cardamom powder
    a few strands of saffron

    Method: 

    1. Clean the sago, wash it and soak  for half an hour.
    2. Boil it in half cup of water on a medium flame. The pearls  should be soft and translucent. 
    3. Add milk to it. Put a few strands of  saffron to it. 
    4. Let boil for sometime. Keep stirring in between, it may get burnt. 
    5. Add sugar to it.
    6. Make powder of almonds and put it in the kheer. 
    7. Once it thickens slightly, remove from flame.  Finally, add cardamom powder. You can serve it warm or chilled. 

    Take a tip:

    • Dry fruits like cashew and almonds pieces can be roasted in ghee and garnished.
    • The kheer gets thicker on cooling. Keep the consistency moderately thin while cooking.
    • Sago pearls may be boiled in milk but they do not cook so well. 

    The other sweet recipes for the festive season are : Badam puri, Khaja, Shenga Holige, Kadabu

    sabudana kheer / sago payasam

    Sabudana Kheer / Sago Payasam

    Sabudana Kheer is a delicious sweet ideal as a quick-fix dessert. It can be made ahead and stored.
    Prep Time 5 minutes
    Cook Time 15 minutes
    Soaking time 30 minutes
    Total Time 50 minutes
    Servings: 4 cups
    Course: fasting recipe, festive sweet, sweets
    Cuisine: Indian

    Ingredients
      

    • 1/2 cup sago
    • 1/2 cup water
    • 1/2 cup milk
    • 1/2 cup sugar
    • 10 almonds
    • 1/4 teaspoon cardamom powder
    • a few strands of saffron

    Method
     

    1. Clean the sago, wash it and soak  for half an hour.
    2. Boil it in half cup of water on a medium flame. The pearls  should be soft and translucent.
    3. Add milk to it. Put a few strands of  saffron to it.
    4. Let boil for sometime. Keep stirring in between, it may get burnt.
    5. Add sugar to it.
    6. Make powder of almonds and put it in the kheer.
    7. Once it thickens slightly, remove from flame.  Finally, add cardamom powder. You can serve it warm or chilled.

    Notes

    Dry fruits like cashew and almonds pieces can be roasted in ghee and garnished.
    The kheer gets thicker on cooling. Keep the consistency moderately thin while cooking.
    Sago pearls may be boiled in milk but they do not cook so well. 

    Pin it for later:

    sabudana kheer/ sago payasam
    Sabudana kheer/ sago payasam

    If you ever make this Sabudana Kheer recipe or any of my other dishes,  do take a picture and tag @foodiejayashree on Instagram or @evergreendishes on Facebook or Twitter. I will be glad to see your creation and share it further. Let’s be connected, do follow on social media platforms. Until next time, let’s stay connected.  Subscribe to get all updates and an e-book for free. Check out my e-books on Amazon.  Happy Cooking !

  • Rumali Roti | Roomali Roti recipe

    Rumali Roti | Roomali Roti recipe

    Jump to Recipe Print Recipe

    Rumali Roti / Roomali roti is a soft, thin, unleavened flat bread from Indian sub-continent. Roomal translates to a handkerchief, these rotis are thin and may be folded as a hand- kerchief, hence the name.

    Rumali roti is also known as Manda roti. In Punjab, it is called as lamboo roti. The roti is made into a thin, long flatbread, hence the name.

    It is usually made with all-purpose flour. A mix of wheat flour and maida too gives a good one.


    Rumali Roti / Roomali Roti
    Rumali Roti /Roomali Roti


    The other kind of flat breads shared earlier are potato and peas paratha, zucchini paratha, gujarati thepla, masala paratha, mint paratha

    A few side dish to pair with it are Alu Palak, Dal Palak, Malai Kofta, Dum AlooMethi Chaman

    On a busy day, you can make this Rumali roti and pair it with Butter Paneer Masala from Alco Foods. They also have Royal Paneer and Paneer with Onion and Capsicum which are delicious. Children will be happy with these curries. 


    Let us get to the  Rumali Roti / Roomali Roti recipe


    Ingredients:


    2 cup wheat flour
    1/2 cup maida
    1 teaspoon ghee
    salt
    1.25 cup water
    2 teaspoon oil

    Equipments: 

    pan, rolling pin, kadai, 


    Method:

    1. In a wide bowl, take wheat flour and maida. Add salt and ghee to it and mix well. 
    2.  Using a small quantity of water at a time, mix the dough. 
    3. Smear a little oil over the dough, cover it with a muslin cloth and keep it aside for an hour. 
    4. Remove the dough, knead it again for sometime. 
    5. Take a ball, dust it with a little flour and roll it into a thin roti.
    6. Heat a kadai. Once it is hot, put the rolled roti over it, cook it on a  slow to medium flame.   Press the edges, lightly with a thin cloth. 
    7. Once it is cooked, flip it to the other side and let cook for sometime. After  a few spots are visible, it is done.
    8. Serve it hot with any curry. 

    Take a tip: 

    • You may use only maida.
    • These rotis are best served hot. They turn crisp if left for sometime.
    • Do not use non-stick kadai. Iron kadai is the best. 
    Rumali Roti / Roomali Roti
    Evergreendishesdev

    Rumali Roti / Roomali Roti

    Rumali Roti is a soft, unleavened flatbread. It is ideal to serve with any curry.
    Prep Time 20 minutes
    Cook Time 40 minutes
    2 hours
    Total Time 3 hours
    Servings: 4 people
    Course: dinner, lunch
    Cuisine: north indian

    Ingredients
      

    • 2 cup wheat flour
    • 1/2 cup maida
    • 1 teaspoon ghee
    • salt
    • 1.25 cup water
    • 2 teaspoon oil

    Equipment

    • pan
    • rolling pin
    • kadai
    • small plate
    • bowl

    Method
     

    1. In a wide bowl, take wheat flour and maida. Add salt and ghee to it and mix well.
    2. Using a small quantity of water at a time, mix the dough.
    3. Smear a little oil over the dough, cover it with a muslin cloth and keep it aside for an hour.
    4. Remove the dough, knead it again for sometime.
    5. Take a ball, dust it with a little flour and roll it into a thin roti.
    6. Heat a kadai. Once it is hot, put the rolled roti over it, cook it on a  slow to medium flame.   Press the edges, lightly with a thin cloth.
    7. Once it is cooked, flip it to the other side and let cook for sometime. After  a few spots are visible, it is done.
    8. Serve it hot with any curry.

    Notes

    You may use only maida.
    These rotis are best served hot. They turn crisp if left for sometime.


    Pin it for later:

    Rumali Roti/ Roomali Roti is a soft, unleavened flatbread. It is ideal to serve for lunch or dinner.
    Rumali Roti / Roomali Roti

    If you ever make this Lemon Rasam   recipe or any of my other dishes,  do take a picture and tag @foodiejayashree on Instagram or @evergreendishes on Facebook or Twitter. I will be glad to see your creation and share it further. Let’s be connected, do follow on social media platforms. Until next time, let’s stay connected.  Subscribe to get all updates and an e-book for free. Check out my e-books on Amazon.  Happy Cooking !


  • Lemon Rasam / Nimbehannina Saru

    Lemon Rasam / Nimbehannina Saru

    Jump to Recipe Print Recipe

    Lemon Rasam  is another kind of rasam made during monsoon days. The citrusy flavour with the aroma of fresh herbs is tasty and soothing. It is a healthy and comfort food for many people. The ease and simplicity of the recipe makes it a go to recipe. 

    Rasam, as we all know is a lentil based, soup like dish tempered with spices. It is popular in South India and pairs well with hot, steamed rice. Sometimes, it is the simplest of the food like this,  gives immense comfort. I remember, after eating out for a week during our trips, it was simple, home cooked food we longed the most. The rasam varieties shared earlier are drumstick rasam, mysore rasam, andhra rasam

    Lemon Rasam is  a simple yet flavoursome dish, it makes a good accompaniment with hot steamed rice. One can use it as a soup too. . There is hardly any rasam powder used, no tamarind and no garlic too.  If you have not tried it yet, do give a try,  The herbs and lemon give a good taste to it. Every household has its own lemon rasam recipe. Some use moong dal instead of tur dal while others do not add any pepper. However, ,the basic ingredients of tomato, ginger, coriander, green chillies and lemon remain the same. 

    lemon rasam
    lemon rasam

    About the  event: 

    It’s raining  and we at Shhh Secretly Cooking Challenge have a host of monsoon recipes. The theme was suggested by Shobha Keshwani. She is a wonderful blogger who showcases many kinds of recipes on her blog. I want to try her Adraki Aloo.   Coincidentally, she is my partner too for the challenge. She has given me ghee and asafoetida and I have made this recipe. I had given her ginger and pepper and she has made a unique Drumstick soup

    shhh cooking secretly

    Let’s get to the  Lemon Rasam Recipe: 

    Ingredients:

    • 4 cups water
    • 2 tomatoes
    • 1 inch ginger
    • 3 green chilli
    • 1/2 teaspoon turmeric powder
    • a few curry leaves
    • 1/4 cup coriander leaves
    • 1/2 cup tur dal
    • 1 lemon
    • salt to taste


    For tempering:


    • 1 teaspoon ghee
    • 1/2teaspoon mustard seed
    • 1/2 teaspoon cumin
    • 1/4 teaspoon asafoetida
    • 1 red chilly
    • a few curry leaves
    • 1/2 teaspoon pepper powder


    Method:

    1. Wash the tur dal and cook it in a pressure cooker with a little turmeric powder. It should be soft and well cooked. 
    2. Take water in a pan, add tomato pieces, grated ginger, slit green chilli, turmeric powder, coriander and curry leaves to it. Boil them for sometime. The tomatoes should be well cooked. 
    3. Mash the dal well with the back of the ladle. Add it to the boiled broth along with salt.
    4. Make seasoning. In a small pan, take ghee, add mustard seeds. As they splutter put asafoetida and turmeric powder, throw in the red chilly, a few curry leaves and pepper powder. Put the tempering into the rasam. 
    5. Once it boils,  put lemon juice to it and remove from stove. 
    6. Lemon rasam is ready to serve. 

    Take a tip: 

    • Do not skip adding ginger, green chilli, coriander and curry leaves.
    • Use fresh coriander. Chop it finely.
    • Quantity of green chilli may be adjusted. 
    • Rasam can be used as a soup on a cold winter night. 

    Video Recipe is here : 


    lemon rasam
    Evergreendishesdev

    Lemon Rasam

    Lemon rasam is another variety of rasam. It is tasty and makes a good food during monsoon.
    Prep Time 10 minutes
    Cook Time 20 minutes
    Total Time 30 minutes
    Course: lunch ideas, Main Course
    Cuisine: karnataka, South Indian

    Ingredients
      

    • 4 cups water
    • 2 to matoes
    • 1 inch ginger
    • 3 green chilli
    • 1/2 teaspoon turmeric powder
    • a few curry leaves
    • 1/4 cup coriander leaves
    • 1/2 cup tur dal
    • 1 lemon
    • salt to taste
    • For tempering:
    • 1 teaspoon ghee
    • 1/4 teaspoon mustard seed
    • 1/4 teaspoon asafoetida
    • 1 red chilly
    • a few curry leaves
    • 1/2 teaspoon pepper powder

    Equipment

    • pressure cooker
    • pan
    • ladle

    Method
     

    1. Wash the tur dal and cook it in a pressure cooker with a little turmeric powder. It should be soft and well cooked.
    2. Take water in a pan, add tomato pieces, grated ginger, slit green chilli, turmeric powder, coriander and curry leaves to it. Boil them for sometime. The tomatoes should be well cooked.
    3. Mash the dal well with the back of the ladle. Add it to the boiled broth along with some salt.
    4. Make seasoning. In a small pan, take ghee, add mustard seeds. As they splutter put asafoetida and turmeric powder, throw in the red chilly, a few curry leaves and pepper powder. Put the tempering into the rasam.
    5. Once it boils,  put lemon juice to it and remove from stove.
    6. Lemon rasam is ready to serve.

    Notes

    • Do not skip adding ginger, coriander, curry leaves and green chilli. They give a good flavour to it. 
    • Use fresh coriander leaves and chop them finely. Remove the grime by putting in water.
    • Quantity of green chilli can be adjusted as per preference. 
    • You can use it as a soup on a cold winter night. 
    Lemon rasam/ nimbehannina saaru is a comfort food during monsoon and winter season. It is ideal to serve for a quick lunch or dinner.
    lemon rasam / nimbehannina saaru

    If you ever make this Lemon Rasam   recipe or any of my other dishes,  do take a picture and tag @foodiejayashree on Instagram or @evergreendishes on Facebook or Twitter. I will be glad to see your creation and share it further. Let’s be connected, do follow on social media platforms. Until next time, let’s stay connected.  Subscribe to get all updates and an e-book for free. Check out my e-books on Amazon.  Happy Cooking !

  • Rawa Kesari | Sheera | Prasad recipe

    Rawa Kesari | Sheera | Prasad recipe

    Jump to RecipePrint Recipe

    Rawa Kesari is quite often prepared in most households. It is called by different names as Rawa Kesari, Sheera or as Sooji ka halwa in different parts of the country. In South India, Sheera is made as offering during the Satyanarayan Pooja. 

    The ease of making it and the different flavours which one can impart to it makes it a favourite of every household. It is ideal to pair with breakfast, lunch or dinner. In olden times,  kesari with jaggery was often made.  Earlier, I have shared mango kesari.

    The method of making the sheera as offering is different from the usual one. It is tasty and different from the usual one. Today, I am sharing the recipe of the same.
    rawa kesari/ sheera/ satyanarayan prasad


    Let us get to the recipe of Rawa Kesari / Sheera

    Ingredients :


    1 cup semolina ( measurement used :1 cup=200ml)
    2 teaspoon + 2 tablespoon ghee
    8 cashew
    1 cup water
    2 cup milk
    1 banana
    1 cup sugar
    a few strands of saffron
    1/4 teaspoon cardamom powder


    Method:

    • Take a thick bottom pan, add two teaspoon of ghee and roast the semolina to a golden colour along with cashew pieces. Be careful not to burn it.
    • Put the saffron in a little milk and set it aside.Cut thee bananana into pieces.
    • In another pan, add milk and water, put it on a low flame. Add sugar and ghee to it. Put banana pieces to it. Give a stir, once it boils, slowly add the semolina to it. Keep stirring with a ladle, no lumps should be formed. Let cook for sometime..
    • Add saffron soaked in milk  and cardamom powder to it. Give a stir. Rawa Kesari or Sheera is ready to offer to the Lord.

    Take a tip:

    • You can add a little extra ghee to it. 
    • Almonds and raisins may be used. 
    • You can roast the nuts separately in the beginning. 
    rawa kesari/ sheera/ satyanarayan prasad
    Evergreendishesdev

    Rawa Kesari / Sheera / Satyanarayan Prasad

    Rawa Kesari is a traditional sweet dish from Indian sub-continent. This version is also prepared during Satyanarayan Pooja.
    Prep Time 5 minutes
    Cook Time 15 minutes
    Total Time 20 minutes
    Servings: 6 people
    Course: Breakfast, dinner, lunch
    Cuisine: Indian, South Indian

    Ingredients
      

    • 1 cup semolina measurement used :1 cup=200ml
    • 2 teaspoon + 2 tablespoon ghee
    • 8 cashew
    • 1 cup water
    • 2 cup milk
    • 1 banana
    • 1 cup sugar
    • a few strands of saffron
    • 1/4 teaspoon cardamom powder

    Method
     

    1. Take a thick bottom pan, add two teaspoon of ghee and roast the semolina to a golden colour along with cashew pieces. Be careful not to burn it.
    2. Put the saffron in a little milk and set it aside.Cut thee bananana into pieces.
    3. In another pan, add milk and water, put it on a low flame. Add sugar and ghee to it. Put banana pieces to it. Give a stir, once it boils, slowly add the semolina to it. Keep stirring with a ladle, no lumps should be formed. Let cook for sometime..
    4. Add saffron soaked in milk  and cardamom powder to it. Give a stir. Rawa Kesari or Sheera is ready to offer to the Lord.

    Notes

    You can add a little extra ghee to it. 
    Almonds and raisins may be used. 
    You can roast the nuts separately in the beginning. 

    Pin it for later:

    Rawa kesari | Sheera | Prasad recipe is an offering made to the Lord during Satyanarayan Puja. It is tasty dish. Give a try to this version of prasad recipe.
    Rawa Kesari / Sheera

    If you ever make this Rawa Kesari / Sheera recipe, take a picture and tag  @foodiejayashree on Instagram or @evergreendishes on Facebook or Twitter. I will be happy to see your creation and share them further. Subscribe to get all updates and book of handyhints for free.

  • Menthe Matvadi Palya | Matodi Palya | Karnataka recipes

    Menthe Matvadi Palya | Matodi Palya | Karnataka recipes

    Jump to Recipe 

    Menthe Matvadi Palya / Matodi Palya  is a traditional side dish from Karnataka. Fenugreek leaves are cooked along with ground paste of bengal gram to make this delicious accompaniment. It is a no onion garlic recipe. It is vegan and makes a healthy side dish. A delicious side dish, one can eat it as a snack too. 

    It is one of the heirloom recipes, I wanted to post it since a long time and it is on my blog today.  Menthe Matodi Palya  is a dish you make it once in a way and enjoy, it needs good amount of oil to cook and ample time also. Thus, one needs to be liberal with the use of oil here.  It pairs well with steamed rice or one can serve it as a side dish along with rice and rasam. It may eaten by itself as a snack too. 

    I love using fenugreek leaves in my cooking as it gives a good flavour to many dishes. Moreover, it is rich in nutrients as Vitamin K, Vitamin C, Vitamin A, folate, Riboflavin and Pyridoxine. It also contains many antioxidants. It is low in calories. It helps to control diabetes and anaemia. It is good for the digestive system.

    menthe matvada palya

    About the event: 

    It’s time for Shhh Secretly Cooking Challenge post. The theme for the month of June was suggested by Seema Doraiswamy Sriram as ” Fear Not The Bitter”. Seema is a wonderful blogger who blogs at Mildly Indian. She  has many delicious recipes with a good twist in them. I love the simplicity of her cooking and bookmarked the black rice ladoo and guava chutney to make it soon.  Seema was my partner and she gave me coconut and  green chilly as the secret ingredients. But since I had not used coconut, I asked for a change and it was oil she gave me and I made this Matvadi Palya.  I had given oil and cumin as the secret ingredients to Seema  and she has made this delicious side dish Karela ka Bharta

    Karnataka recipes :

    The other karnataka recipes shared earlier on the blog are Huli Nuchu, Mixed Vegetable Kootu, Bisebelebath. Among the sweets, we cherish the traditional Ragi Halbai and Bellada Sheera.

    Let’s get to the recipe of Menthe Matvada Palya /Matodi Palya : 

    Ingredients:


    1 cup bengal gram  (Measurement used: 1 cup = 150ml) 
    2 cluster (bunch) fenugreek leaves
    5 green chilly
    water (little)
    3 tablespoon oil
    1/2 teaspoon mustard
    asafoetida
    1/4 teaspoon turmeric powder
    salt

    Method:


    1.Wash and soak bengal gram for two hours.
    2. Separate the fenugreek leaves. Chop them and put them in water. Clean it several times to remove the grime.
    3.Remove the bengal gram from water and grind it along with green chilly. Add little water while grinding.
    4. Heat oil in a pan, add mustard seeds. As it splutters, put asafoetida and turmeric powder to it. Now, put the fenugreek leaves. Let them cook for a minute. Once the methi leaves are cooked, add the ground mixture to it. Put salt and mix it. Let it cook on a low flame. Keep on stirring with a ladle, otherwise, the wet mixture forms a mass and  it will stick to the pan. All the efforts  turn to be a waste.  From the wet mixture, it cooks to a dry, delicious curry. It needs at least ten to fifteen minutes to cook perfectly. A perfectly cooked dish is dry and grainy. 


    Take a tip: 

    • Add very little  water to grind it to a coarse paste.
    • Coconut and ginger may be added while grinding. I have not added. 
    • A little cumin may be put in the seasoning.
    Print Recipe

    Menthe Matodi Palya

    Menthe Matodi Palya is a delicious side dish from Karnataka. It is a , healthy, vegan, no onion garlic, side dish.
    Prep Time 15 minutes
    Cook Time 20 minutes
    Soaking time 30 minutes
    Total Time 1 hour 5 minutes
    Course: dinner, lunch
    Cuisine: karnataka, South Indian

    Ingredients
      

    • 1 cup bengal gram
    • 2 cluster bunch fenugreek leaves
    • 5 green chilly
    • water little
    • 3 tablespoon oil
    • 1/2 teaspoon mustard
    • asafoetida
    • 1/4 teaspoon turmeric powder
    • salt

    Method
     

    1. 1.Wash and soak bengal gram for two hours.
    2. Separate the fenugreek leaves. Chop them and put them in water. Clean it several times to remove the grime.
    3. 3.Remove the bengal gram from water and grind it along with green chilly. Add little water while grinding.
    4. Heat oil in a pan, add mustard seeds. As it splutters, put asafoetida and turmeric powder to it. Now, put the fenugreek leaves. Let them cook for a minute. Once the methi leaves are cooked, add the ground mixture to it. Put salt and mix it. Let it cook on a low flame. Keep on stirring with a ladle, the wet mixture forms a mass and  it will stick to the pan. All the efforts will turn to be a waste.  From the wet mixture, it cooks to a dry, delicious curry. It needs at least ten to fifteen minutes to cook.

    Notes

    Add very little  water to grind it to a coarse paste.
    Coconut and ginger may be added while grinding. I have not added. 
    A little cumin may be put in the seasoning.

    Pin it for later: 

    Menthe Matvada Palya is one of the heirloom recipes. It is a tasty side dish ideal to pair with rice and rasam.
    Menthe Matvada Palyaacc


    If you ever make this Menthe Matvadi  recipe or any of my other dishes,  do take a picture and tag @foodiejayashree on Instagram or @evergreendishes on Facebook or Twitter. I will be glad to see your creation and share it further. Let’s be connected, do follow on social media platforms. Until next time, let’s stay connected.  Subscribe to get all updates in your inbox. Happy Cooking !

  • Veg manchurian | dry veg manchurian recipe

    Veg manchurian | dry veg manchurian recipe

    Jump to Recipe Print Recipe

    Veg Manchurian is a popular Indo-Chinese snack. It is often served as an appetiser or an evening snack. It is delicious, bursting with many flavours of hot, sweet and spicy making it simply irresistible.  Vegetable balls are deep fried and cooked in a medley of sauces, it makes a good appetizer. This is the recipe of dry veg manchurian.

    Indo-Chinese cuisine is loved by many Indians. It is a cuisine which is made suitable to the Indian taste. Earlier I have shared hakka noodles  and veg fried rice  a favourite of my children. The other recipes shared are gobi manchurian, Alu 65, healthy carrot soup, vegetable manchow soup

    The popularity of gobi manchurian or veg manchurian is spread throughout the country. It is a street food which is served at many places. It overtook the popularity of bhel puri and sev puri among college students. 

    Veg Manchurian Recipe

    Ingredients:


    For the balls:

    • 1 onion
    • 2 carrot grated
    • 1/2 head cauliflower
    • 2 potato peeled and grated
    • 10 beans
    • 1/2 capsicum
    • 1/2 tsp pepper powder
    • salt
    • 1.5 tbsp cornflour
    • 1.5 tbsp maida

    For the manchurian sauce:

    • 1 tbsp tomato sauce
    • 1/2 tbsp soya sauce
    • 1.5 tbsp red chilli sauce
    • 1/2 tsp vinegar
    • 1 tbsp cornflour
    • 2 tbsp water
    • oil
    • 6 cloves garlic
    • 1 inch ginger
    • 1/2 capsicum
    • 1 onion
    •  

    Method :

    To make the balls :

    1. Cut the cauliflower florets and put them in water with a little salt and turmeric. After ten minutes, remove it, put  in a colander for sometime and grate it.
    2. Chop the onion finely.
    3. Grate the carrot.
    4. Peel the potato and grate it. Put it in water to avoid discolouration.
    5. Cut beans and capsicum into small bits.
    6. In a bowl, add all the vegetables, salt, pepper powder, cornflour, maida and mix them together to form a dough like substance. If the mixture is dry, use little water. 
    7. Heat oil in a pan, take a small quantity of the mixture and shape into a ball.
    8. Once the oil is hot, add a few balls and deep fry on medium heat until golden in colour. Keep tossing them in between with the slotted spoon.
    9. Remove them and repeat for the rest of the mixture. 

    To make the dry manchurian sauce :

    1. Grate ginger and cut garlic into small pieces. Cut onion into small pieces, keep it separately.
    2. Mix tomato sauce, soy sauce, red chilli sauce and vinegar in a bowl.
    3. Mix cornflour with a small quantity of water. 
    4. Take oil in a pan, add ginger and garlic to it. Saute for sometime, take care not to burn them.  Now, add onion to it, continue to saute. Once it is slight pink in colour, throw in the capsicum pieces to it. 
    5. Cook for two minutes, let it be a little crunchy. Put the sauce mixture to it. Add little salt as the sauces contain salt in them. Now, put the corn flour slurry to it and give a stir. After a minute, once it boils switch off the flame and put the fried balls to it. Mix it properly. Garnish with spring onion greens. 

    Take a tip:

    • Cabbage is usually used in veg manchurian. 
    • Spring onion is also used in this dish. It is garnished with spring onion leaves. 
    • You can use vegetables of your choice to make the balls. Cut them finely into small bits. 
    • You can add the sauces directly to the pan while cooking. 
    veg manchurian
    veg manchurian
    veg manchurian

    Veg Manchurian

    Veg Manchurian is a tasty snack dish from Indo-Chinese cuisine. It is usually served as a starter.

    Ingredients
      

    • For the balls:
    • 1 onion
    • 2 carrot grated
    • 1/2 head cauliflower
    • 2 potato peeled and grated
    • 10 beans
    • 1/2 capsicum
    • 1/2 tsp pepper powder
    • salt
    • 1.5 tbsp cornflour
    • 1.5 tbsp maida
    • For the manchurian sauce:
    • 1 tbsp tomato sauce
    • 1/2 tbsp soya sauce
    • 1.5 tbsp red chilli sauce
    • 1/2 tsp vinegar
    • 1 tbsp cornflour
    • 2 tbsp water
    • oil
    • 6 cloves garlic
    • 1 inch ginger
    • 1/2 capsicum
    • 1 onion

    Method
     

    1. To make the balls :
    2. Cut the cauliflower florets and put them in water with a little salt and turmeric. After ten minutes, remove it, put  in a colander for sometime and grate it.
    3. Chop the onion finely.
    4. Grate the carrot.
    5. Peel the potato and grate it. Put it in water to avoid discolouration.
    6. Cut beans and capsicum into small bits.
    7. In a bowl, add all the vegetables, salt, pepper powder, cornflour, maida and mix them together to form a dough like substance. If the mixture is dry, use little water.
    8. Heat oil in a pan, take a small quantity of the mixture and shape into a ball.
    9. Once the oil is hot, add a few balls and deep fry on medium heat until golden in colour. Keep tossing them in between with the slotted spoon.
    10. Remove them and repeat for the rest of the mixture.
    11. To make the dry manchurian sauce :
    12. Grate ginger and cut garlic into small pieces. Cut onion into small pieces, keep it separately.
    13. Mix tomato sauce, soy sauce, red chilli sauce and vinegar in a bowl.
    14. Mix cornflour with a small quantity of water.
    15. Take oil in a pan, add ginger and garlic to it. Saute for sometime, take care not to burn them.  Now, add onion to it, continue to saute. Once it is slight pink in colour, throw in the capsicum pieces to it.
    16. Cook for two minutes, let it be a little crunchy. Put the sauce mixture to it. Add little salt as the sauces contain salt in them. Now, put the corn flour slurry to it and give a stir. After a minute, once it boils switch off the flame and put the fried balls to it. Mix it properly. Garnish with spring onion greens.

    Notes

    Cabbage is usually used in veg manchurian. 
    Spring onion is also used in this dish. It is garnished with spring onion leaves. 
    You can use vegetables of your choice to make the balls. Cut them finely into small bits. 
    You can add the sauces directly to the pan while cooking. 

    Pin it for later: 

    veg manchurian
    Veg Manchurian is a classic dish from Indo-Chinese cuisine. This is the dry version, ideal as a snack or appetizer.

    If you ever make this veg manchurian recipe, do take a picture and tag @foodiejayashree on Instagram or @evergreendishes on Facebook or Twitter. I will be glad to see your creation and share it further. Let’s be connected, do follow on social media platforms. Until next time, let’s stay connected.  Subscribe to get all updates in your inbox. Happy Cooking ! 


  • Watermelon Rind Dosa | Watermelon Rind Recipes

    Watermelon Rind Dosa | Watermelon Rind Recipes

    Jump to RecipePrint Recipe


    Watermelon Rind Dosa is a delicious and unique breakfast option. It is soft, spongy and porous.  It is vegan and gluten free  and as the name suggests watermelon rind is used in it.

    Considering the fact, watermelon rind is healthier, I don’t like to waste it. The rind is the white part of the watermelon. It is rich in fibre and aids in digestion.  Usually, I use it in a smoothie or a salad.  Of late, I have another recipe and I make this dosa also. The dosa is made slightly thick and cooked only on one side. Like the regular dosa, this needs to be fermented. This  recipe is adopted from Vinaya Prasad’s blog  Vegetarian Culinary Delights. I am active in a couple of groups on Facebook and this group is one of them. I like the enthusiasm and patience with which she runs the group. Recently, the group reached the 15000 milestone mark. 

    Watermelon Rind Dosa Recipe 

    Ingredients: 

     1. 25 cup  rice
    1/2 cup  urad dal
    1/4 cup flattened rice (poha) 
    1/2 cup   watermelon rind
    1/2 cup  fresh coconut
    1/2 teaspoon methi seeds
    oil for roasting
    water for soaking and grinding
    salt to taste


    Method:

    1. Soak rice, urad dal and methi for 4 hours.
    2. Soak flattened rice (poha) for half an hour.
    3. Cut the rind into small pieces. 
    4. Grind the soaked rice and lentil mixture to a fine batter, remove it in a bowl. Now, grind the rind pieces, soaked poha and  coconut, mix it into the batter. Add salt to it, cover and keep it in a warm place to ferment overnight or 5-6 hours.
    5. Next day, mix the batter, heat a skillet. Smear a little oil if using the cast iron. pour a ladleful of batter, spread a little oil, cover with a lid   and allow to cook. There is no need to cook the other side for this dosa. Once it is cooked, remove and serve hot with coconut chutney. Repeat for the rest of the batter. 


    Take a tip: 

    1. The dosa is made as a set dosa.  The consistency of the batter should be moderately thick.
    2. Use any kind of skillet, iron or non-stick, cover with a lid and cook. There is no need to flip  to the other side. 


    watermelon rind dosa
    watermelon rind dosa


    My family enjoys dosa any day.  Rava dosa is usually prepared during weekends. A dosa batter is handy and used in different ways. You can make masala dosa, uttapam or gundapongal. The other kind of dosa are ragi dosa, jowar dosa, set dosa, neer dosa and mixed flour dosa. 

    watermelon rind dosa

    Watermelon Rind Dosa

    Watermelon rind dosa is soft, spongy dosa. It is ideal to prepare it for breakfast.
    Prep Time 4 hours
    Cook Time 30 minutes
    Fermentation time 6 hours
    Total Time 10 hours 30 minutes
    Course: Breakfast
    Cuisine: Indian, South Indian

    Ingredients
      

    • 25 cup rice
    • 1/2 cup urad dal
    • 1/4 cup flattened rice poha
    • 1/2 cup watermelon rind
    • 1/2 cup fresh coconut
    • 1/2 teaspoon methi seeds
    • oil for roasting
    • water for soaking and grinding
    • salt to taste

    Method
     

    1. Soak rice, urad dal and methi for 4 hours.
    2. Soak flattened rice (poha) for half an hour.
    3. Cut the rind into small pieces.
    4. Grind the soaked rice and lentil mixture to a fine batter, remove it in a bowl. Now, grind the rind pieces, soaked poha and  coconut, mix it into the batter. Add salt to it, cover and keep it in a warm place to ferment overnight or 5-6 hours.
    5. Next day, mix the batter, heat a skillet. Smear a little oil if using the cast iron. pour a ladleful of batter, spread a little oil, cover with a lid   and allow to cook. There is no need to cook the other side for this dosa. Once it is cooked, remove and serve hot with coconut chutney. Repeat for the rest of the batter.

    Notes

    The dosa is made as a set dosa.  The consistency of the batter should be moderately thick.
    Use any kind of skillet, iron or non-stick, cover with a lid and cook. There is no need to flip  to the other side. 

    Pin it for later:

    Watermelon rind dosa is soft, supple and porous. It is a good way to use the rind  of the fruit which is usually discarded. Watermelon rind is rich in fibre and minerals. Give a try to this variation of dosa.
    watermelon rind dosa

    If you ever make this dosa recipe or any of my dishes,  do take a picture and tag @foodiejayashree on Instagram or @evergreendishes on Facebook or Twitter. I will be glad to see your creation and share it further. Let’s be connected, do follow on social media platforms. Until next time, let’s stay connected.  Subscribe to get all updates in your inbox. Happy Cooking ! 


  • Masala Tea Powder | Chai Masala Powder Recipe

    Masala Tea Powder | Chai Masala Powder Recipe

    Jump to Recipe Print Recipe

     Masala Tea Powder | Chai Masala Powder  is a spice mix used along with tea leaves in the preparation of tea. It makes the tea flavoursome and a good immunity booster. Masala Chai is a popular tea variety in Indian sub-continent. With the on set of monsoon, this tea is mostly preferred by all. 


    Tea is of various kind, from the simple, regular tea to Irani Tea. Since the Covid period started, it’s been a testing time for all of us. We take many precautions to keep safe and healthy.  I regularly add some spices to the tea past two years.  Earlier, it used to be cardamom tea or ginger tea. For the past two weeks, I am using this masala tea powder and will be a regular affair for the next few months. It’s monsoon and we love to have this kind of Masala Chai regularly.  The season is perfect for some hot pakoras and masala chai. 

    Benefits of Masala Tea:


    Masala Tea consists of spices as cardamom, cloves, cinnamon, ginger and pepper. Spices have anti-inflammatory, anti-bacterial and anti-fungal properties. It helps to prevent cold, cough and nasal congestion. It helps in reducing inflammation and boosts the immunity power. The regular use of spice mix helps in improving the metabolism of the body.
    Medical studies have proven the ingredients used aids in the prevention of diabetes and cancer.

    Difference between Cassia Cinnamon and Ceylon  Cinnamon


    Cinnamon is made from the inner bark of the Cinnamon tree. The unique property  is the presence of  essential oils, Cinnamaldehyde. Cinnamon is basically of two kinds : Cassia Cinnamon and Ceylon Cinnamon. The regular cinnamon which is widely used is the Cassia cinnamon. It is curled inward from both the sides.  It has stronger flavour and reddish brown in colour. It is ideal to use in savoury dishes.   The sticks of Ceylon cinnamon curl in a telescopic form. It is warmer in tone, has a sweet flavour and tan in colour.  The coumarin content is higher in cassia cinnamon. Coumarin is a naturally occurring element found in both Cassia cinnamon and Ceylon cinnamon. High amount of coumarin consumption may have adverse effect on health. Bottom line is, both can be used in cooking. But if you are using regularly, Ceylon cinnamon seems to be the ideal choice. You can read more about it here

    Masala Tea Powder

    Masala Tea Powder Recipe:

    Ingredients:

    • 40 gram cardamom
    • 10 gram cinnamon
    • 10 gram  clove
    • 10 gram pepper
    • 10 gram  dry ginger

    Method: 

    Take all the ingredients and grind them together. Store it in an air tight container. 

    Take a tip:

    I have used the ceylon cinnamon  in this recipe. To get the cup and tablespoon measurement, watch the video below. 


    How to use the prepared masala powder: 

    Add a small quantity (1/4 teaspoon)  of the  prepared masala powder while preparing the tea. I prefer to put in the water and boil. Later, I add the tea leaves, boil,  and strain after sometime. A maximum of half tea spoon of masala powder is sufficient for three cups of water. 

    How to store :

    Store it in a clean, air tight container. 


    Masala Tea Powder/ Chai Masala Powder

    Masala Tea Powder

    Masala Tea Powder gives a good flavour to tea. It is a blend of spices which can be stored in an air-tight container.
    Prep Time 10 minutes
    Total Time 10 minutes
    Course: condiments
    Cuisine: Indian

    Ingredients
      

    • 40 gram cardamom
    • 10 gram cinnamon
    • 10 gram clove
    • 10 gram pepper
    • 10 gram dry ginger

    Method
     

    1. Take all the ingredients and grind them together. Store it in an air tight container.

    Notes

    I have used the Ceylon cinnamon  in this recipe.
    To get the cup and tablespoon measurement, watch the video above.

    Pin it for later: 

    Masala Tea Powder/ Chai Masala is a flavoursome condiment used in the preparation of tea in Indian sub-continent. It is ideal to have it in the kitchen shelf. Give a try to this.
    Masala Tea Powder/Chai Masala

    If you have liked this post, do share it with your family and friends. If you ever make this, take a picture and share it by tagging @foodiejayashree on Instagram or @evergreendishes on Facebook or Twitter.

    Let’s be connected, the follow buttons are on the side bar. Subscribe to get all updates and an e-book for free!