Category: dry snacks

  • Oats Peanut Laddo | easy snack recipe

    Oats Peanut Laddo | easy snack recipe

    Jump to Recipe

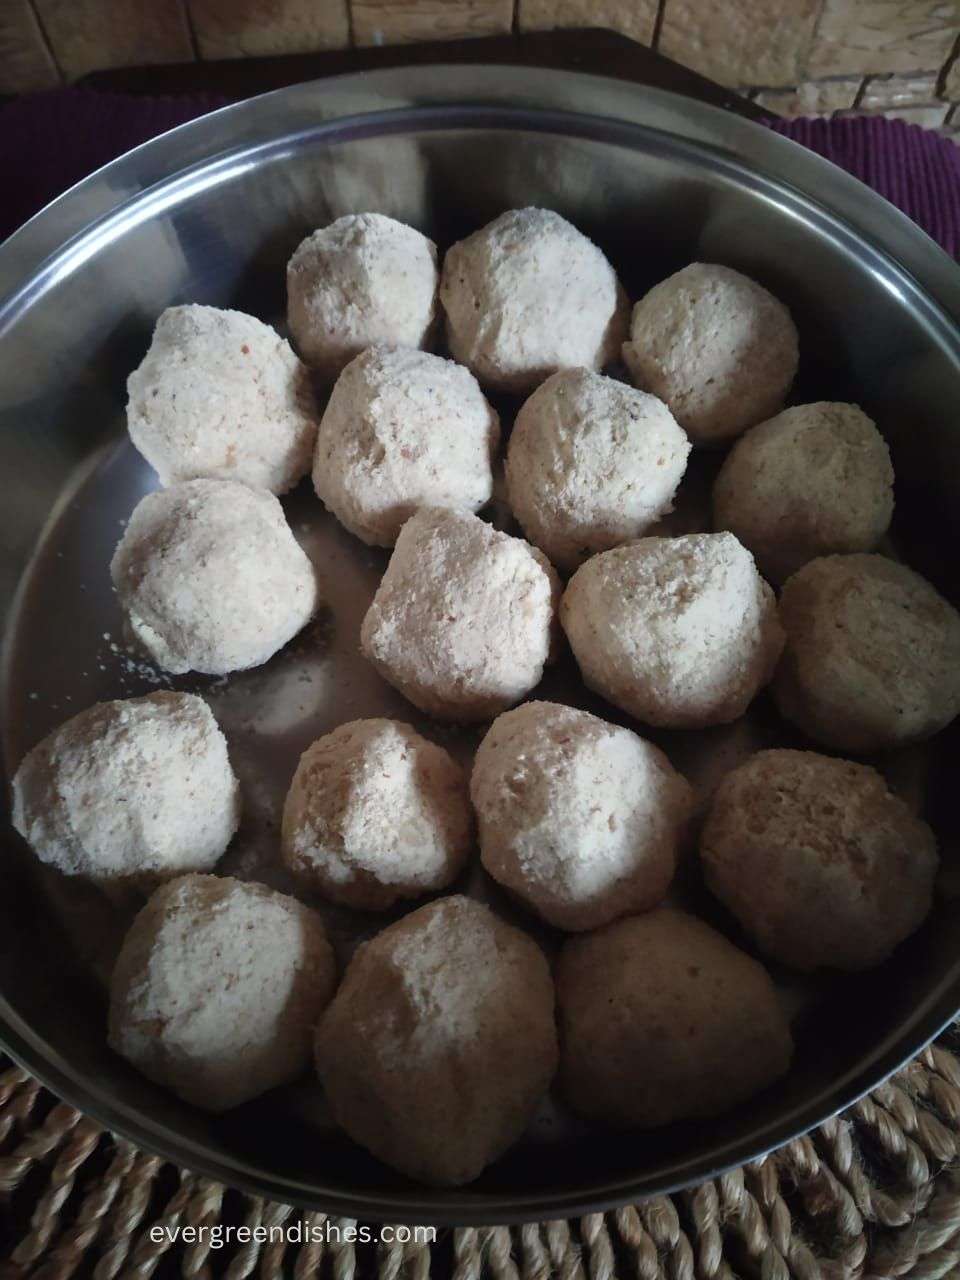
    Oats Peanut Laddo is a tasty, healthy and an easy to make snack. If you are looking for ways to include oats for your family, this laddo recipe is for you.

    Welcome one and all to my little world. Life had been busy and I was on an hiatus for sometime. I am back here with a few good recipes for you. 

    Laddo is a round shaped Indian sweets often made in most regions of India. Varied kind of laddos arre prepared during festive season. 

    Our eating habits are ever changing.  Oats Peanut Laddo is one of the sweet snacks I prepare often these days. The ease of making and the good taste has made it a favourite snack. Moreover, when healthy eating can be easily implemented, it  should  be a part of your lifestyle. Oats Peanut Laddo needs  few ingredients which are easily available in the kitchen, no added nuts and makes use of  jaggery. It is ready in twenty minutes. 

    The ingredients used in making the laddos  are : 

    Oats- You can use any kind of oats. Healthy eating is a choice, so I find ways to include it in our diet. 

    Peanut- Dry roast and remove the skin. Rub it with the palm, once it cools. You can make it ahead and store. 

    Jaggery- The amount of jaggery used is moderate. You may use more quantity if you have a sweet tooth. 

    Cardamom – Cardamom powder gives a good fragrance to sweets. 

    Ghee- I have used a little gheee, it eases the preparation of balls. If you can manage, you can do without it. 

    Oats Peanut Laddo

    Ingredients: 

    • 1 cup oats
    • 1 cup peanut
    • 3/4 cup jaggery
    • 3 cardamom
    • 1 teaspoon ghee 

    Method : 

    1. Dry roast oats until golden and you get a good aroma.
    2. Dry roast the peanuts, the dark specks on it indicate they are done well. Let it cool. Peel the skin.
    3. Grind peanuts, add oats and give a swirl. Finally, add jaggery and cardamom powder to it and grind together.
    4. Remove in a bowl. Add a spoon of melted ghee , mix and make balls of it.
    5. Oats Peanut Laddo is ready to serve. 

    Take a tip:

    1. Store in a clean, air-tight container. It stays good for a week. 
    2. The peanut roasted should be moderate. Once cool, they become crunchy. If they are well roasted, the skin sheds easily. 
    3. Grate the jaggery or break into small pieces, it is easier to grind. 
    4. Addition of ghee is optional but recommended. It makes rolling of lad
    5. I have used regular cooking oats. 

    I love making recipes with oats, have shared a few savoury ones too. The other oats recipes shared earlier : 1) Oats and Wheat Pancake 2) Oats Khichdi 3) Ladoo 4) Oats Dhokla 

    Oats Peanut Ladoo

    Oats Peanut Ladoo iis a tasty, healthy, easy to snack.

    Ingredients
      

    • 1 cup oats
    • 1 cup peanut
    • 3/4 cup jaggery
    • 3 cardamom
    • 1 teaspoon ghee

    Method
     

    1. Dry roast oats until golden and you get a good aroma.
    2. Dry roast the peanuts, the dark specks on it indicate they are done well. Let it cool. Peel the skin.
    3. Grind peanuts, add oats and give a swirl. Finally, add jaggery and cardamom powder to it and grind together.
    4. Remove in a bowl. Add a spoon of melted ghee , mix and make balls of it.
    5. Oats Peanut Ladoo is ready to serve.
    6. Take a tip:
    7. Store in a clean, air-tight container. It stays good for a week.

    Notes

    Store in a clean, air-tight container. It stays good for a week. 
    The peanut roasted should be moderate. Once cool, they become crunchy. If they are well roasted, the skin sheds easily. 
    Grate the jaggery or break into small pieces, it is easier to grind. 
    I have used regular cooking oats. 

    Pin it for later : 

    oats peanut laddo
    oats peanut laddo

    If you ever make Oats and Peanut Laddo  recipe, take a picture and share it by tagging @foodiejayashree or @evergreendishes on Instagram or Facebook respectively. Subscribe to get an e-book and all updates for free. 

  • Ragi Chakli | Finger millet Chakli

    Ragi Chakli | Finger millet Chakli

    Jump to Recipe Print Recipe

    Ragi Chakli is a twist to the usual chakli we often prepare. It is tasty and makes a good snack to munch.

    Chakli makes a good snack to have with a cup of tea. During holidays, children love to binge on snacks. Moreover, festive season calls for celebrations with sweets and savoury snacks.

    I have shared various kind of savoury snacks earlier. Butter Murukku, Split gram murukkunippattu are some of the popular south indian snacks. I have also shared a variety of sev recipes : Besan Sev, Palak Sev and Ratlami Sev. If you are looking for something different, try the mathris, lately they are our favourite snacks.

    The awareness of the many benefits of millets has brought a change in the way we eat and cook. Finger millet or ragi is regularly used to make idli, dosa or halbai. Today, I am sharing finger millet chakli. I have made it a couple of times earlier, but not shared with all of you. Ragi Chakli is tasty and makes a good snack to store in the jar.

    Ragi Chakli Recipe

    Ingredients :

    • 1 cup ragi flour
    • 1/2 cup rice flour
    • 1/4 cup roasted gram flour
    • 1 tablespoon hot oil
    • 1 teaspoon chilli powder
    • 1 teaspoon sesame seed
    • 1 teaspoon chilli powder
    • salt to taste
    • water as required for mixing
    • oil for frying

    Method :

    1. Take ragi flour,  rice flour, gram flour, chilli powder, sesame seed, chilli powder, salt and mix it well.
    2. Heat oil in a pan, add a tablespoon of hot oil to the flour mix and mix it thoroughly with fingers.
    3. Now, add a little water at a time, make a pliable dough. The dough should neither be too hard or smooth.
    4. Heat oil in a pan.
    5. Take a chakli mould, grease it with a little oil. Use the star shaped nozzle to make chakli.
    6. Put a small piece of dough in the oil, if it sizzles and  floats on top, you can continue to fry them.
    7. Put some dough and press a few. You can either press directly or put them on a sheet and slide later into the oil.
    8. Deep fry them on both sides.
    9. Remove them on a tissue paper. Repeat with the rest of the dough.
    10. Once they are completely cool, store them in an air-tight container.

    Take a tip :

    • Use good quality ragi flour.
    • Add water slowly in small quantities. If the dough is smooth, it will absorb lot of oil. If iit is hard, you will not be able to press it properly.
    • Never keep hot, deep fried snacks in closed container. they  becomes soggy. Allow them to cool completely, before you store in an air-tight container.

    Ragi Chakli

    Ragi Chakli is a twist to the usual one we often make at home.

    Ingredients
      

    • 1 cup ragi flour
    • 1/2 cup rice flour
    • 1/4 cup roasted gram flour
    • 1 tablespoon hot oil
    • 1 teaspoon chilli powder
    • 1 teaspoon sesame seed
    • 1 teaspoon chilli powder
    • salt to taste
    • water as required for mixing
    • oil for frying

    Method
     

    1. Take ragi flour,  rice flour, gram flour , chilli powder, sesame seed, chilli powder, salt and mix it well.
    2. Add butter and give a good mix by rubbing it between fingers.
    3. Add a little water at a time, make a pliable dough. The dough should neither be too hard or smooth.
    4. Heat oil in a pan.
    5. Take a chakli mould, grease it with a little oil. Put some dough and press a few. You can either press directly or put them on a sheet and slide later into the oil.
    6. Deep fry them on both sides.
    7. Remove them on a tissue paper. Repeat with the rest of the dough.
    8. Once they are completely cool, store them in an air-tight container.

    Happy Diwali everyone! May the festival of lights bring immense joy, peace and happiness. If you ever make Ragi Chakli recipe, take a picture and share it on Facebook or Instagram by tagging @evergreendishes and @foodiejayashree  respectively. I will be happy to see your creation and share it further.

    Subscribe to get all updates and an e-book for free.

    Pin it for later :

    ragi chakli
    Ragi Chakli


  • Ratlami Sev / Masala Sev Recipe

    Ratlami Sev / Masala Sev Recipe

    Jump to Recipe Print Recipe

    Ratlami Sev / Masala Sev  is a popular variety of sev. It is tasty and makes a good snack with tea. It is usually available in super markets. The addition of spice mix makes it spicy and unique in taste. 

    Ratlami Sev is a spicy sev served as a snack with tea. The use of varied  spices makes it spicy and flavoursome. It is a good change from the usual one we make. Ratlam is a small town in Madhya Pradesh. It was a princely town town four hundred years back. Raja Ratan Singh  of Jodhpur created it in 1652. Shah Jahan had given large lands for the service they had rendered. While on a visit, the Mioghuls, wanted sevaiyan. Since there was no wheat available, gram flour was used along with spices and the sev came into existence. Since then, it is known as Ratlami Sev. It is different from the usual variety. It has a blend of unique spices which gives a good flavour to it. Moreover, the size of the sev is totally different from the regular ones. 

    What is Sev?

    Sev is a popular savoury snack from Indian sub-continent. It is deep-fried , crispy  snack made from gram flour. 

    Different kind of sev:

    1. Nylon Sev – The fine, thin variety of sev used as topping in chaats. It is made with minimum spices. It is the most popular sev used.
    2. Regular Sev – These are slightly thicker and can be used as a snack. I have shared the Ompudi and Palak Sev earlier. It is moderately spicy. 
    3. Ratlami Sev- This is spicier and thicker than the other usual  ones. 

    The other kind of savoury snacks you might like are Instant Chaklis, Kodbole, Butter Murukku, Ribbon Pakoda, Nippattu

    Ratlami Sev
    Ratlami Sev

    Ratlami Sev Recipe 

    Ingredients: 

    • 2. 5 cup besan / gram flour
    • 2 tablespoon rice flour
    • 2 tablespoon oil
    • 1 teaspoon lemon juice
    • 1/4 tsp turmeric powder
    • 1 teaspoon kashmiri chilli powder
    • pinch of asafoetida 
    • 1/4 teaspoon baking soda
    • salt to taste
    • 1/2 cup water for mixing

    For the spice mix:

    • 3/4 teaspoon clove
    • 1/2 teaspoon fennel
    • 1/4 teaspoon ajwain
    • 1 teaspoon cumin
    • 1 teaspoon pepper 
    • 2 pods cardamom
    • small piece of cinnamon

    Method :

    1. Dry roast cloves. cardamom, fennel, ajwain, cumin, cinnamon  and pepper for two minutes. Grind to a powder.
    2. Take gram flour in a wide. Put  rice flour to it. Add  salt, asafoetida, turmeric powder, chilli powder. Give a mix.
    3. Add oil and mix it thoroughly.
    4. Put the spice mix and baking soda. Mix, add a little water and make a stiff dough of it. 
    5. Take the mould and use the disc with thick sev pattern. 
    6. Grease the mould with a little oil, take a ball  and squeeze into it. 
    7. Heat oil in a pan, press it directly into the oil. Take care, slowly put it into a coil shape.
    8. Deep fry, slowly turn to the other side and once it is golden in colour remove it on a tissue paper,
    9. Repeat for the rest of the dough.
    10. Store in an air-tight container. 

    Take a tip:

    • Once you add the ingredients, give a good mix, before mixing with water. 
    • Addition of rice flour is optional but it makes them crispy.
    • Once they are cool, store in an air-tight container. 
    Ratlami Sev
    Evergreendishesdev

    Ratlami Sev

    Ratlami Sev is a spicy savoury snack from Indian cuisine.
    Prep Time 10 minutes
    Cook Time 20 minutes
    Total Time 30 minutes
    Course: dry snack
    Cuisine: Indian

    Ingredients
      

    • 2.5 cup besan / gram flour
    • 2 tablespoon rice flour
    • 2 tablespoon oil
    • 1 teaspoon lemon juice
    • 1/4 tsp turmeric powder
    • 1 teaspoon kashmiri chilli powder
    • pinch of asafoetida
    • 1/4 teaspoon baking soda
    • salt to taste
    • 1/2 cup water for mixing
    • For the spice mix:
    • 3/4 teaspoon clove
    • 1/2 teaspoon fennel
    • 1/4 teaspoon ajwain
    • 1 teaspoon cumin
    • 1 teaspoon pepper
    • 2 pod cardamom
    • small piece cinnamon

    Method
     

    1. Dry roast cloves. cardamom, fennel, ajwain, cumin, cinnamon  and pepper for two minutes. Grind to a powder.
    2. Take gram flour in a wide. Put  rice flour to it. Add  salt, asafoetida, turmeric powder, chilli powder. Give a mix.
    3. Add oil and mix it thoroughly.
    4. Put the spice mix and baking soda. Mix, add a little water and make a stiff dough of it.
    5. Take the mould and use the disc with thick sev pattern.
    6. Grease the mould with a little oil, take a ball  and squeeze into it.
    7. Heat oil in a pan, press it directly into the oil. Take care, slowly put it into a coil shape.
    8. Deep fry, slowly turn to the other side and once it is golden in colour remove it on a tissue paper,
    9. Repeat for the rest of the dough.
    10. Store in an air-tight container.
    11. Take a tip:
    12. Once you add the ingredients, give a good mix, before mixing with water.
    13. Addition of rice flour is optional but it makes them crispy.
    14. Once they are cool, store in an air-tight container.

    Notes

    Addition of rice flour is optional but it makes them crispy.
    Reduce clove, pepper and chilli powder to reduce spiciness.

    Pin Ratlami Sev to your board:

    Ratlami Sev is a spicy savoury snack from Indian snack. It makes a good snack option to store at home.
    Ratlami Sev

    If you ever make this  Ratlami Sev recipe,  do take a picture and tag @foodiejayashree on Instagram or @evergreendishes on Facebook or Twitter. I will be glad to see your creation and share it further. Let’s be connected, do follow on social media platforms. Until next time, let’s stay connected.  Subscribe to get all updates and an e-book for free. Check out my e-books on Amazon.  Happy Cooking !


  • Ribbon Pakoda / how to make ribbon pakoda

    Ribbon Pakoda / how to make ribbon pakoda

    Jump to Recipe Print Recipe

    Ribbon Pakoda is a savoury snack from Indian cuisine. It is usually prepared during festivals as Diwali and Krishna Janmasthmi. It is crispy and tasty. It makes a good snack to store in the kitchen shelves.

    Diwali, the festival of lights is round the corner. It is that time of the year when we make a variety of sweet and savoury snacks and enjoy good times with our family.  The festive spirit brings in joy, contentment  and happiness.

    Diwali, the festival of light marks the return of exile of Lord Rama from exile. It is also a festival when Goddess Lakshmi is worshipped. It symbolizes the victory of light over darkness, good over evil and knowledge over ignorance. The first day is Dhanteras, followed by Naraka Chaturdasi,  Laxmi Puja, Bali Padya and Bhai Dhuj.

    When the world is going through a dark phase, let us hope and pray for a Covid free world. The disease has taken a toll of our lives, the last six months have been scary and disrupted everyone. The festive season is not going to be the same but let us try to celebrate in a small way.

    Let’s pray for a virus free world. Let us pray for the well being of one and all. May the festival of light eliminate the fear of Carona from the whole world.

    Ribbon Pakoda
    Ribbon Pakoda

    About the event:

    Sending this to Shhhh Secretly Cooking for the theme, ” Diwali Treats”. It is a monthly event, the theme was suggested by Poonam Bachav. She has many recipes from Maharashtrian cuisine on her blog.  I loved her motichoor ladoo, bookmarked to prepare it soon. Here, we are paired with a partner and  secret ingredients are exchanged. The dish is prepared and the other members guess the secret  ingredients. I was paired with Priya Iyer has a variety of sundal recipes on her blog, do check it. I had given pumpkin and ghee as the secret ingredients, she has made this delicious halwa. Gram flour and salt were the secret ingredients given to me and I am sharing ribbon pakoda recipe. It is tasty, easy to make  and ideal to serve for guests.

    shhh cooking secretly

    About Ribbon Pakoda:

    Ribbon Pakoda is a traditional snack prepared during Diwali. It is crispy and tasty, ideal with a cup of tea.  It is also known as Nada pakoda, ola pakoda  and Tape as per its shape.

    Ribbon Pakoda recipe  is easy to make,  ideal to make for the festive days. Do follow the recipe given below and read the tips also.

    Do check out my other savoury snack recipes for Diwali.

    Ingredients:

    • 2 cup gram flour
    • 1/2 cup rice flour
    • 1/2 teaspoon turmeric powder
    • 1 teaspoon carom seeds, made into powder
    • 1 teaspoon chilli powder
    • salt
    • 1/2 cup oil
    • water
    • oil for frying

    Method:

    1. Take gram flour, rice flour, turmeric powder, ajwain powder, cumin powder, salt and sieve them together.
    2. Heat half cup oil in a kadai, add it to the flour. Mix thoroughly with fingers, it should be like a crumbly texture.
    3. Now, add little water and mix it to a stiff dough, keep it covered.
    4. Take the noodle press, choose the appropriate plate, grease oil to it and fill with dough.
    5. Heat oil in a pan, Once the oil is hot, press slowly into it, keeping at a distance from oil.
    6. Deep fry it to golden colour.
    7. Remove it on a plate with tissue paper. Repeat for the rest of the dough.
    8. Store it in an air tight container.

    Take a tip:

    • The flour used must not be coarse. The ribbon pakoda will break when put in oil.
    • Hot oil is essential to mix the flour.  Oil may be heated once in a pan and poured some on the flour.
    • Rice flour gives crunchiness to the snack.
    • Adjust spiciness as per your taste.
    • Noodle press is available in the market. It is used for various purposes as making sev, chakli and many others.
    • Always fry in medium flame.
    • If you are making in large quantities, mix the spices, add hot oil to it, mix and keep it aside. Take a portion of the flour, prepare the dough and make it.

    Ribbon Pakoda
    Evergreendishesdev

    Ribbon Pakoda / Naada Pakoda

    Ribbon Pakoda is a tasty and crispy snack to store in the kitchen shelves. It is ideal for the upcoming festival, Diwali.
    Prep Time 10 minutes
    Cook Time 20 minutes
    Total Time 30 minutes
    Servings: 4 people
    Course: dry snack
    Cuisine: karnataka

    Ingredients
      

    • 2 cup gram flour
    • 1/2 cup rice flour
    • 1/2 teaspoon turmeric powder
    • 1 teaspoon carom seeds made into powder
    • 1 teaspoon chilli powder
    • salt
    • 1/2 cup oil
    • water
    • oil for frying

    Method
     

    1. Take gram flour, rice flour, turmeric powder, ajwain powder, cumin powder, salt and sieve them together.
    2. Heat half cup oil in a kadai, add it to the flour. Mix thoroughly with fingers, it should be like a crumbly texture.
    3. Now, add little water and mix it to a stiff dough, keep it covered.
    4. Take the noodle press, choose the appropriate plate, grease oil to it and fill with dough.
    5. Heat oil in a pan, Once the oil is hot, press slowly into it, keeping at a distance from oil.
    6. Deep fry it to golden colour.
    7. Remove it on a plate with tissue paper. Repeat for the rest of the dough.
    8. Store it in an air tight container.

    Pin it for later:

     Ribbon Pakoda is a crispy and tasty snack, ideal to prepare for the upcoming festive season. It tastes good as a snack with tea also. Site title Title Primary category Separator
    Ribbon Pakoda / Naada Pakoda

    If you ever make any of these recipes, take a picture and share it by tagging @foodiejayashree on Instagram or @evergreendishes on Facebook. I will be glad to see and share your creation further.
    Check out my e-books on Amazon. Do not miss any post, subscribe to get all updates and an e-book for free !

  • Tengalu / Thenkuzhal | Guest Post for Sapana

    Tengalu / Thenkuzhal | Guest Post for Sapana

    Tengalu is a crispy, dry snack usually made during Diwali and Holi. It is popular in Karnataka and Tamil Nadu. It is also known as Thenkuzhal. 


    I have great memories of this snack. During Diwali, chakli and tengalu were often prepared at home in big containers and stored. Usually, Tengalu is made by making the flour at home. It is a week-long process and today, none of us have the time and patience to do. I prefer making the easier method these days as life seems to be busy. Here is the method I use to make Tengalu using ready flour. Here, I bought the urad dal flour from supermarket.

    Tengalu / Thenkuzhal guest post

    Difference between Chakli and Tengalu :

    Chakli and Tengalu are both deep-fried snacks from South India  but chakli is more popular in all regions. Tengalu is made only in some parts of the state. The blade/jali for Tengalu has three or four perforations but the Chakli blade has only perforation. Moreover, different varieties of chakli are prepared.

    This is a guest- post I have written for Sapana. Sapana is an awesome  blogger who blogs at Cooking with Sapana. It is good to be associated with her in this blogging world. Her blog has many dishes from different cuisines. Do check out her blog and the recipe for Tengalu.

    If you ever make this recipe, do take a picture and tag @evergreendishes on Facebook or @evergreendishes on Instagram.

    Subscribe to get all updates and an e-book for free !


  • Cornflakes Cookies / how to make cornflakes cookies

    Cornflakes Cookies / how to make cornflakes cookies

    Jump to Recipe Print Recipe

    Cornflakes cookies are crunchy and tasty. They make a good snack to store in the jar.  Cornflakes cookies are made with a few ingredients easily available at home. They are eggless. 

    Cornflakes makes a good breakfast cereal. It is ideal to serve as a quick fix with cold or hot milk. Zerobeli cornflakes is crispy and tasty. It is rich in fibre, packed with vitamin and nutrients. With different flavors and rich taste it makes a good choice of breakfast every morning.

    Zerobeli is the innovative brand name for cereals by Georgia Foods Pvt Ltd. Cornflakes, oats, muesli in different flavors is not only tasty but also filling. It is a quick fix breakfast for busy week day mornings. I regularly use them and find them to be an ideal choice with taste and cost as well.

    We loved these cornflakes, it is not only tasty but keeps satiated for a long time. The breakfast has to be ready at 7.30a.m and some days, I find it difficult to prepare. Moreover, I can play around between milk and greek yoghurt and with different toppings. Some times, I top it with almonds while at times with cashew and berries.

    It makes a good choice for snack too as I am happy that children are not eating fried snacks to satisfy the hunger pangs. I love using these cornflakes to make different kind of snacks. You can opt to make the cornflakes chaat or chiwda with it. It makes a quick light snack to serve in the evenings.

    It is rich in dietary fibre and thus helps in controlling weight naturally. It makes ideal choice for adults also. Healthy eating is a choice which we need to make and help our family members to adopt.

    Now, for the festive season, I have some goodies here.

    With Christmas round the corner, I thought of making cookies and they were delicious. I am elated with these and shall make them again.


                                                                                                          Cornflakes Cookies

     Cornflakes Cookies Recipe

    Ingredients:

    Measurement: 1 cup = 150 ml

    • 1 cup Zerobeli cornflakes crushed
    • 1 cup softened butter
    • 1 cup castor sugar
    • 1 cup all purpose flour
    • 1/2 teaspoon baking powder
    • 1 tablespoon lemon juice
    • 1/2 teaspoon vanilla essence

    Method:

    1. Take butter and castor sugar in a bowl and beat it until it is smooth and creamy.
    2. Add lemon juice, vanilla essence and baking powder to it.
    3. Now mix the flour to it.
    4. Pre-heat the oven at 170 degree centigrade.
    5. Put a baking sheet on the tray.
    6. Take a small ball of the dough and press it in the form of a cookie.
    7. Dust it with cornflakes on either side and arrange on the lined sheet.
    8. Repeat with the rest of dough.
    9. Bake it for 10-12 minutes.
    10. Once they are golden in colour, keep them to cool on the rack.

    Take a tip:

    • You can take wheat flour instead of plain flour.
    • A mixture of wheat flour and plain can also be taken.
    Evergreendishesdev

    Cornflakes Cookies

    Cornflakes cookies are tasty and make a good snack to store at home. The freshness of lime gives a good taste to it.
    Course: dry snack
    Cuisine: Vegetarian

    Ingredients
      

    • 1 cup zerobeli cornflakes crushed
    • 1 cup softened butter
    • 1 cup castor sugar
    • 1 cup all purpose flour
    • 1/2 tsp baking powder
    • 1 tbsp lemon juice
    • 1/2 tsp vanilla essence

    Method
     

    1. Take butter and sugar in a bowl, beat them until smooth and creamy.
    2. Add baking powder, vanilla essence and lemon juice to it.
    3. Put the flour and slowly knead to a dough.
    4. Pre-heat the oven at 170 degree celsius
    5. Place parchment paper on the baking tray.
    6. Take a small ball of the dough, press it lightly and roll it in the crushed cornflakes.
    7. Repeat with the rest of the dough.
    8. Bake for 10-12 minutes, they should be golden in colour.
    9. Let cool on the rack.
    10. Store in an air-tight container.

    Do check out Zerobeli products on their website. You can order online from Amazon also at discounted price.


    Disclaimer: This is a brand collaboration with Zerobeli . I received products from Zerobeli to test and review them. All inputs given are my own.

    Pin it for later:

    Cornflakes Cookies are crunchy, tasty and refreshing with every bite. They are ideal to make during Christmas and New Year eve.
    cornflakes cookies

    Are you making this one? If you ever make, take a picture and tag me @foodiejayashree on Instagram or @evergreendishes on Facebook. I will share it further.

    Are you looking for more interesting recipes?  Do  check out almond cookies and kulkul.

    Let’s be connected !

    Subscribe to get a book of handyhints for free !

  • Butter Murukku / murukku recipe

    Butter Murukku / murukku recipe

    Jump to Recipe

    Butter Murukku is a crispy, savoury snack from South India. It is a dry snack that is usually made during festivals as Krishna Janmasthmi and Diwali.

    Murukku is one of the snacks which every South Indian can resonate with, festive treats and crunchy munchy snacks. Those who follow my blog regularly, do know that I love making these snack recipes. Earlier, I had put chakli, nippattu and kodbole.

    Murukku is a deep fried snack, originally from the state of Tamil Nadu but soon spread to all other states in South India. Murukku means to twist, the snack is deep concentric circles and is usually twisted in shape. Murukku and chakli are two siblings, the difference lies in the ingredients, shape of each spiral, region from which it hails and the method of making. Murukku is usually twisted and coiled and gram flour is usually used in it. The major ingredients of chakli are rice flour and urad dal.

    Different varieties of murukku are prepared, I have earlier posted two kinds here, Split gram murukku and Ring Murukku

    Butter Murukku or Benne murukku as it is commonly known is yet another varation and a popular one. Gram flour is mixed with rice flour and urad dal along with other spices to a stiff dough, it is then placed in the mould, pressed and deep fried. It tastes good with a cup of hot tea.

    butter murukku
    butter murukku

    Let’s get to the making of Butter Murukku

    Ingredients:

    • 2.5 cup gram flour
    • 2 cup rice flour
    • 1 cup urad dal flour
    • 1/2 cup butter
    • 1 teaspoon cumin powder
    • salt
    • asafoetida
    • pinch of baking soda
    • water
    • oil for frying

    Method:

    1. Take gram flour, rice flour and urad dal in a bowl.
    2. Add salt, cumin powder, baking soda and asafoetida. Mix well.
    3. Melt butter and put it in it.
    4. Mix well.
    5. Take half the quantity and knead to a stiff dough.
    6. Grease the mould, take a small piece of the dough, put it in the mould and press into concentric circles on a plastic sheet or a plate.
    7. Heat oil in a pan, add a few murukku into it and deep fry.
    8. Remove on a plate with tissue paper. Repeat for the dough. Remember, you had kept aside some mixed flour in the beginning, make it into a dough and repeat the steps.
    9. Store in an air tight jar when cool.

    Take a tip:

    1. Deep fry on medium flame, keep turning them in the oil by splashing some oil over them with the ladle.
    2. Fry them until golden in colour, they will be crispy.
    Evergreendishesdev

    Butter Murukku

    5 from 3 votes
    Butter Murukku is a crunchy savoury snack from South India.
    Prep Time 15 minutes
    Cook Time 1 hour 15 minutes
    Total Time 1 hour 30 minutes
    Course: dry snack
    Cuisine: Tamil nadu

    Ingredients
      

    • 2.5 cup gram flour2 cup rice flour1 cup urad dal flour1/2 cup butter1 teaspoon cumin powdersalt asafoetidapinch of baking sodawateroil for frying

    • 2 cup rice flour
    • 1 cup urad dal
    • 1/2 cup butter
    • 1 teaspoon cumin powder
    • asafoetida a pinch
    • baking soda a pinch
    • salt
    • 2 tablespoon oil
    • 2 teaspoon oil
    • water
    • oil for frying

    Equipment

    • chakli press
    • ladle
    • frying pan
    • plates
    • container
    • tissue paper

    Method
     

    1. Take all the flour in a wide bowl, add salt, asafoetida, cumin powder and mix it
    2. Melt butter and put it in it. Mix it well.
    3. Take only half the quantity of the flour and knead to a stiff dough.
    4. Heat pil in a kadai.
    5. Grease the mould, take a ball of the dough, put it in it and press into concentric circles on a plastic sheet or a plate.
    6. Once the oil is heated, slowly drop a couple of them into it and deep fry. Keep turning them, let them be golden in colour.
    7. Remove in a plate with tissue paper, repeat for the rest of the dough.
    butter murukku
    plateful of butter murukku


    If you have liked this post, do leave a comment below. All comments make my day brighter.

    If you ever recreate this snack, take a picture and tag me on Instagram @foodiejayashree or on Facebook @evergreendishes, I will be glad to see it and shall share it further.

    Subscribe to get a book of handy hints for free!

    Pin it for later : 

    butter murukku
    butter murukku
  • Butter Cookies / how to make eggless butter cookies

    Butter Cookies / how to make eggless butter cookies

    Butter Cookies are classic, tasty and melt in the mouth. They are ideal to binge as snacks after school or during mid- day hunger pangs.

    Baking is therapeutic, the aroma  fill my home and rejuvenates my senses, but alas ! I am a novice baker. Somehow, I never make many attempts, I would rather make dosa  or kebab.

    Butter cookies are one of the simplest cookies that we can bake, they are tasty and melt in the mouth. I have been making these since many years and these are evergreen, simple yet never out of fashion.

    A few other cookies that I have tried are Ghee Cookies, Mocha Cookies,

    butter cookies
    butter cookies

    Ingredients:

    • 225 grams butter
    • 75 grams castor sugar
    • 250 grams all purpose flour
    • pinch of salt

    Method:

    1. Sieve the flour along with salt. Keep it aside.
    2. Beat the butter for one minute. It should be soft and at room temperature.
    3. Add sugar to the butter, beat it again.
    4. Now, add the flour and mix it to a crumbly mixture. Slowly, knead it to a dough.
    5. Take a ball of the dough and flatten it lightly between palms.
    6. Repeat for the rest of the dough.
    7. Preheat the oven, bake at 180 degree celsius for 10 minutes.
    8. Once they are done allow to cool, store in air tight containers.

    Take a tip:

    • Butter should be at room temperature.
    • It is ideal to sieve the castor sugar.
    • You can make a mark on the cookie with the back of fork, I forgot to do.

    Pin it for later:

    butter cookies
    butter cookies

    Evergreendishesdev

    Butter Cookies

    Butter cookies are classic, soft and melt in the mouth, ideal as an evening snack.
    Prep Time 10 minutes
    Cook Time 30 minutes
    Total Time 40 minutes
    Course: dry snack
    Cuisine: international

    Ingredients
      

    • 225 grams butter
    • 75 grams castor sugar
    • 250 grams all purpose flour
    • salt

    Method
     

    1. Ingredients:225 grams butter75 grams castor sugar250 grams all purpose flourpinch of saltMethod:Sieve the flour along with salt. Keep it aside.Beat the butter for one minute. It should be soft and at room temperature.Add sugar to the butter, beat it again.Now, add the flour and mix it to a crumbly mixture. Slowly, knead it to a dough.Take a ball of the dough and flatten it lightly between palms.Repeat for the rest of the dough.Preheat the oven, bake at 180 degree celsius for 10 minutes.Once they are done allow to cool, store in air tight containers.Take a tip:Butter should be at room temperature.It is ideal to sieve the castor sugar.You can make a mark on the cookie with the back of fork, I forgot to do.
    2. Sieve the flour along with the salt. Keep it aside.
    3. Beat the butter for one minute. 
    4. Add sugar to the butter, beat it.
    5. Now, add the flour and mix it to a crumbly mixture. Slowly, knead to a dough.
    6. Take a ball of the dough and flatten it between the palm.
    7. Repeat for the rest of the dough.
    8. Pre-heat the oven, bake at 180 degree celsius for 10 minutes.
    9. Once they are done, allow to cool. Store in air tight container.

    Notes

    • Butter should be soft and at room temperature.
    • It is ideal to sieve the castor sugar too.
    • You can make marking on the cookie with the back of a fork.

    I am sending this to the #BM 98 for the theme Kids Event – Snacks/Bites co-hosted by Rafeeda. This is the second of three posts, the first one was Vegetables and Vermicelli Cutlets

    BMLogo

    Check out the Blogging Marathon page for the other Blogging Marathoners doing this BM#98

    If you have liked this post, do share it further  with your family and friends.

    Follow us on Facebook, Twitter, Instagram and Pinterest.

    Subscribe to the YouTube Channel that I have started recently.

    Check out my e-books

    Subscribe to get all updates and a book of handy hints for free !


  • Methi Mathri / how to make mathri  in steps

    Methi Mathri / how to make mathri in steps

    Methi  Mathri is an Indian snack usually made in many households. It is crispy, tasty and ideal to serve with tea or during mid-day.

    It’s ideal to store these snacks at home, children crave quite often and they make good snacks with masala chai. It is ideal to carry during travelling.

    I have many snack recipes on my blog, from crispy avalakki (poha chiwda) to nippattu and kodbole. these are essential during festivals.

    methi mathri
    methi mathri

    Let’s get to the recipe of Methi Mathri:

    Ingredients:                Measuremnt used: 1 cup = 250ml

    • 2 cups wheat flour
    • 1/4 cup semolina
    • 3/4 cup fenugreek leaves
    • 2 tablespoon ghee
    • 1 teaspoon cumin
    • 1 teaspoon pepper powder
    • 1/2 teaspoon ajwain
    • salt to taste
    • 1/4 cup water
    • oil for frying

    Method:

    1. Cut and wash the fenugreek leaves, put them in a colander.
    2. Mix wheat flour and semolina in a bowl. Add cumin, pepper powder, salt and ajwain to it. Add ghee and rub it well.
    3. Add fenugreek leaves, mix well.
    4. Add water to it, knead to a stiff dough.
    5. Keep it aside for five minutes.
    6. Heat oil in a pan.
    7. Take a ball of the dough, roll into a thin ircle. Cut into discs using a cookie cutter or any circular shaped object. Pork them with a fork.
    8. Put the discs in oil. Deep fry them on slow to medium flame, once they are golden in colour, remove on a plate with a tissue paper/ absorbent paper on it.
    9. Repeat for the rest of the dough.

    Take a tip:

    1. You can take small ball of the dough, roll into a thin puri and then prick with a fork. Repeat for all the balls.
    2. You can reduce the amount of fenugreek leaves to 1/2 cup


    Methi Mathri

    Methi Mathri is a crispy snack from North India. 
    Prep Time 10 minutes
    Cook Time 30 minutes
    Total Time 40 minutes
    Servings: 50 pieces
    Course: dry snack, festive treats, kids favourite, travelling food
    Cuisine: north indian

    Ingredients
      

    • 2 cup wheat flour / atta
    • 1/4 cup semolina
    • 3/4 cup fenugreek leaves
    • 2 tablespoon ghee
    • 1 teaspoon cumin
    • 1 teaspoon pepper powder
    • 1/2 teaspoon ajwain
    • salt to taste
    • 1/4 cup water
    • oil for frying

    Method
     

    1. 2 cups wheat flour
      1/4 cup semolina
      3/4 cup fenugreek leaves
      2 tablespoon ghee
      1 teaspoon cumin
      1 teaspoon pepper powder
      1/2 teaspoon ajwain
      salt to taste
      1/4 cup water
      oil for frying
      Add water to it, knead to a stiff dough.
      Keep it aside for five minutes.
      Heat oil in a pan.
      Take a ball of the dough, roll into a thin ircle. Cut into discs using a cookie cutter or any circular shaped object. Pork them with a fork.
      Put the discs in oil. Deep fry them on medium flame, remove on aplate with a tissue paper on it.
      Repeat for the rest of the dough.
    2. Cut and wash the fenugreek leaves, put them in a colander.
    3.  Mix wheat flour and semolina in a bowl. Add cumin, pepper powder, salt and ajwain to it. Add ghee and rub it well. fenugreek leaves, mix well.
    4. Add water to it, knead to a stiff dough.
    5. Keep it aside for five minutes.
      Heat oil in a pan.
    6. Take a ball of the dough, roll into a thin ircle. Cut into discs using a cookie cutter or any circular shaped object. Pork them with a fork.
    7. Put the discs in oil. Deep fry them on medium flame, remove on aplate with a tissue paper on it.
    8. Repeat for the rest of the dough.

    Pin it for later:

    Methi Mathri
    Methi Mathri

    This post is part of #BM97 with the Kid’s Special for the theme ” Travel Food” co-hosted by Renu

    BMLogo

    Check out the Blogging Marathon page for the other Blogging Marathoners doing this BM#97

    Let’s be social: Facebook, Twitter, Pinterest, Instagram

    If you ever recreate this dish, take a picture and tag @foodiejayashree on Instagram, shall share it further. Will be happy to see your creation too.

    Subscribe to get all updates and an e-book of handyhints for free !

  • Namak Pare/ Namak Para / Nimki / Nimkin

    Namak Pare/ Namak Para / Nimki / Nimkin

    Namak Pare is a deep fried savoury snack usually made during festivals as Holi and Deepavali. It is crispy and tasty and make a good snack for children. It is ideal to carry while travelling.

    Usually namak pare is made with self raising flour or a mix of self raising flour and wheat flour in the same ratio. But, I use only wheat flour along with semolina and they turn out equally good. Deep fried snacks are always welcome at home, children love to binge on this.

    It is that time of the month when I work on my themed post, and I have chosen travel food for kids. So stay tuned for tasty snacks in  the next three days.

    The other snack recipes on blog : Masala Mathri, ring murukku, split gram murukku, nipattu

    namak pare
    namak pare

    Let’s get to the recipe of Namak Pare

    Ingredients:

    • 2 cup wheat flour
    • 2 tablespoon semolina
    • 1 teaspoon ajwain
    • 1/2 teaspoon pepper powder
    • salt to taste
    • 3 tablespoon oil
    • water

    Method:

    1. Take wheat flour in a pan, add semolina to it.
    2. Heat oil in a pan, we need it to mix the dough.
    3. Add ajwain, salt, pepper powder and oil to the flour. Mix it well. It should form a crumbly mixture.
    4. Add little water and mix to a stiff dough.
    5. Divide the dough into two parts, take a ball of the dough, dust with flour and roll into a circle which is nether too thick or thin.
    6. Make diagonal incisions on it. We need to make them in a rhombus shape.
    7. Heat oil, once the oil is put the cut pieces into it. Fry on a low flame. Keep stirring in between. Once they are cooked, remove them and repeat for the other ball of dough.
    8. Once they are cool, store in a air tight container.

    Namak Pare / Nimki
    Namak Pare / Nimki

    namak pare
    Evergreendishesdev

    Namak Pare

    Namak Pare is a crispy snack that can be relished anytime. It is ideal to carry as a travel food. 
    Prep Time 10 minutes
    Cook Time 20 minutes
    Total Time 30 minutes
    Course: dry snack
    Cuisine: Indian

    Ingredients
      

    • 2 cups wheat flour
    • 2 tablespoon semolina
    • 1 teaspoon ajwain
    • 1/2 teaspoon pepper powder
    • salt to taste
    • 3 tablespoon oil
    • water

    Method
     

    1. Take wheat flour in a wide bowl, add semolina to it.
    2. Heat oil in a pan, we need it to mix the dough.
    3. Add ajwain, salt, pepper powder and oil to the flour. Mix it well. It should form a crumbly mixture.
    4. Add little water and mix to a stiff dough.
    5. Divide the dough into two parts, take a ball of the dough, dust with flour and roll into a circle which is nether too thick or thin.
    6. Make diagonal incisions on it. We need to make them in a rhombus shape.
    7. Heat oil, once the oil is put the cut pieces into it. Fry on a low flame. Keep stirring in between. Once they are cooked, remove them and repeat for the other ball of dough.
    8. Once they are cool, store in a air tight container.

    This post  goes to #BM97 with the theme Kids Delight with the theme Travel Food  guest hosted by Renu. 

    If you have liked this post, do share it further.

    If you ever make this, do take a picture and tag me on @foodiejayashree on Instagram

    Let’s be connected Facebook, Twitter, Pinterest and Instagram


    BMLogo

    Check out the Blogging Marathon page for the other Blogging Marathoners doing this BM#97

    Subscribe to get all updates and a book of handy hints for free!