Category: evening snacks

  • Paneer Tikka Recipe

    Paneer Tikka Recipe

    Jump to Recipe

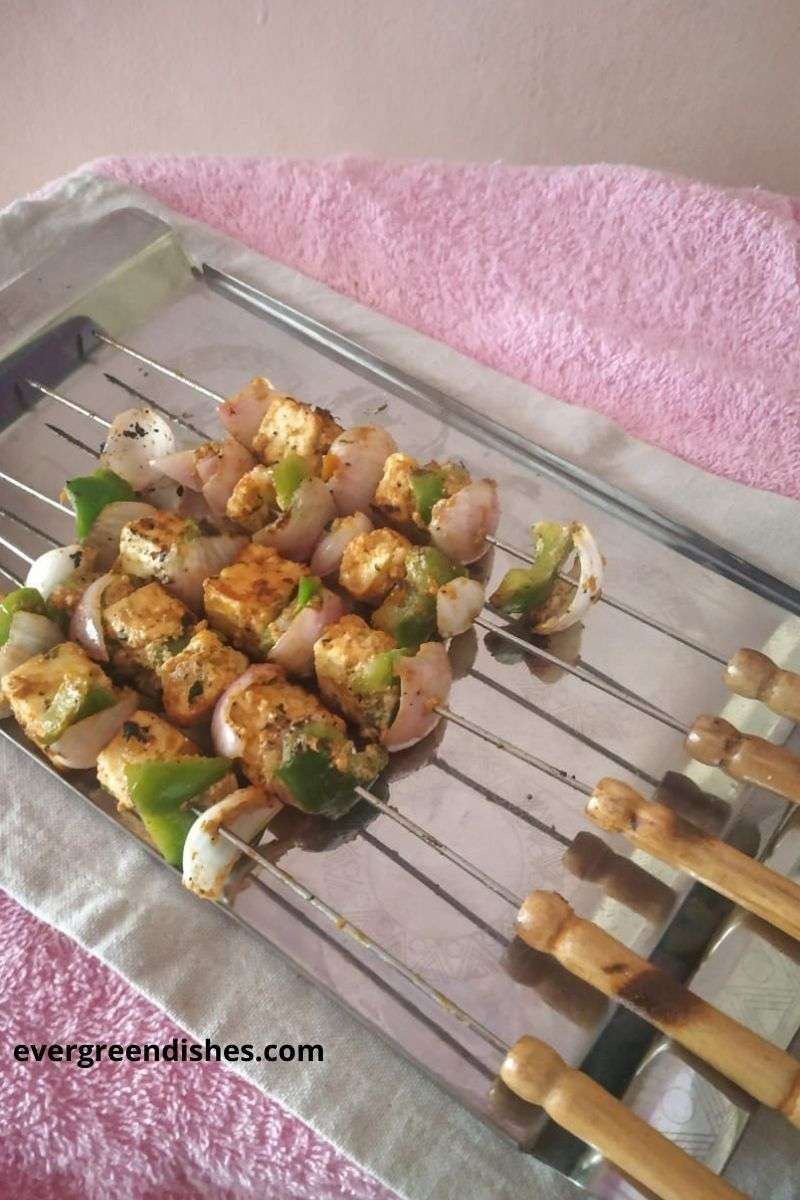
    Paneer Tikka is a popular snack known to India and its neighbouring countries. It is often served as an appetiser. Paneer pieces are marinated in spices and grilled to make a perfect snack.

    Paneer or cottage cheese is extensively used in Indian cooking . It is used in gravies, sabzies and snacks. Paneer Tikka is a popular North Indian snack, often served as an appetiser. These tasty bits are ideal to binge on a holiday or at a party. It is made by marinating the cottage cheese  in a blend of spices along with a few veggies and grilled or roasted.. This post is also a part of blog hop with the theme “appetisers” 

    paneer tikka

    A few other appetisers shared earlier are Vegetable Manchurian, Gobhi Manchurian, Veg Shami Kebab, Hara Bhara Kabab

    Paneer Tikka Recipe

    Ingredients :

    • 200 grams cottage cheese 
    • 1 onion 
    • 1 capsicum 
    • oil for frying

    For the marinade :

    • 1 cup thick curd or yoghurt 
    • 1 teaspoon cumin powder 
    • 1 teaspoon coriander powder
    • 1/2 teaspoon amchur powder 
    • 1 teaspoon chilly powder 
    • 1 teaspoonn chat masala 
    • 1 teaspoon ginger garlic paste 
    • salt to taste

    To Make the Paneer Tikkas :

    • Cut cubes of paneer , onion and capsicum.
    • The paneer should be kept in boiling water for at least fifteen minutes before using it.
    • Mix all the ingredients under the section ” For the marinade” 
    • Put the pieces into them and marinade them for an hour. Keep it covered in the refrigerator.
    • Take a skewer, pass on a capsicum, onion and paneer piece  on it. Repeat with a couple more.
    • Take another skewer and put the in the same order.
    • Heat a skillet. Roast them with a little oil. After a minute, change thee direction of the skewers. they should be well cooked.
    • Serve them hot.

    Take a tip :

    • Tomato slices may be used along with other vegetables.
    • To make ginger garlic paste, I have used an inch of ginger and eight cloves of garlic.


    About the event:

    This is an old post which I have edited with better pictures. With time, there is a change in the way we write and our pictures are better. Sending this to Foodies_Redoing Old Post 75, a fortnightly event. I have missed a few in between but joined back again.

    Evergreendishesdev

    Paneer Tikka

    Cottage cheese or paneer cubes marinated in spices and deep fried makes a tasty snack.
    Servings: 4
    Course: Snack
    Cuisine: north indian

    Ingredients
      

    • 200 grams paneer or cottage cheese cubes
    • 1 onion
    • 1 capsicum
    • oil for frying
    For marinade
    • 1 teaspoon cumin powder
    • 1 teaspoon coriander powder
    • 1/2 teaspoon amchur powder
    • 1 teaspoon chilli powder
    • salt to taste
    • 1 cup curd

    Method
     

    1. Cut the onion and  capsicum into  cubes. Remove the paneer cubes and put them in hot water for fifteen minutes.
    2. Mix all ingredients under the section “For marinade”
    3. Put the veggies and paneer  in the marinade mixture for  an hour, preferably keep them in the refrigerator.
    4. Deep fry them in oil.
    5. Paneer Tikka is ready to serve. 


    The other appetisers can be read below. Do not miss them

    Vani’s Boondi Chaat

    Piyali’s Rajma pops withTzatziki dip

    Shubha’s Punjabi Samosa

    Padma’s Punugulu

    paneer tikka

    If you ever make Paneer Tikka  recipe, take a picture and tag @foodiejayashree on Instagram or @evergreendishes on Facebook. Subscribe to get all updates in your inbox and an e-book for free!


  • Kanchipuram Idli

    Kanchipuram Idli

    kanchipuram idli | idli variety | south indian breakfast recipes | good food everyday |

    Jump to Recipe

    Kanchipuram idli is yet another kind of idli. It is spicy, tasty and ideal to serve as a finger food for small children. It needs no accompaniment. 

    With the summer showing it’s true colours, I am on an Idli spree,I think nothing is more comforting in the blazing heat. After the semolina idli, we come to the kanchipuram idli.

    This recipe is ideal to make when you have leftover idli batter in the refrigerator. It is often regarded as a boredom to eat anything more than once a week. This is easy to make and tasty,, needs no accompaniment and  ideal for breakfast or serve it at  tea time.

    I often keep a little batter aside to make kanchipuram idli. It is usually made during dinner at home. The variations you can make here are ample. Use coarsely ground pepper powder in the idli batter and it is known as pepper idli.  Another variety  is to add cumin, curry leaves and some chopped coriander in the batter. Steam the idli and later sprinkle a little chilli powder over it. 

    kanchipuram idli
    kanchipuram idli

    The Story Behind Kancheepuram Idli

    I recently came to know  from my aunt about it and I thought I must share it here. It is a traditional prasadam offered in the Varadharaja Perumal Temple of Kancheepuram. Thus it is popular by the name. The idlis are cooked in the bamboo casings lined with the dried mandhara leaves. The leaves lend a good aroma to the idlis.

    The batter is specifically ground for the purpose and the spices used in the temple preparation are black pepper, cumin, cashew, asafoetida and dried ginger. There is a long queue in the temple for the tasty prasadam.

    My way of making the idli

    The recipe is adopted from my mother who was making it quite often when we were young. I realised that making simple changes in the breakfast menu was ideal for all of us  and soon it was the kanchipuram idli with leftover idli batter. Instead of making the regular idli, it was a spicy idli which needed no accompaniments. A simple mango tasted best along with some butter.

    It is ideal to serve for breakfast, lunch or dinner. You can even serve it  in the lunch box. The only thing you should not forget while making these spicy idlis is to grease the container with a little oil. The idlis will not stick to the bottom and come out perfectly.

    I would like to remind that if you are like me, making with the leftover batter, be careful with the addition of salt. The batter has salt initially added in it. The quantity of chillies given below is just an indicator and the level of spiciness is not much. You may add a little more if you wish.


    Why should you make kanchipuram idli ?

    • it needs no accompaniment
    • a good way to use the leftover batter
    • steamed food is ideal during summer
    • it is healthy breakfast option
    • another variation for the morning breakfast


    Print Recipe
    kanchipuram idli
    Evergreendishesdev

    Kanchipuram Idli

    Kanchipuram idli is another variety of idli ideal for breakfast. It is spicy, tasty and needs no accompaniment. It tastes good with pickle.
    Prep Time 10 minutes
    Cook Time 15 minutes
    Total Time 25 minutes
    Course: Breakfast, healthy snacks
    Cuisine: karnataka

    Ingredients
      

    • Ingredients :
    • Idli batter 1/2 kg
    • bengal gram 2tbsp
    • green chilli 2
    • ginger 1 inch
    • coriander 1/2 bunch
    • cumin 1tsp
    • oil 1tsp
    • mustard 1/4tsp
    • asafoetida 1/4tsp

    Equipment

    • 1 idli maker
    • 1 small seperator ( the container we get along with pressure cooker )
    • 1 bowl
    • 1 ladle
    • 1 knife
    • 1 wide bowl

    Method
     

    1. Soak bengal gram in water for an hour.
    2. Wash coriander leaves and grind it along with green chilli and ginger.
    3. In a small pan, make the seasoning,add the mustard seeds, as they crackle add cumin and curry leaves. Add it to the batter.
    4. Drain water from the soaked bengal gram, and put it along with a pinch of salt.
    5. Take a seperator and smear some oil in it. Pour the batter, to half the quantity.
    6. Heat water in a pressure cooker and let cook without whistle until done.
    7. Remove and cut it diagonally into pieces.
    8. Tasty kanchipuram idlis are ready to serve.

    Notes

    • Adjust spiciness as per your taste.
    • Grease  the tin before pouring the batter into it.
     

    If you ever make this Kanchipuram Idli ,  do take a picture and tag @foodiejayashree on Instagram or @evergreendishes on Facebook or Twitter. I will be glad to see your creation and share it further. Let’s be connected, do follow on social media platforms. Until next time, let’s stay connected.  Subscribe to get all updates and an e-book for free. Check out my e-books on Amazon.  Happy Cooking !

    Pin it for later :

    kanchipuram idli
    Kanchipuram Idli
  • Hakka noodles

    Chinese dishes have  gained immense popularity in our country in the past few years. Though, not exactly the same version, the major ingredients are included with a slight touch of our spices, thus it was the beginning of Indo- Chinese cuisine in our country. From starters to lunch ideas, they have a huge variety of delicacies which have become the buzz word  in our society today. The immediate dish that occurs one’s mind is noodles. Today, I present to you their exclusive Hakka noodles  along with  a starter,alu 65 for our blog hop .This day marks the blogversary of my website also. Thankyou to  one and all for the support.  It has really been a wonderful journey here.

    (more…)

  • Alu 65, chilli potato

    Indo-Chinese snacks are very popular. Among the many varieties Alu 65, or chilli potato  is one of them. A dry snack , it is tasty and loved by all. It can be of different kinds as with cauliflower,paneer or tofu. I have used potato as it is liked by kids and I had prepared it on my daughter’s birthday.

    (more…)

  • Mirchi baaji, stuffed chilli pakodas

    Among the savoury snacks of south india, the most cherished is mirchi bajji, stuffed chilli pakodas which are deep fried in batter of gram flour. Nothing to beat that I beleive followed by onion pakodas. A plate of murmura with these fried snacks, was the most enjoyable  pasttime for us during college days , nostalgic memories flooding with this here !

    (more…)

  • Five No Cook Sandwich Ideas

    Five No Cook Sandwich Ideas

     Sandwich are considered to be the easiest ones that one can make. But, nothing can be made in two minutes, not even maggi noodles !  Everything needs some amount of planning and pre essentials to be had at hand, before being laid on the table for breakfast.


    5 No Cook Sandwich Ideas
    5 No Cook Sandwich Ideas

    Sandwiches can be made of various kinds. They can be grilled, open or just stuffed sandwiches. Today, I will write about the stuffings that can be used for this sandwich without cooking.

    Different kind of stuffings :

    1  Cheese Sandwich :

    Take a layer of cheese and lay it between two slices and that is heaven for kids !

    2 Cucumber  Sandwich:

    Take some soft butter with a wee bit of salt  and smear it on both sides. Keep some cucumbers with a dash of chat masala on it.

    3  Vegetable Mint Sandwich :

    Make some green chutney with mint, coriander and green chillies. Use this as a spreading along with butter. Different veggies as cucumber,onion, tomato and carrot can be used.

    Ingredients for the Mint and Coriander Chutney :

    •  Mint leaves  1/2 bowl
    • Coriander leaves 1 bowl
    • green chillies 2
    • salt to taste

    Method : Grind all these together to a paste.

    4  Vegetable Sandwich :

    Use fresh coconut to make the base for the bread slice. Grind it with green chilly and coriander leaves. Use pepper powder with butter and smear it. Over it,apply the chutney. Use different vegetables as in No 3.

    Ingredients for the coconut chutney :

    • fresh grated coconut 1 cup
    • green chilly 2
    • coriander 1/2 bowl
    • garlic cloves 2
    • salt to taste

    Method :

    Grind them together and use it as a spread.

    5  Lettuce and Celery for Sandwiches

    I just love using lettuce in these easy breakfast. Spread some butter mixed with salt and pepper. Put some garlic chutney onto it and spread the lettuce along with a few  finely cut cucumber and onion rings. Dab some oregano and top with another slice.

    A few other bread recipe from the blog : Roasted Paneer Slabs, Quick Open Sandwich, Sandwich Party

     ****POST UPDATED 26/12/2018 with new picture

    If you have liked this post, leave a comment below, all comments make my day.

    Follow evergreendishes on Facebook to get latest updates

  • Urad dal wada / uddina wade

    Urad dal wada / uddina wade

    (Disclosure : As an Amazon Associate, I will get a small commission for qualifying purchases without no addition cost to you.)

    urad dal wada | uddina wade | wada recipe | uddina vade| south indian recipes |

    Urad dal wada are tasty and loved by all. It is usually served along  with idli in restaurants. It is one of the essentials of South Indian breakfast. 

    Urad dal is soaked and then made into a thick batter, seasoned with spices and then deep fried in oil. Shaped like doughnuts, these have always been my favourite. With or without chutney, I love these fried dumplings. Today, a sneak and peek at this one.

    This is vegan and gluten free snack, ideal for breakfast along with idly or as an accompaniment with any meal. It is tasty and one cannot  resist having a couple of them. It is usually served with coconut chutney but one can dunk them in sambar or thick curd, it tastes awesome.

    This is an old post which I had written when I started my blog. Now, the post is redesigned with new picture and content, looking back there is a phenomenal change in the pictures and the way of writing. Well, that’s life, we try to get better each day isn’t it? And this post is part of the new group that I have joined Foodies_Redoing Old Posts started by Renu. The purpose is to give a new face to the old posts that we had written long back.

    urad dal wada

    INGREDIENTS :

    • 2 cup urad dal
    • 5 green chilly
    • coriander leaves
    • a few fresh coconut pieced
    • curry leaves
    • salt
    • water
    • oil for frying

    METHOD :

    • Soak urad dal in water for three hours.
    • Grind it to a fine batter with little water.
    • In another jar, grind green chilly and coriander and mix with it. Throw in a few roughly cut curry leaves, coconut pieces  and salt.
    • Heat oil in a pan , when done, beat and take some batter, make a hole with the thumb, and slowly release it into the oil. Initially, one needs a little practice to make urad dal wada, but once you know the trick, you can do it. 
    • In the beginning, one may not be able to make them and needs to be satisfied with the usual round balls.
    • Fry until brown on medium flame, remove and put them on a tissue paper. 
    • Serve with coconut chutney.


    About the Lifelong Iron Pan

    The pan is made from cast iron and is ideal for sauting,  deep frying or shallow frying. It is toxin free and teflon free. It is sturdy and is durable for a long time. The pan can be used on all kind of cook tops including induction stove.

    Pin it for later:

    urad dal wada
    urad dal wada


    urad dal wada
    Evergreendishesdev

    Urad Dal Wada

    Urad dal wada is a popular fried snack from South India. It is usually served for breakfast along with idli, chutney and sambar.
    Course: Breakfast
    Cuisine: South Indian

    Ingredients
      

    • 2 cup urad dal
    • 5 green chilly
    • coriander leaves
    • a few fresh coconut pieces
    • curry leaves
    • salt
    • water
    • oil for frying

    Method
     

    1. Soak urad dal in water for three hours.
    2. Grind it to a fine batter with little water.
    3. In another jar, grind green chilly and coriander and mix with it. Throw in a few roughly cut curry leaves, coconut pieces  and salt.
    4. Heat oil in a pan , when done, beat and take some batter, make a hole with the thumb, and slowly release it into the oil. Initially, one needs a little practice to make urad dal wada, but once you know the trick, you can do it.
    5. In the beginning, one may not be able to make them and needs to be satisfied with the usual round balls.
    6. Fry until brown on medium flame, remove and put them on a tissue paper.
    7. Serve with coconut chutney.

    Notes

    Add a little quantity of water while grinding, we need a batter of thick consistency.


    If you have liked this post, do share it with your family and friends. If you ever recreate it, take a picture and share it by tagging @foodiejayashree on Instagram or @evergreendishes on Facebook. I will be glad to see your creation.

    (Disclosure : As an Amazon Associate, I will get a small commission for qualifying purchases without no addition cost to you.)


  • Cutlets for the party

    It’s time for virtual party again. Thankyou Cherie Chalmers for bringing us together again . As Christmas is fast approaching, it is the Tree Trimming Party.

    Cutlets have been a popular snack since ages. As kids, we often went to one of the restaurants that prepared the delicious ones. Today ,cutlets are made of various kinds.

    Here is one kind which I often make and loved by all at home. This is made using different veggies, hence healthy and  ideal to serve for children and adults alike. The advantage of making these cutlets is they are shallow fried. Hence guilt free of the calories that you will be adding.

    INGREDIENTS :

    • beans  15
    • carrot 2
    • potatoes 3
    • peas 1 bowl
    • onions 2
    • green chilly 3
    • ginger 1 inch
    • coriander leaves 1/2 bunch
    • garam masala powder 1/2 tsp
    • chilli powder 1tsp
    • cumin powder 1/2tsp
    • salt
    • corn flour 2tbsp
    • bread crumbs
    • oil for frying

    cutlets
    mouth watering

    PROCEDURE :

    • Chop vegetables finely into small pieces.
    • Boil potatoes and keep aside.
    • Cut onions into fine bits.
    • Grind green chillies and ginger to a paste.
    • Take a spoon of oil in a pan and saute the onions. As they turn pink in colour, add the other veggies and let cook on a low flame.
    • When done, add the ginger- chilli paste and mix well. 
    • Add garam masala powder,cumin powder and chilli powder.
    • Mash the potatoes and mix along with the other ingredients.
    • Add  finely cut coriander leaves.
    • Mash all the veggies with a masher. 
    • Shape them into cutlets and keep aside on a plate.
    • Mix cornflour with water to a thin paste in a wide bowl.
    • Take one of them and dip it  iin the cornflour paste and then roll in the bread crumbs.
    • Heat a skillet and smear some oil on it. Shallow fry the cutlets on both the sides. You can make four or five at a time.
    • Serve with tomato ketchup.

    cutlets


    HAVE A GREAT TIME WITH OUR PARTY. WE ARE GLAD TO HAVE YOU HERE. DO VISIT OUR FRIENDS TOO !!

    [social_share style=”bar” align=”horizontal” heading_align=”inline” facebook=”1″ twitter=”1″ google_plus=”1″ linkedin=”1″ pinterest=”1″ /]


  • Mangalore bonda

    The daily food seems to bad to indulge and  calls for a change.  Fried food seems to be tasty while eating and liked by all.  I do not prepare often but children do love these !  (more…)

  • Samosa | How to make crispy samosa

    Samosa | How to make crispy samosa

    Samosa are an all time favourite snack relished by young and old alike. Crispy, triangular shaped,  filled with tasty fillings and deep fried make sumptuous snack to devour anytime. Love the idea of a samosa for a weekend when children can eat and enjoy their favourite serial, isn’t it? 

    The filling of a samosa can be of many kind. The most popular one is the potato filling. Mixed vegetables along with boiled potatoes makes a good option. The recent trending ones are the corn samosa, paneer samosa and the dry fruit samosa.

    samosa


    Ingredients 

    for the covering :

    • wheat flour 2 cups
    • salt a pinch
    • ghee 2tsp

    for the filling :

    • potatoes 3 boiled
    • onion 1 finely cut
    • green peas 1 bowl
    • amchur powder 1/4 tsp
    • coriander powder 1tsp
    •  cumin powder 1 tsp
    • red chilly powder 2 tsp
    • garam masala powder 1/2 tsp
    • salt to taste
    • coriander leaves finely cut

    Other ingredients:

    • flour for dusting
    • oil for frying


    Procedure :

    for the dough :

    Take the flour in a wide nowl. Add ghee and salt to it. Mix it well with fingers, it should form a crumbly texture. Now, add water in small quantities and mix into a dough  of thick consistency. Cover it with a damp cloth and keep it aside for 15 minutes.

    dough

    Take oil in a kadai and saute the onions and remove from fire. Add the potatoes and all the ingredients. Mix well and keep aside.

    DSC01750

    rolledtwo halves

    Take a ball and roll into a thin circle of 5 inches. Cut it in the centre. Take one section and keep aside.  Now ,you should fold into a cone .Place the stuffing and seal the sides with a little water. Heat oil in a pan, once it is hot, put two and deep fry on low flame. Keep tossing with some oil over them in between. Once they are golden, in colour, remove and put them on a tissue paper. Repeat for the remaining.

    stuffing

    I had prepared medium sized ones.

    samosa

    The stuffed samosas can be put in the air fryer and made a guilt-free snack. I used my Philips Air fryer to make these guilt free snacks. In just ten minutes, crispy, tasty, guilt-free samosas were ready.

    samosas in air fryer


    samosa

    Samosa in 2 ways

    Samosa is a crispy and tasty snack loved by all. It is ideal to serve as an evening snack with a cup of hot tea.
    Course: evening snacks
    Cuisine: punjabi

    Ingredients
      

    • for the covering :
    • 2 cup wheat flour
    • salt a pinch
    • 2 teaspoon ghee
    • for the filling ;
    • 3 potatoes boiled
    • 1 onion finely cut
    • 1 cup green peas
    • 1/4 tsp amchur powder
    • 1 tsp coriander powder
    • 1 tsp cumin powder
    • 2 tsp red chilly powder
    • 1/2 tsp garam masala powder
    • salt to taste
    • coriander leaves finely cut
    • Other ingredients:
    • flour for dusting
    • oil for frying

    Method
     

    1. Take the flour in a wide nowl. Add ghee and salt to it. Mix it well with fingers, it should form a crumbly texture. Now, add water in small quantities and mix into a dough  of thick consistency. Cover it with a damp cloth and keep it aside for 15 minutes.
       
    2. Take a ball and roll into a thin circle of 5 inches. Cut it in the centre. Take one section and keep aside.  Now ,you should fold into a cone .Place the stuffing and seal the sides with a little water.
    3. Heat oil in a pan, once it is hot, put two and deep fry on low flame. Keep tossing with some oil over them in between. Once they are golden, in colour, remove and put them on a tissue paper. Repeat for the remaining.

    samosa
    samosa

    So, here’s something to cook for the weekend ! Happy Cooking and have  a great weekend ! Do subscribe to get a copy of Book of Handyhints. If you have liked this Samosa recipe, do share it with your family and friends. If you ever make this, take a picture and share it by tagging @foodiejayashree on Instagram or @evergreendishes on Facebook or Twitter.