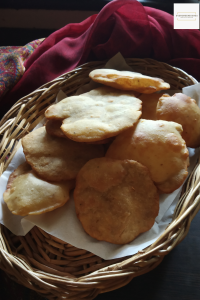
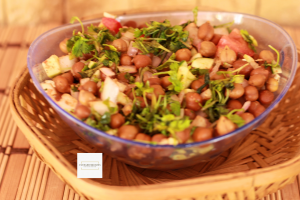
Vegetable Pakora in air fryer is crispy, tasty and guilt free snack to have anytime.
Monsoon is all set as we had a couple of showers this year. It’s one of the season that calls for delicious, spicy food. Pakodas, mirchi bhajji, samosa are some of the relished snacks at home.
Today, I am so happy to share a guilt-free pakora recipe with all of you here. Air fryer is a boon to all of us. It helps us to create guilt free recipes without any hassle. Air fryer pakoras are almost similar like the fried ones without any guilt.
Benefits of Air fryer:
Air fryer is a blessing to all of us. We can enjoy many tasty recipes without deep frying in oil. It means, less consumption of oil and a way to healthy living. It is ideal to cook for a wide range of dishes. Moreover, there is no need to slog in the kitchen for hours during summer.
This is the first air fryer recipe that I am sharing here though I have tried various ones at home like wedges and tikkis. I will update about them soon.
Philips Air Fryer:
We are using the Philips Air Fryer, it is extremely good to prepare a wide range of dishes such as tikkis, wedges, samosas, pakoras and grilled vegetables. It is a good value for money. We are more so ever conscious of our health, this is the best investment we have made for ourselves.
About the event :
Sending this to ” Monsoon Time” at Healthy Wealthy Cuisines. It is a fortnightly event, where bloggers create a recipe on a pre-selected theme. The theme was suggested by Poonam Bachav. Poonam is a dedicated blogger who has many tasty recipes on her blog. I liked her beetroot pachadi, never tried making beet with curds in it.

Other recipes from my co-bloggers
- Beets and Potato Tikki by Preethi
- Ram Ladoo by Swati
- Rice Cutlet by Nams Corner
- Garlic Rasam by Poonam
- Paneer Pakoras by Shalu
- Baked Maddur Vada by Vanita
- Masoor Dal Fritters by Sasmita
- Moong Dal Pakoda by Ruchi
What is pakora ?
Pakora / Pakoda are deep fried Indian fritters made using chickpea flour. Different kind of pakoras are made such as onion, mix veg, cabbage etc. Although used as a snack, it is also served as an accompaniment with any meal.
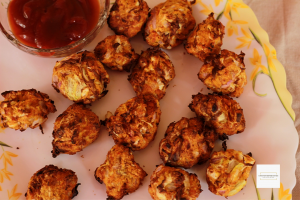
Air fryer Vegetable Pakora Recipe
Let’s get to the recipe of air fryer pakora.
Ingredients:
- 1 carrot grated
- 1 onion finely cut
- 1 capsicum finely cut
- 1 tablespoon coriander leaves
- 1/4 cup besan
- 1/4 cup rice flour
- 2 tablespoon curd
- 1/2 teaspoon turmeric powder
- 1 teaspoon red chilly powder
- 1/2 teaspoon coriander powder
- 1/2 teaspoon cumin powder
- 1/2 teaspoon carom seed
- 1/2 teaspoon pepper powder
- 1/2 teaspoon chaat masala
- salt
- 2 teaspoon oil
- little oil for brushing
Method:
- Take the veggies in a bowl.
- Add the spice powders to it.
- Now, put oil to it and mix with curds. Do not add water.
- Keep the mixture aside for half an hour. The mixture becomes moist with water released from the salt and vegetables.
- Pre-heat the air fryer for 3 minutes.
- Brush a little oil and put the pakoras in the air fryer with a spoon.
- Set the temperature and time. I kept it for 5 minutes twice.
- Check once and flip them.
- Remove and serve hot when ready with tomato ketchup. Repeat for the rest of the batter.

Air Fryer Vegetable Pakora
Ingredients
Method
- Take the veggies in a bowl.
- Add the spice powders to it.
- Now, put oil to it and mix with curds. Do not add water.
- Keep the mixture aside for half an hour.
- Pre-heat the air fryer for 3 minutes.
- Brush a little oil and put the pakoras in the air fryer with a spoon.
- Set the temperature and time. I kept it for 5 minutes twice.
- Check once and flip them.
- Remove and serve hot when ready with tomato ketchup. Repeat for the rest of the batter.
Pin Air Fryer Pakora to a Snacks Board:

If you have liked this post, do share it with your family and friends. If you ever make this, take a picture and share it by tagging @foodiejayashree on Instagram or @evergreendishes on Facebook or Twitter.
Let’s be connected, the follow buttons are on the side bar. Subscribe to get all updates and an e-book for free!


 Ingredients: