Tag: glutenfree

  • Quinoa Kheer Recipe | Quinoa Payasam

    Quinoa Kheer Recipe | Quinoa Payasam

    quinoa kheer | quinoa payasam | quinoa pudding | sweets |

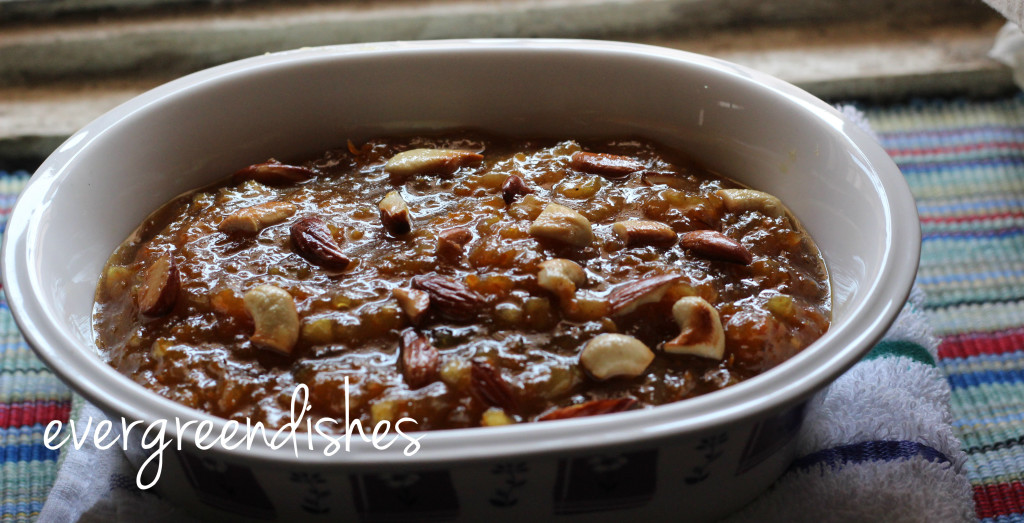
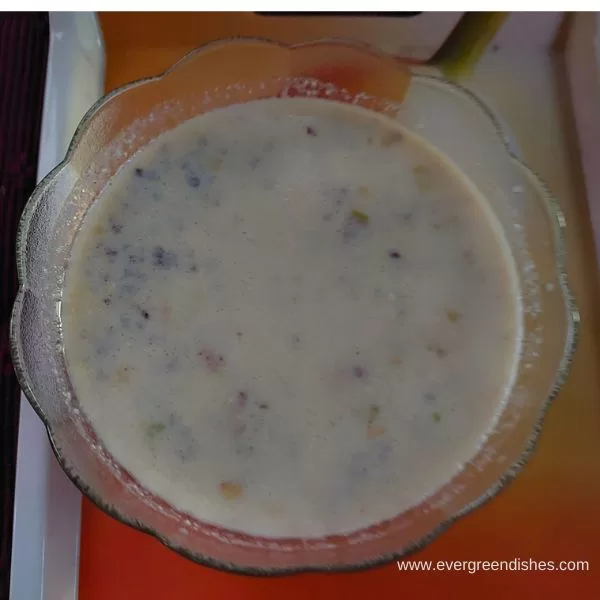
    Quinoa Kheer is a tasty, varied kind, naturally healthy kheer. It is a delicious twist to the usual kheer made with rice or vermicelli.The quinoa consumers are steadily increasing in number. It is one of the preferred choice of food for many people. 

    quinoa kheer
    a bowl of quinoa kheer

    Quinoa is versatile to use. Today, I am sharing a kheer recipe with it. It is nutty, tastes good and ideal to prepare for the festive days.

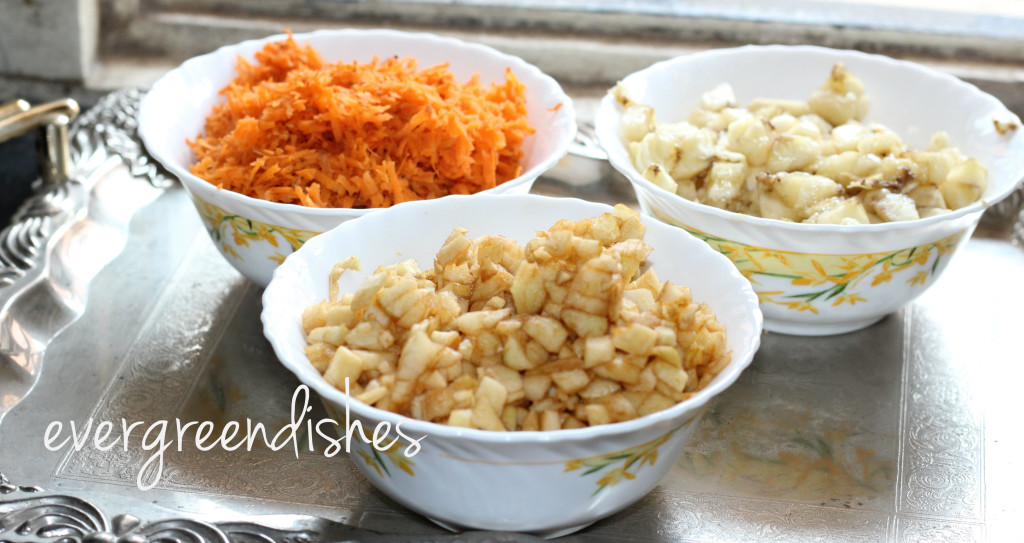
    A simple and easy recipe which you can make for any occasion. With quinoa gaining popularity,  I wanted to give a try to the favourite Indian sweet payasam with quinoa. Wash the quinoa to remove the saponins and soak it in water for two hours. You can use any variety of quinoa.  In the meantime, boil the milk in a thick bottom pan. Put the saffron strands, it gives a good aroma and color to the kheer. Take the soaked quinoa, put half a cup of water and cook in a pressure cooker for one whistle.

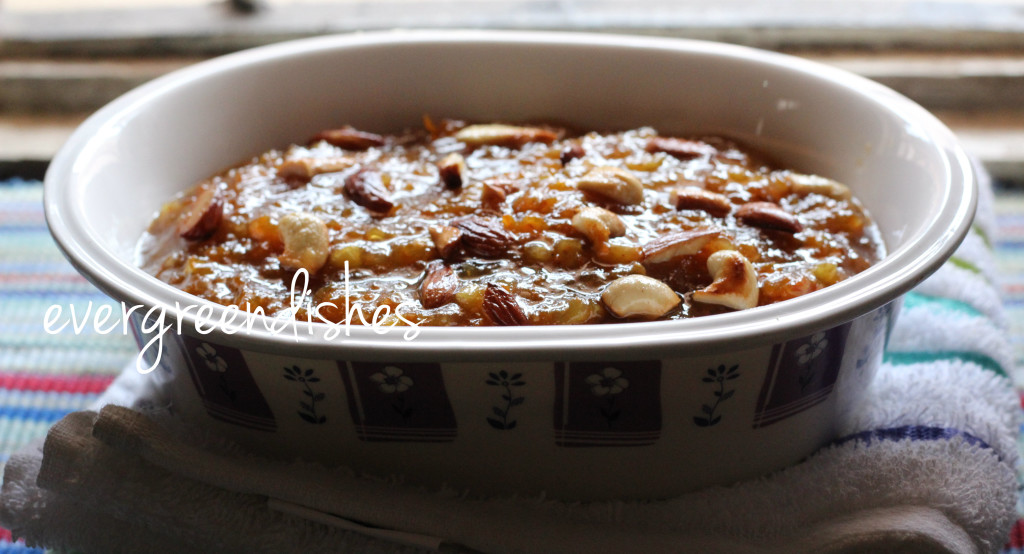
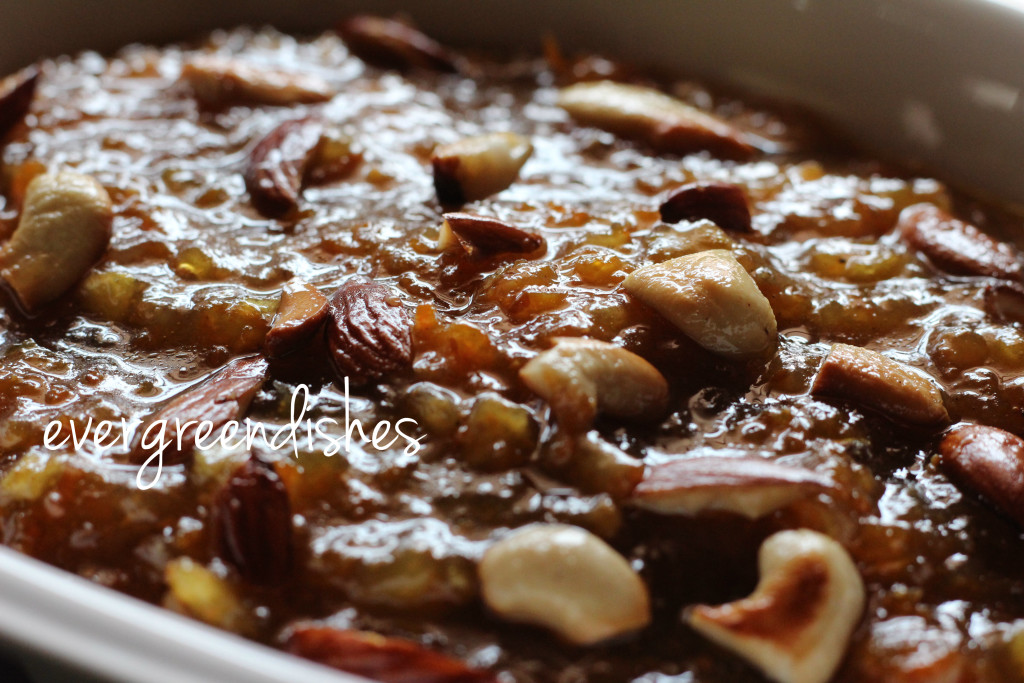
    Grind the dry fruits to a powder. Add the cooked quinoa to the milk along with the dry fruit powder. As it thickens, add sugar and cook for two minutes. Remove and keep aside. Garnish with cardamom powder.

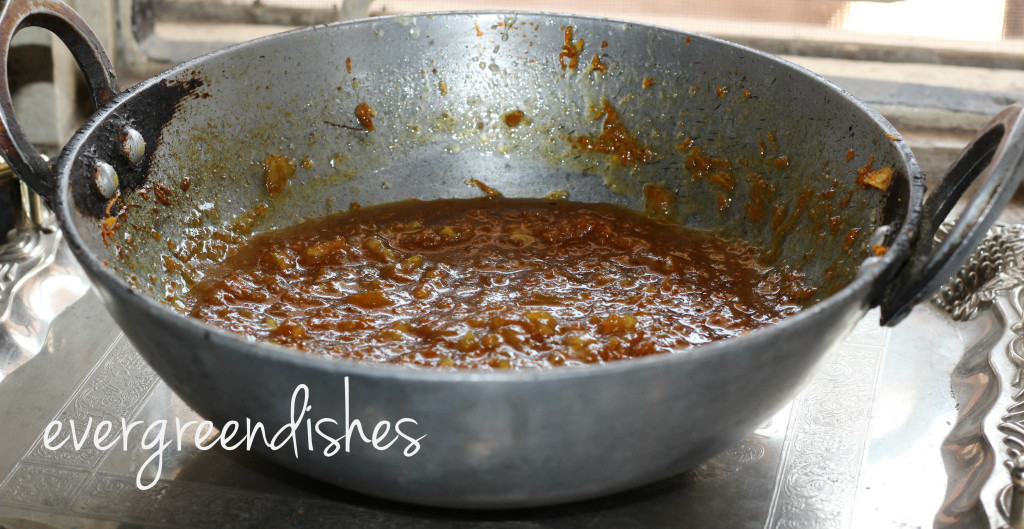
    If you want to add dry fruit pieces, boil the milk until it is reduced to half. Then, roast the dry fruit pieces in ghee and put it in the prepared payasam. You can serve it warm or chilled. 

    The other recipes with quinoa shared earlier are :

    Quinoa Dosa
    Quinoa Dosa
    Quinoa Upma
    quinoa upma


    quinoa pongal
    quinoa pongal


    Print Recipe
    quinoa kheer
    Evergreendishesdev

    Quinoa Kheer

    5 from 5 votes
    Quinoa Kheer is a delectable sweet dish made with milk and quinoa.
    Course: Dessert, milk based sweets

    Ingredients
      

    • 3/4 litre milk
    • 1/3 cup quinoa
    • 1/2 cup water +extra for soaking
    • 1/2 cup sugar
    • 7 almond
    • 7 cashewnut
    • 2 cardamom
    • a few strands of saffron

    Equipment

    • pan
    • ladle
    • pressure cooker with containers
    • mixer along with small jar

    Method
     

    1. Wash and soak the quinoa for two hours. It should be rinsed well to remove the saponin covering.
    2. Put the milk in a thick bottom pan and boil it for sometime. Put the saffron strands to the milk.
    3. Pressure cook the quinoa with half a cup of water for one whistle.
    4. In the meantime, make a powder of dry fruits along with cardamom.
    5. Once the pressure releases by itself, put the quinoa to the boiled milk and cook it for sometime. Put the dry fruit powder to it.
    6. Once it thickens, add sugar to it and give a stir. Boil for two minutes. Keep it aside. Quinoa kheer is ready to serve.

    Notes

    • You can use any variety of quinoa.
    • It can be served warm or chilled.
    • If you want to add roasted nuts instead of powder, you need to boil the milk until it reduces to half the quantity. 

    If you  make Quinoa Kheer, take a picture and share it by tagging @foodiejayashree on Instagram and @evergreendishes on Facebook.  Subscribe to get all updates and an e-book for free.

    Pin it for later : 

    quinoa kheer
    quinoa kheer
  • Dal Makhani / Easy Dal Makhani Recipe

    Dal Makhani / Easy Dal Makhani Recipe

    Jump to Recipe Print Recipe

    Dal Makhani is a rich creamy, delectable side dish from North Indian cuisine. It makes a good accompaniment to all kinds of flat breads, rice dishes and steamed rice. Dal is the Hindi word for lentil while Makhani translates to butter. It is a whole black lentil cooked in butter. 

    The first time I had it was decades back and since then it has been a family favourite. I learnt this recipe from a good Punjabi friend who is no more. She was kind enough to share this recipe with me. Dal Makhani is synonymous to the traditional Maa ki dal. Whole black dal  is cooked on a low flame for long hours with spices. 

    Here is an easy restaurant style dal makhni recipe. It is rich, creamy and tastes delicious. It can be paired with any kind of flatbread like roti, nan, paratha,  roomali roti or phulka.


    A few pointers while cooking dal makhni at home.  It needs time and patience, the lentil needs to be soaked for at least six hours. Once they are soaked,  put them in a colander, after sometime, clean it thoroughly, discard the hard ones. The hard pulses never cook and do not taste good. Later, it is cooked in a pressure cooker for six whistles  along with kidney beans and a few other ingredients. Once the pressure releases, the makhan comes into action. After sauting the onion and tomato in butter, lentils are again cooked in a pressure cooker. This is the usual procedure  I have been following to get a creamy dal makhani. 

    Dal Makhani
    Dal Makhani

    Dal Makhani Recipe

    Ingredients :

    250 grams black urad dal
    50 grams rajma
    1 inch ginger
    2 green chillies
    3 cups water
    2 tablespoon butter
    1/2 teaspoon cumin
    1 onion
    2 tomato
    salt to taste
    1/2 teaspoon chilli powder
    coriander for garnshing


    Method:

    1. Wash black urad dal a couple of times and soak in water overnight.
    2. Soak kidney bean  in another bowl .
    3. The next day, put the soaked urad dal in a colander for sometime.
    4. Now, clean the lentil. Some of them are hard as pellets and will never cook. They need to be discarded.
    5. In a bowl, add the cleaned lentils and kidney beans with three cups of water. Cut the green chilli into two pieces and throw it. Put the grated ginger and a little turmeric powder to it. Pressure cook for five or six whistles.
    6. In another pressure pan, add butter. Add cumin, as it splutters, put onion pieces. Saute it for sometime, until light pink in colour. Put tomato  in it. Saute it. Once it is mushy, add the cooked lentil and bean mixture to it. Put salt. Allow it to simmer for sometime. Put chilli powder and pepper powder. Check the consistency, add water accordingly. The consistency, will be thicker on cooling, you need a medium, flowing consistency. Pressure cook for one whistle.
    7. Once the pressure release, check the taste and adjust accordingly. Garnish with fresh coriander. 

    Take a tip:

    1. I have not added garlic, if you wish, put it and saute with onions.
    2. You can make tomato puree and use it.  
    3. The measurement given here may be more for some of you. Reduce the quantity of lentil and kidney beans used. Use the other ingredients as per your need.
    4. You may add some cream in the end.


    Evergreendishesdev

    Dal Makhni

    Dal Makhni is a delicious side dish from North India. Black urad dal and kidney bean are cooked together to form a creamy and tasty accompaniment. It is ideal to pair with roti, nan or steamed rice.

    Ingredients
      

    • 250 grams black urad dal
    • 50 grams rajma
    • 1 inch ginger
    • 2 green chillies
    • 3 cups water
    • 2 tablespoon butter
    • 1/2 teaspoon cumin
    • 1 onion
    • 2 to mato
    • salt to taste
    • 1/2 teaspoon chilli powder
    • coriander for garnshing

    Method
     

    1. Wash black urad dal a couple of times and soak in water overnight.
    2. Soak kidney bean  in another bowl .
    3. The next day, put the soaked urad dal in a colander for sometime.
    4. Now, clean the lentil. Some of them are hard as pellets and will never cook. They need to be discarded.
    5. In a bowl, add the cleaned lentils and kidney beans with three cups of water. Cut the green chilli into two pieces and throw it. Put the grated ginger and a little turmeric powder to it. Pressure cook for five or six whistles.
    6. In another pressure pan, add butter. Add cumin, as it splutters, put onion pieces. Saute it for sometime, until light pink in colour. Put tomato  in it. Saute it. Once it is mushy, add the cooked lentil and bean mixture to it. Put salt. Allow it to simmer for sometime. Put chilli powder and pepper powder. Check the consistency, add water accordingly. The consistency, will be thicker on cooling, you need a medium, flowing consistency. Pressure cook for one whistle.
    7. Once the pressure release, check the taste and adjust accordingly. Garnish with fresh coriander.

    About the event:

    Sending this post at Shhh Cooking Secretly Challenge  for the  theme “Restaurant style food at home”. The theme was suggested by Aruna Sahas Chandra. I like the variety of different dishes she puts on her blog. Recently, she posted Paneer Do Pyaza, would like to recreate the same as my children love paneer dishes. 

    Here, it  is a monthly event, partners are paired and secret ingredients are exchanged between them.  The dish is prepared and shared in the Facebook group. Guessing the ingredients is a fun activity. My partner for the event was talented blogger Anu Kollon. The two ingredients given to me where cumin and onion. I made Dal Makhni which I intended to post since a long time. I had given ginger and tomato, she has made delicious, Paneer Butter Masala

    shhh cooking secretly

    A few  North Indian dishes shared earlier are :

    Pin Dal Makhani to Indian Food Board: 

    Dal Makhani is a creamy and tasty side dish from North Indian cuisine.
    Dal Makhani

    If you ever make this Dal Makhani recipe, do take a picture and tag me @foodiejayashree on Instagram, I will be glad to see your creation.Follow evergreendishes on FacebookTwitterPinterest and Instagram, let’s be connected. Subscribe to get all updates and a book of handy hints for free! Check out my e-books

  • Instant Ragi Idli

    Instant Ragi Idli

    finger millet idli | instant ragi idli |millet recipes | breakfast recipes | healthy recipes

    Jump to Recipe

    Instant Ragi Idli is tasty, healthy and easy to make. It is a good option for breakfast, evening snack or dinner. You can serve it for people with diabetics.

    The summer is at it’s peak, nothing is more soothing than a glass of cold water. One needs to eat simple food that is tasty and nourishing for the body. Idli is ideal during summer. Here is another version of Idli.

    Ragi or finger millet is regularly used at home these days. It is gluten free and good source of protein. It is rich in calcium, good carbohydrates and proteins. It helps to control diabetes and blood sugar. It is ideal for weight watchers. It helps in controlling anxiety and depression.

    Moreover, it is ideal food for summer. It has cooling properties which helps the body to combat stress. A few other idli recipes that I have shared earlier :Chennai Idli, Sago Idli,

    I had earlier shared the fermented version of ragi idli. But, I find this to be more simple and handy. One hardly require ten minutes for all the preparation, keep it aside for half an hour and later put it in the mould and steam.

    A few pointers before I proceed to the recipe. Curds or yoghurt must be sour. Addition of veggies is optional, you can make without it. Once the baking soda is added, immediately put it in the moulds and keep it to steam.

    instant ragi idli
    instant ragi idli

    Ragi Flour : Always use fresh flour. The best way to keep a track of all the groceries is to bring them in a required quantity. For a family of four, one kilogram of ragi atta is sufficient. There is no need to buy two kilograms and keep as a reserve for the future. We tend to use different ingredients on a rotational basis.

    Semolina : The semolina used here is bombay rawa. 

    Sour curd ; The curd should be sour but should not have a foul smell. It 

    Vegetables ; Vegetables used here are onion, carrot, green chilli and coriander. You may use green peas and capsicum. Using of onion is                            optional. 

    Baking Soda : As the idli is an instant version, baking soda is essential. You can use eno instead. 

    Water : It is needed to bring in the desired consistency.  You also need water for steaming.

    Seasoning : All the ingredients of seasoning are needed. You may add a few curry leaves. Cashews give a good taste.


    instant ragi idli
    Evergreendishesdev

    Instant Ragi Idli

    5 from 4 votes
    Instant ragi idli is tasty, healthy and easy to make breakfast option for the busy mornings. One can make it for evening snack or dinner too.
    Prep Time 10 minutes
    Cook Time 20 minutes
    Resting time 30 minutes
    Servings: 20 idli
    Course: Breakfast, dinner ideas, evening snacks
    Cuisine: South Indian

    Ingredients
      

    • 1 cup finger miller flour
    • 1 cup sour curd
    • 1 carrot
    • 1 onion
    • fresh coriander
    • salt
    • 1 tablespoon oil
    • 1/2 teaspoon mustard
    • 1/4 teaspoon asafoetida
    For seasoning
    • 1 tablespoon mustard seed
    • 1/4 teaspoon asafoetida
    • 1/4 teaspoon turmeric powder
    • 1/2 teaspoon cumin
    • 4 cashewnut

    Method
     

    1. Take a wide bowl, add ragi flour and semolina to it. Put salt and curd to it. Mix it well, keep the batter aside for half an hour.
    2. Chop the onion finely and grate the carrot.
    3. Make seasoning, take oil in a small pan, add mustard seeds, as it crackles, put cumin, cashew pieces, broken chilli, a few curry leaves, pour it over the batter.Add veggies and chopped coriander. Adjust the consistency by adding some water.
    4. Put water in the idli pan and heat in on a low flame.Meanwhile, put the soda powder to the batter, mix it and put it to the moulds.
    5. Steam it for fifteen minutes on moderate flame., then on low heat for five to ten minutes. Check if it is done. Switch off. Unmould after sometime.Serve with coconut chutney.

    Notes

    • Sour curds is mandatory. 
    • Addition of veggies is optional.
    • Once the baking soda is added, immediately put it in moulds and steam it.
    • Eno may be used instead of baking soda.
    • Serve hot. 

    This post is part of the Healthy Wellthy Cuisines with the theme “Steamed Dishes”, do check out the other recipes by co-bloggers:

    If you have liked this post, pin it for later. Do share with your family and friends. If you ever make it, take a picture and tag us on Facebook or @foodiejayashree on Instagram, we would be happy to see your creation.

    Pin it for later

    instant ragi idli
    instant ragi idli

    Do subscribe to get a book of handyhints for free !

    Are you passionate about writing? Do start a blog and pen your thoughts Choose A2 Hosting as I have done. They are easily approachable and reliable.


  • How To Make Perfect Sabudana Khichdi

    How To Make Perfect Sabudana Khichdi

    Jump to Recipe Print Recipe

    Sabudana Khichdi is made from soaked tapoica pearls and tossed in spices, is a favourite of one and all. It is usually made during fasting days. It is tasty and makes a good evening snack. We all love this to the core. It is commonly used as a fasting food during Ekadasi and Navratri.

    Sabudana khichdi, reminds me of so many tales. My mother makes the best kind, it’s so tasty. I make sabudana khichdi quite often, it’s one of the favourite of my children, but somehow never made to the blog, happy I am posting it today.

    About the event :

    The Shhhh Secretly Cooking Challenge group have now reached the heart of the country, a foodies delight, splendid state of Madhya Pradesh. The cuisine of the state is influenced by neighbouring countries and has a love for street food. Thus, a wide range of delectable dishes are famous here from Malpua to Seekh Kabab. I was paired with Sasmita of www.firsttimercook.com She is a good cook and a consistent blogger. I had given milk powder and cashewnut as the secret ingredient,  and Sasmita prepared Mawa Baati.  Cumin and peanut were  the secret ingredients given to me  and I have prepared my favourite Sabudana Khichdi.

    We love sabudana khichdi at home, but somehow, this dish had not made to the blog. Now, I got a chance to put it here. But, I had put sabudana wada before, it is made in appe pan.

    casserole of sabudana khichdi
    sabudana khichdi

    Tips to make a good khichdi:

    Making a good khichdi is an art destined to a few. It is tricky and one gets to know it the hard way. Always use good quality sabudana. I prefer using Varalakshmi brand, it is good and gives me good results each time. Secondly, soaking is done with a little quantity of water,  for ten minutes. After ten minutes, discard the water and keep it aside for four to five hours.. Thirdly, sabudana khichdi needs a little more quantity of oil than other dishes we prepare.

    Steps in making sabudana khichdi:

    Preparing sabudana khichdi, needs a little planning as it needs to be soaked for a few hours.

    • soaking
    • roasting of groundnuts
    • grinding
    • cooking of sabudana

    Read the method given below for proper soaking of sabudana. 


    Ingredients:

    • 1/2 kilogram sabudana
    • 2 potato
    • 4 tablespoon roasted peanut powder
    • 8 green chilly (use less if spicy)
    • 1 +1 teaspoon cumin
    • 2 tablespoon ghee
    • 2 tablespoon oil
    • salt to taste
    • 1 lemon

    Method:

    1. Clean the sago pearls, wash them in running water, discard the water to remove all the starch. Put some water, a little above the sago pearls, keep it aside for ten minutes. Then discard the water again (keeping very little) and keep it aside closed for four to six hours. The pearls bloom and are  tender when you hold between fingers.
    2. Roast the peanuts and make a coarse powder.
    3. Grind green chilly and a spoon of cumin in the small jar.
    4. Cut the potato into small thin pieces. Put them in water to avoid discolouration.
    5. Take oil and ghee in a thick pan, add cumin, as it splutters, rinse the potato slices and put it. Let cook for sometime.
    6. In the meantime, add salt, green chilly paste and lime juice to the soaked sabudana. Mix it.
    7. Once the potatoes are cooked and slightly crunchy, add the mixed sabudana to it. Give a stir, let cook on a low flame for sometime.
    8. Garnish with fresh coriander. Fresh grated coconut may be used.

    Take a tip:

    1. Tapioca pearls or sabudana used are not the small, shiny tiny ones. These are white small balls.
    2. Green chilly, adjust as per your need. It also depends on the spice level of the green chilli.
    3. Washing the sabudana, adding water, keeping aside for ten minutes, then discard the water and soaking it  with very little water is an important step here.
    4. The measurements given here are for 1/2 kilogram of dry sabudana. Thus the quantity of prepared dish, it yields is more. Decrease the quantity proportionately as per your need.

    Sabudana Khichdi
    Evergreendishesdev

    Sabudana Khichdi

    Sabudana khichdi is delicious  snack prepared with tapoica pearls, spices are added to it and served usually during fasting days. 
    Prep Time 7 hours
    Cook Time 20 minutes
    Soaking time 6 hours
    Total Time 6 hours 11 minutes
    Servings: 6 people
    Course: Breakfast, evening snacks, fasting recipe
    Cuisine: Indian, Madhya Pradesh

    Ingredients
      

    • 1/2 kilogram sabudana
    • 2 potatoes
    • 2 tablespoon oil
    • 2 tablespoon ghee
    • 1 +1 teaspoon cumin
    • 8 green chilly ( I used less spicy ones)
    • 4 tablespoon peanut powder
    • salt to taste
    • 1 lemon
    • coriander for garnishing
    • fresh coconut (optional)

    Method
     

    1. Clean the sago pearls, wash them in running water, discard the water to remove the starch. Put some water, a little above the sago pearls, keep it aside for ten minutes. Then discard the water (keeping very little) and keep it aside closed for four to six hours. The pearls bloom and are tender to hold between fingers.
       
    2. Roast the peanuts and grind to a coarse powder
    3. Grind green chilly and a spoon of cumin in the small jar.
    4. Cut the potato into small thin pieces. Put them in water to avoid discolouration.
    5. Take oil and ghee in a thick pan, add cumin, as it splutters, rinse the potato slices and put it. Let cook for sometime.
    6. In the meantime, add salt, green chilly paste and lime juice to the soaked sabudana. Mix it.
    7. Once the potatoes are cooked and slightly crunchy, add the mixed sabudana to it. Give a stir, let cook on a low flame for sometime.
    8. Garnish with fresh coriander. Fresh grated coconut may be used.

    Notes

    • Tapioca pearls or sabudana used are not the small, shiny tiny ones. These are white small balls.
    • Green chilly, adjust as per your need. 
    • It is essential for the sabudana to be  soaked and ready before cooking. Washing the sabudana, adding water, keeping aside for ten minutes, then discard the water and soaking it  with very little water is an important step here.
    • The measurements given here are for 1/2 kilogram of dry sabudana. Thus the quantity of prepared dish, it yields is more. Decrease the quantity proportionately as per your need. 


    Sabudana Khichdi
    Sabudana Khichdi


    Sabudana Khichdi
    Sabudana Khichdi

    shhhhh secret cooking challenge
    shhhhh secret cooking challenge

    Pin it for later :

    casserole of sabudana khichdi
    sabudana khichdi


    Follow us on Facebook, Twitter, Pinterest and Instagram 

    If you ever recreate this dish, do take a photo and tag @foodiejayashree on Instagram. Subscribe to get a book of handy hints for free and all updates in your inbox. Be the first one to be notified.

  • How to make jowar dosa

    How to make jowar dosa

    Jowar dosa | healthy recipe | south indian cooking || breakfast recipe

    Jowar dosa is a healthy twist to the usual one. It is tasty and can be made both crispy and soft. Serve it with chutney and potato sabzi for a good breakfast. Jowar is the Indian name for Sorghum. It is also known as Indian millet, Great millet, Durra and milo. In India, the other names by which it is known are jola, chholam or jonna.

    Dosa is one of the favourites of South Indian. A dosa batter in the refrigerator really saves our day ! It is on the weekly menu, and not to mention the many variety that they prepare. Rice is one of the essential ingredients in it, but now different versions are being made. We are more conscious of what we consume, thus dosa with millets has made their way in most kitchens.

    Jowar dosa is a healthy twist to the regular one and I am loving it. The taste is not similar but I can vouch that there is not much difference too. Infact, we are loving this variety of millets dosa. It is ideal for breakfast, evening snack or dinner. It is vegan and glutenfree.

    What are millets? 

    Millets are coarse grains and a repository of high fibre, protein, mineral and vitamins. They are widely grown as cereal crops for fodder and human food. Some millets are fox tail, sorghum, pearl millet, little millet, proso millet and barnyard millet. 

    Can one make the same quantity of batter as the regular dosa?

    I prefer not to make as the taste varies once the batter gets sour. The regular dosa tastes good.It is better to make these in lesser quantity as for a single use. 

    A few other dosa variety that I often prepare Neer Dosa, Rava Dosa,

    You can pair them with coconut chutney, green chutney or  Red Onion chutney 

    Jowar dosa
    Jowar dosa

    Here whole grains of jowar are used, they need to be soaked for a longer time. It is advisable to soak before you go to bed at night, but the urad dal, soak it for two hours only. Grind them to a batter and allow to ferment. Thus, pre-planning is essential.

    Make a small quantity and preferably finish the batter on the same day. If it remains, finish it the next day, I am doubtful how good it tastes as the usual dosa batter that we use.

    Since millet is used here, unlike the regular dosa, these need to be cooked on both sides.

    Jowar Dosa

    Ingredients:                       

     (Measurement used 1 cup = 150 ml)

    • 1 cup jowar
    • 1 cup rice
    • 1 cup urad dal
    • 1 teaspoon fenugreek
    • water for soaking
    • salt
    • oil for roasting

    Method:

    1. Wash and soak the jowar in water for six to eight hours.
    2. Soak rice separately with methi in it.
    3. Soak urad dal for two hours.
    4. Grind the jowar at first, add rice to it later and let them blend.
    5. After sometime, put urad dal to it. Put some water to the batter if needed. I preferably use the soaked water.
    6. Grind all of them to a smooth batter.
    7. Remove the batter in a wide bowl.
    8. Allow it to ferment for seven to eight hours.
    9. Add salt to the batter, mix it.
    10. Take some batter in another bowl.
    11. Heat a skillet.
    12. Take a spoonful of batter, pour it on the skillet and spread it inside out. A thin crepe can be made.
    13. Drizzle oil, once it roasted, turn it to the other side.
    14. Serve hot with chutney. Potato sabzi too tastes good.
    making of jowar dosa
    making of jowar dosa

    Pin it for later: 

    Jowar dosa
    Jowar dosa


    Jowar dosa
    Evergreendishesdev

    Jowar Dosa

    Jowar dosa is tasty and healthy twist to the usual dosa. It can be served for breakfast, lunch, evening snack or dinner. 
    Prep Time 15 minutes
    Cook Time 30 minutes
    Fermentation time 6 hours
    Total Time 45 minutes
    Servings: 20 dosas
    Course: Breakfast, evening snacks, glutenfree
    Cuisine: karnataka, south india

    Ingredients
      

    • 1 cup jowar 1 cup = 150 ml
    • 1 cup raw rice
    • 1 cup urad dal
    • 1 teaspoon methi
    • water for grinding
    • salt
    • oil for roasting

    Method
     

    1. Wash and soak the jowar in water for eight hours.
    2. Soak rice separately with methi in it.
    3. Soak urad dal for two hours.
    4. While grinding, at first, put only the jowar in the machine. After sometime, put rice. Add some water. Then later, add urad dal. Grind all of them together to a smooth batter. 
    5. Remove the batter in a big bowl, allow to ferment for six to eight hours.
    6. Add salt to it.
    7. Mix the batter and take some in a small bowl. Heat a skillet, pour a ladle full of batter and spread it inside out to a thin crepe. Drizzle some oil.
    8. Allow to cook. Flip it to the other side. After two minutes, remove and serve.

    Notes

    • Make a small quantity of batter and finish it within a day or two. 

    This post is part of the theme #TimeForDoasatHW at Healthy Wellthy Cuisines group. Here are the other dosa varieties by co-bloggers

    If you have liked this post, do share it further.  Do pin it for future reference.

    If you ever make this recipe, do take a picture and tag me @foodiejayashree on Instagram, I will be glad to see your creation.

    Follow evergreendishes on Facebook, Twitter, Pinterest and Instagram, let’s be connected.

    Subscribe to get all updates and a book of handy hints for free!

    Check out my e-books

  • Chocolate Chia Seed Pudding

    Chocolate Chia Seed Pudding

    Chocolate chia seed pudding is a tasty, easy to make, high fiber, protein packed ideal for breakfast. It can be made in fifteen minutes with a little preparation.  (more…)

  • Ragi Halbai / Finger Millet Fudge

    Ragi Halbai / Finger Millet Fudge

    Jump to Recipe Print Recipe

    Ragi Halbai or Finger millet fudge is a tasty, soft, chewy fudge made of finger millet, coconut and jaggery. It is a healthy sweet.  It is a dish from South Canara region of Karnataka. Here, the whole grain of finger millet is used by soaking and then grinding and cooking it.

    The use of millets is more so now than ever as the benefits one reap is abundant. It is nutritious and high in fibre. I prefer using ragi at home since it is liked by all.  Do check these breakfast recipes Ragi Idli, Ragi Thalipeeth, Ragi Khichu

    South Canara cuisine is delicious and coconut is one of the main ingredients in their cooking. The coconut used is fresh one and it is usually ground to a paste and used in most dishes.

    With many festive days ahead, you can try this recipe soon.

    What is Ragi ?

    Ragi is popularly known as Finger millet or Nachni. Finger millet or Elusine Coracana is an annual herbaceous plant widely grown as a cereal crop in the arid and semi -arid areas in Africa and Asia.  It came to India around 2000 BC and since then its been consumed in different ways.

    Nutrients in Ragi

    Ragi is a whole grain that is gluten free and staple in South India. It is rich in fiber that helps with weight loss and diabete. It is packed with calcium, good carbs amino acids and Vitamin D. The nutrition per 100 grams is as below: ( Source: Wikipedia)

    • Protein 7.6 g
    • Fat 1.5 g
    • Carbs 88g
    • Calcium 370 mg
    • Vitamin A 0.48 mg
    • Thiamine 0.33 mg
    • Riboflavin 0.11 mg
    • Niacin 1.2 mg
    • Fiber 3g

    Benefits of Ragi :

    1. Rich in calcium – It is one of the best non- dairy sources of calcium when compared to other grains. Dr. Anju Sood, a nutrionist from Bangalore says, ” It is extremely beneficial for growing kids and can be given in the form of porridge”
    2. Help in controlling diabetes: The grains seed coat is abundant in polyphenol and dietary fibre. The low glycemic index lessens food cravings and helps maintain blood sugar.
    3. Relax the body: The regular usage of finger millet has found to help stress  related disorders as insomnia, depression and anxiety.
    4. Helps in weight loss: The high of dietary fibre helps one to keep full for a long time, thus the cravings are less.
    5. Battles anemia: It is rich source of natural iron and thus a boon for anaemic patients. Once it is sprouted, the Vitamin C level increases and leads to easy absorption of iron into the bloodstreams.
    6. Reverts skin ageing: methionine and lysine present in it  make tge skin tissue less prone to wrinkles and sagging.

    ragi halbai

    Now, getting on to the recipe without further ado:

    Ragi Halbai / Finger Millet Fudge

    Ingredients:

    • 1 cup ragi
    • 1 cup jaggery
    • 1 cup fresh coconut
    • 2 tablespoon ghee
    • 2.5 cup water
    • 1/2 teaspoon cardamom powder
    • a few cashew

    Method:

    1. Soak  ragi for five hours.
    2. Grate the coconut.
    3. Discard the water, grind the ragi to a fine paste along with coconut by adding little water.
    4. Strain the liquid through a sieve, press the residue  with a spoon Grind it again with some water. I used one and half cup of water to grind.
    5. Grease a plate with a little ghee.
    6. Take the jaggery and melt it with a cup of water. Filter it to remove impurities.
    7. Put the melted jaggery and the strained puree in a thick bottom pan. Let it cook. Add some ghee, keep stirring, otherwise it will stick to the bottom of the pan.
    8. Put the remaining  ghee, once it thickens to a mass and leaves the side, put cardamom powder, mix and pour it over the greased plate.
    9. Cut it into squares.  Decorate with roasted cashews. Ragi Halbai is ready to serve.

    Pre- requirements:

    Ragi are small red grains, one needs to clean it properly as tiny specks of impurities are seen. It is usually soaked in water and then the water is slowly discarded. The grains are then put to dry and used.


    Evergreendishesdev

    Ragi Halbai / Finger Millet Fudge

    5 from 7 votes
    Ragi halbai is a twist to the usual one that is prepared using rice. It is tasty and healthy. Finger millet, coconut and jaggery are cooked together to form a delicious fudge. 
    Prep Time 5 hours
    Cook Time 20 minutes
    Total Time 5 hours 20 minutes
    Servings: 15 pieces
    Course: festive treats, healthy snacks, traditional sweets
    Cuisine: dakshina kannada, karnataka

    Ingredients
      

    • 1 cup ragi
    • 1 cup jaggery
    • 1 cup fresh coconut
    • 2 tablespoon ghee
    • 2.5 cup water
    • 1/2 teaspoon cardamom powder
    • a few cashew for topping

    Method
     

    1. Soak ragi for five hours.
    2. Grate the coconut.
    3. Discard the water, grind ragi and coconut to a fine paste by adding little water.
    4. Strain the liquid through a sieve, press the residue with the back of a spoon to extract the liquid. Grind it again with some water, and again strain it. I used one and half cup of water for grinding. 
    5. Smear some ghee on a plate. 
    6. Take the jaggery and melt it with a cup of water. Strain to remove impurities. 
    7. Now, put the jaggery and the strained mixture in a pan and lett it cook. Add some ghee to it. Keep stirring, otherwise, it will stick to the pan. 
    8. Add the remaining ghee, once it foerms a mass and leaves the side, put cardamom powder, mix and spread it over the greased plate. 
    9. Cut it into squares, decorate with roasted cashews. 

    Notes

    • Ragi needs to be cleaned well before using. Small impurities are present that can damage organs of the body, thus it is highly recommended to clean it properly before using. 
    • It is usually rinsed in water and gently the water is displaced, the impurities are seen lying at the bottom. 
    • While grinding, check the amount of water that you are utilising, it is important you use the recommended amount.
    • While  cooking, keep stirring the liquid. 

    If you have liked this post, do share it further.

    ragi halbai

    This post is part of the #HWCuisine with Ragi as the theme. Here are the other Ragi recipes by my co-bloggers

    About the event :

    Sending this post to Foodies_Redoing Old Post_113. It is a fortnightly event where we work on an old post either by changing the picture, text, formatting or anything else related to the post. Here, I have changed the pictures.This is an old post which I had written in 2018, now I have changed it with better pictures.


    If you ever make this ragi halbai  or any of my other dishes,  do take a picture and tag @foodiejayashree on Instagram or @evergreendishes on Facebook or Twitter. I will be glad to see your creation and share it further. Let’s be connected, do follow on social media platforms. Until next time, let’s stay connected.  Subscribe to get all updates and an e-book for free. Check out my e-books on Amazon.  Happy Cooking !

  • Spring onion and corn pulao

    Spring onion and corn pulao

    Jump to Recipe Print Recipe

    Spring onion and corn pulao is a mildly fragrant rice dish and makes a delicious meal.

    Rice is one of the daily essentials without which we cannot survive. Rice dishes just give more glamour and taste to the usual food, they are loved by all, especially the children who are so fussy to eat good food.

    Spring onion and corn pulao is mildly fragrant and makes a good meal. It is vegan and gluten free. It is ideal for weekend menu or one can pack it in lunch box.

    spring onion pulao
    spring onion pulao

    Spring Onion and Corn Pulao

    Ingredients:   Measurement used: 1 cup=250ml

    • 1 cup rice
    • 1 cup spring onion chopped
    • 1 onion
    • 1/2 cup sweet corn kernels
    • 1 teaspoon ghee
    • 1 tablespoon oil
    • 2 cloves
    • 2 cardamom
    • 1/2 teaspoon saunf
    • 1/2 teaspoon shajeera
    • 1 bay leaf
    • 1 green chilly
    • 1/2 cup coriander leaves
    • a few mint leaves
    • 2 cloves garlic
    • 1/2 inch ginger
    • water
    • salt to taste

    Method:

    1. Cut the spring onion finely, separate the greens and bulbs.
    2. Wash the greens by soaking in water.
    3. Wash the rice and soak in water for fifteen to twenty minutes.
    4. Cut the onion and put the corn kernels in water and set them aside.
    5. Grind the coriander, mint, green chilly, ginger and garlic to a paste.
    6. Take ghee in a pan, saute the spring onion for two minutes. Remove it and keep it aside.
    7. Add oil, put the saunf and shajeera to it. Allow it to splutter, throw in the other spices cardamom, clove and bay leaf. Now put the onions into it. Saute for sometime.
    8. Add the corn kernels to it.
    9. Put the paste into it and saute for sometime.
    10. Now, add the rice to it. Saute for a minute.
    11. Add water to it. Put salt to it.
    12. Close the lid and cook it for one whistle.
    13. Once the pressure releases, remove it and put the saute green into it and mix it gently.
    14. Spring onion and corn pulao is ready to serve.

    Take a tip:

    The amount of water depends on the kind of rice used. I have used in the ratio of 1: 2

    spring onion and corn pulao
    spring onion and corn pulao

    A few other rice dishes from the blog: Jeera Rice, Spanish Rice

    spring onion and corn pulao
    Evergreendishesdev

    Spring Onion and Corn Pulao

    Spring onion and corn pulao is a mildly fragrant and delicious dish to serve anytime. 
    Prep Time 10 minutes
    Cook Time 20 minutes
    10 minutes
    Total Time 30 minutes
    Servings: 4 people
    Course: lunch box, lunch ideas, Main Course, rice variety
    Cuisine: Indian, north indian

    Ingredients
      

    • 1 cup rice
    • 1 cup spring onion (green) finely cut
    • 1 onion
    • 1/2 cup sweet corn kernels
    • 1 teaspoon ghee (clarified butter)
    • 1 tablespoon oil
    • 2 cloves
    • 2 cardamom
    • 1/2 teaspoon fennel seed
    • 1/2 teaspoon black cumin
    • 1 bay leaf
    • water
    • salt
    To grind
    • 1 cup coriander
    • 8-10 mint leaves
    • 1 green chilly
    • 1/2 inch ginger
    • 2 cloves garlic

    Method
     

    1. Take the greens of the spring onion, cut them finely and put in water. Rinse and put it aside. 
    2. Soak the rice for 15-20 minutes.
    3. Cut the onion and put the corn kernels in water. 
    4. Grind the ingredients under the section “to grind”
    5. Take ghee in a pan and saute the spring onion leaves for two minutes. Put it aside.
    6. Add oil in the pressure cooker, put the fennel seeds and black cumin, once it splutters put the cardamom, clove and bay leaf. Put the onion and saute for sometime. 
    7. Add the corn kernels to it. Let cook for a minute.
    8. Now, add the ground paste to it and saute for sometime.
    9. Put the rice and saute for sometime.
    10. Add water and salt. Give a stir. Close the lid and let cook for one whistle.
    11. Once the pressure releases, remove the lid and gently mix the sauted spring onion to it. 
    12. Spring onion and corn pulao is ready to serve.

    If you ever make this dish, take a photo and share it with me. I would like to see your creation. Tag @foodiejayashree on Instagram on follow us on facebook.

    You can save these pictures on pinterest for your reference.


    Subscribe to get all updates in your inbox and a book of handyhints for free!

  • ABC Halwa for Holi

    ABC Halwa for Holi

    ABC Halwa is a Gujarati sweet dish prepared with apple, banana and carrots. It is tasty and makes a good sweet for any celebrations.

    It’s that time of the year, when the world is full of new blossoms and the weather is enchanting. A season you love and cherish, but so short lived. Winter has come to an end and summer will soon make way. It’s beautiful spring,time ,yay , it’s Holi time ! And on this ocassion I bring to you a delicious and healthy sweet dish, ABC Halwa.

    Holi is celebrated on the  day of full moon ,that is Poornima of the Phalguna month of the Hindu calendar. It usually occurs in February or March. This year it is on March 23. The next day , the citizens celebrate by playing with colour. What does Holi signify actually ? It indicates the arrival of spring, victory of good over evil, good bye to winter and also a harvest festival.

    Coming back to my dish, yes, the name is intriguing, but the taste is just too good. Apple, banana and carrots together makes this awesome dish. You can add fresh coconut to this, but I avoided as my children are fussy about it. Earlier, I used to make only carrot halwa, now the addition of fruits seems to have taken it to another level. The smell of the apples  being cooked  is  awesome. This is a popular Gujarati dish. I am sending this dish to the Holi Collection by Sonal.

    ABC Halwa
    ABC Halwa


    ABC Halwa
    Recipe Type: Dessert
    Cuisine: Gujarati
    Author: Jayashree
    Prep time:
    Cook time:
    Total time:
    Serves: 6
    A sweet dish with the goodness of fruits and vegetable combined.
    Ingredients
    • apple pieces 1 cup (1big apple)
    • banana pieces 1 cup (2 large bananas)
    • carrot grated 1cup (4 carrots )
    • sugar 1 1/4 cup
    • milk 1 cup
    • ghee 1tbsp +1tsp
    • salt a pinch
    • cardamom powder 1/4 tsp
    • cashew and almond pieces
    Instructions
    1. Remove the skin of apple and cut into small pieces.
    2. Grate the carrots.
    3. Chop the banana also into small bits.
    4. Take a thick bottom pan and put all the cut fruits and carrot together. Add milk and keep on a low flame to cook.
    5. Allow to cook for sometime, until the milk is dissolved and it looks as a mass.
    6. Add a tablespoon of ghee and saute the mixture for sometime. The colour changes and the ghee will be seperated.
    7. Then, add the sugar and continue to cook for some more time. All ingredients will get blended together. Put the pinch of salt.
    8. Finally add the cardamom powder and remove from flame.
    9. Take a small pan , and roast the dry fruits in ghee. Garnish it
    Notes
    • You can increase the quantity of sugar, if you want it to be more sweet.
    • Fresh coconut can be used along with the fruits and carrot.


    apple,banana and carrot pieces
    apple,banana and carrot pieces

    Remove the skin of apple and cut it into small pieces. Grate the carrots and chop the bananas. All are of equal measurement. I required one apple, two bananas and four carrots to make them of one bowl each.

    halwa being cooked
    halwa being cooked

    Put them in a thick bottom pan and add a bowl of milk. let cook on a low flame. Keep stirring. Once the milk has evaporated add ghee and continue to saute. As it leave the sides, add sugar (1 1/4 bowl) and cook till it melts and then thickens. You need at least twenty minutes. Finally add cardamom powder.

    ABC Halwa
    ABC Halwa

    Roast the dry fruits in a little ghee. Garnish them over it.

    ABC Halwa
    ABC Halwa

    ABC Halwa
    ABC Halwa

    Glad if you share it ! HAPPY HOLI !


    Subscribe to get a book of handyhints for free !


  • fig milkshake with chocolate sauce

    Fruits are healthy and ideally should be given at the start of the day and what better way than incorporating it in a milkshake. Those reading me regularly, know that I love making these milkshakes. I find that they are not only healthy but can be consumed without any fuss. Moreover, these help to keep going for long hours. Fig milkshake with chocolate sauce is a tasty drink that can be enjoyed by fussy kids.  (more…)