Tag: vegan

  • Olan Recipe |  Kerala Sadya Recipe

    Olan Recipe | Kerala Sadya Recipe

    Jump to Recipe

    Olan is a traditional dish from Kerala cuisine. It is a part of the sadya menu. Olan recipe is easy to make and pretty straight forward.

    Onam is celebrated from Aug 20th to 29 th this year. It is an annual harvest festival celebrated throughout India. It is the official festival of Kerala. The whole state is decorated during this  period and many cultural events are held.

    Onam sadya is an elaborate menu prepared as offering on the festive day. It consists of at least 26 dishes. Some of them are ada payasam, thoran,  aviyal, pachadi, inji thayir, rice,  kozambu, pulissery,  olan, paal payasam  and banana chips. are some of the dishes. Olan is prepared using ash gourd, red cow peas and coconut milk. For the uninitiated, ash gourd is also known as white gourd, wax gourd and winter melon. It is native to South Asia. In Kannada, we call it as budhakumbalakayi.

    I have extracted the coconut milk at home, so I could easily make the thick and thin milk. Two cups of fresh grated coconut yielded 200 ml of thick milk and 240 ml of thin milk.

    olan

    What ingredients are used in Olan ?

    • Fresh coconut: We need quite a lot of fresh grated coconut. Kerala recipes call for coconut in most recipes. Coconut milk is extracted by grinding and straining it., The thick and thin milk has to be kept separately. At first the thin milk is added and later the thick milk is added. Do not cook for a long time after adding thick milk.
    •  Ash gourd : Remove the skin and cut it into cubes.
    • Lobia: Soak them overnight
    • Green chilli
    • curry leaves
    • Coconut oil : Coconut oil is the preferred oil in this cuisine.
    • Mustard
    • Asafoetida


    The other recipes using ash  gourd shared earlier are


    dum root halwa
    dum root halwa

    majjige

    Print Recipe

    Kerala Olan

    Olan is a traditional dish from Kerala cuisine. It is a part of the sadya menu. Olan pairs well with hot steamed rice.

    Ingredients
      

    • 2 cups of grated coconut
    • 250 grams ash gourd
    • 1/3 cup lobia
    • 2 green chilli
    • curry leaves
    • For the seasoning :
    • 2 teaspoon coconut oil
    • 1/4 teaspoon mustard
    • 1/4 teaspoon asafoetida
    • 1 green chilli
    • a few curry leaves

    Method
     

    1. Soak the red cow peas overnight.
    2. Put the grated coconut in  a cup of warm water and keep it aside for half an hour.
    3. Grind it and make a puree. Extract the puree. Keep the thick milk aside.
    4. Add half a glass of  water and grind it again. Extract and repeat the process, this is the thin milk. We will be using the thin milk in the beginning.
    5. Peel the ash gourd skin and cut into cubes. Be careful as you remove the hard skin, lest you hurt yourself.
    6. Cook the cow pea for one whistle in the pressure cooker.
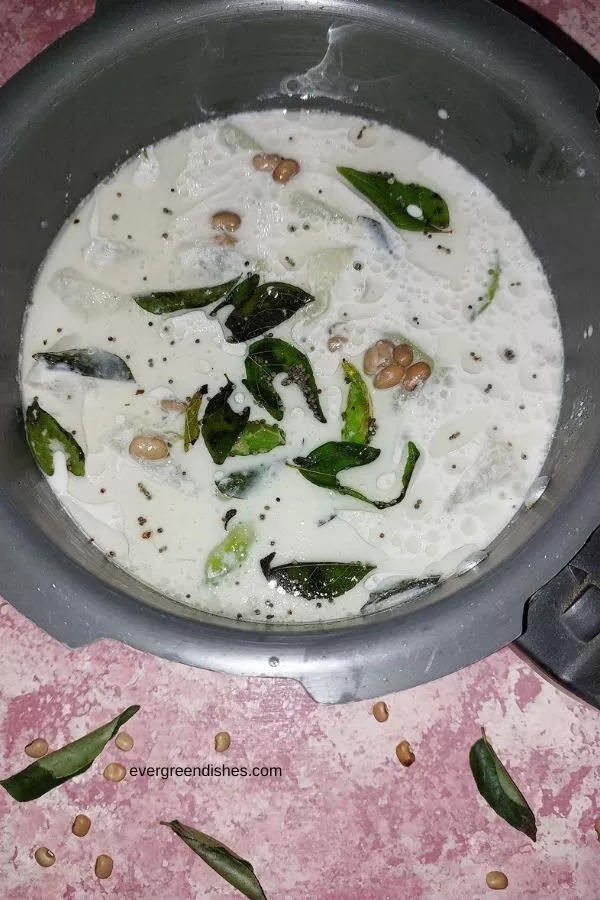
    7. In a pan, put the ash gourd pieces, boiled cow pea, thin coconut milk and boil on a medium flame. Add curry leaves and green chilli to it.
    8. Once the ash gourd is tender, add the thick coconut milk to it. Put salt. Cook for a minute and turn off the stove.
    9. Make seasoning with coconut oil and pour it.
    10. Olan is ready to serve.

    Notes

    White cow pea may be used instead of the red one.
    Do not overcook the cow pea or the ash gourd.
    You can use store bought coconut milk.
    Coconut oil is commonly used in the preparation of Kerala dishes. You can use any neutral oil.
    Do not cook for long time after adding the thick coconut milk. 

    About the event :

    Sending this to the Sadya theme at Shhh Secretly Cooking group. The theme was suggested by Priya Vijayakrishnan. She has prepared Vendakkai Pachadi, an  essential of the sadya menu.  It is easy to prepare and makes a good accompaniment.

    I was paired with Seema Doraiswamy of Mildly Indian. Seema gave me green chillies and coconut I have made olan. With the asafoetida and curry leaves I had shared, Seema has made Mambazha Pachadi, a dish made with ripe mango. I have bookmarked her Madhura Curry to make sometime.

    shhh cooking secretly

    Pin it for later :

    kerala olan recipe
    kerala olan recipe

    I hope you liked the Onam Sadya recipe. If you ever make Olan in your kitchen, take a picture and tag @foodiejayashree on Instagram or evergreendishes on Facebook.  Until next time, Happy Cooking ! Be happy and cheerful.

  • Quinoa Upma | How to make quinoa upma

    Quinoa Upma | How to make quinoa upma

    Jump to Recipe Print Recipe

    Quinoa Upma is a healthy, hearty breakfast ready in thirty minutes. It is ideal for people of all ages. 

    Quinoa is a little grain packed with nutrients. It is one of the food we regularly consume these days. Initially, we did not like it much,  but now, we do enjoy. The numerous benefits and the rich source of proteins makes it an ideal diet for all vegetarians. It is vegan, gluten-free and good alternative for health conscious people. 

    Quinoa Upma
    quinoa upma

    What is quinoa? 

    Quinoa (pronounced as Kinwa or kinuwa) is a flowering plant of Amaranth family. It is technically a seed but classified as a grain. It is a pseudo cereal grown since 5000 years. It is a good source of nutrition for people following animal diet. It is also used as a substitute to rice by many people. 

    What does quinoa contain? 

    Quinoa is a rich source of protein.  It also contains manganese, iron, folate, magnesium along with anti-oxidants. It is also a good source of fiber. 1 cup of cooked quinoa provides 222 calories and  contains 8 grams of protein,  39 grams of carbohydrates, 5 grams of fiber and 6 grams of fat. (Source: Everyday Health) It helps to keep hunger at bay for a long time. 

    How is quinoa cooked ?

    Quinoa should be washed a couple of time  to remove saponin. It is a bitter coating which gives a good covering for the grain. Put the rinsed quinoa and water in the ratio of 1:2 and simmer it for ten to fifteen minutes. It should be well cooked, cover it with a lid while cooking. 

    How is it used ?

    It is versatile to use. It can be used in salads or as a filling  with a few other vegetables. One can also use it to make dosa and idli.  The versatility makes it even more interesting for us to use it.  Watch out this space for more quinoa recipes.

    Quinoa Upma
    quinoa upma

    What recipe are you sharing today and the event related ? 

    Archana, from The Mad Scientist Kitchen has given the theme as Seeds to Cook  in the Shhh Cooking Secretly Challenge. Archana has many recipes on her blog. She has made a winter treat with edible gum. It is the right season to have  Kachaya Dinka Chi Pud. Here we are paired and secret ingredients are shared to guess later by other members in the group.  I decided to make Quinoa Upma. My partner for this month was Poonam Bachchav and she gave me bengal gram and lemon as the secret ingredients accordingly. Poonam wanted to make a mouth freshener and I have given black salt and sesame seed as the secret ingredients. I would love to make this this Flaxseed Mukhwas soon. 


    shhh cooking secretly


    Quinoa Upma Recipe 

    Ingredients:

    • 2 teaspoon oil
    • 1/2 teaspoon mustard seed
    • a pinch of asafoetida
    • 3 green chilli
    • 1 onion
    • 1/4 cup green pea
    • 1 cup quinoa
    • salt to taste
    • sugar
    • 1/2 lemon
    • coriander for garnishing

      Method:
      1. Wash the quinoa by rinsing a couple of times to remove saponins. Keep it aside.
      2. Take oil in a pan, add mustard seed, as they splutter put asafoetida and green chilli. After a minute, put onion to it. Saute it
      3. Add green peas to it. Let them cook for sometime.
      4. Put the rinsed quinoa to it. Add two cups of water to it with salt and a dash of sugar.
      5. Let it cook for sometime. After sometime, cover with a lid and let it cook evenly.Finally, when the water is absorbed and it is well cooked, add lemon juice and garnish with fresh coriander leaves. Serve hot.

    Take a tip:

    • You can use other vegetables as beans and carrot. Chop them finely and put them in the seasoning.
    • Tomatoes too can be added. I have kept it simple with onion and green peas.
    • Alternatively, you can skip onion if you wish.
    • Instead of green chilli, you can add a little sambar and chilli powder. It also tastes good. 
    • To make it gluten-free, avoid asafoetida or using gluten -free asafoetida.
    Quinoa Upma
    quinoa upma
    Quinoa Upma

    Quinoa Upma

    5 from 12 votes
    Quinoa Upma is a healthy, easy to make and tasty breakfast. It is ready in thirty minutes.

    Ingredients
      

    • 2 teaspoon oil
    • 1/2 teaspoon mustard seed
    • a pinch of asafoetida
    • 3 green chilli
    • 1 onion
    • 1/4 cup green pea
    • 1 cup quinoa
    • salt to taste
    • sugar
    • 1/2 lemon
    • coriander for garnishing

    Equipment

    • bowl, pan, ladle

    Method
     

    1. Wash the quinoa by rinsing a couple of times to remove saponins. Keep it aside.
    2. Take oil in a pan, add mustard seed, as they splutter put asafoetida and green chilli. After a minute, put onion to it. Saute it
    3. Add green peas to it. Let them cook for sometime.
    4. Put the rinsed quinoa to it. Add two cups of water to it with salt and a dash of sugar.
    5. Let it cook for sometime. After sometime, cover with a lid and let it cook evenly.
    6. Finally, when the water is absorbed and it is well cooked, add lemon juice and garnish with fresh coriander leaves. Serve hot.

    Notes

    • You can use other vegetables as beans and carrot. Chop them finely and put them in the seasoning.
    • Tomatoes too can be added. I have kept it simple with onion and green peas.
    • Alternatively, you can skip onion if you wish.
    • Instead of green chilli, you can add a little sambar and chilli powder. It also tastes good. 
    • To make it gluten-free, avoid asafoetida or using gluten -free asafoetida.
     
    Quinoa Upma is a healthy, tasty and easy to make breakfast. It is ready in thirty minutes.
    Quinoa Upma

    If you ever make Quinoa Upma recipe, do take a picture and share by tagging @foodiejayashree on Instagram or @evergreendishes on Facebook. Subscribe to get all updates and an e-book for free ! 

  • Watermelon Rind Dosa | Watermelon Rind Recipes

    Watermelon Rind Dosa | Watermelon Rind Recipes

    Jump to RecipePrint Recipe


    Watermelon Rind Dosa is a delicious and unique breakfast option. It is soft, spongy and porous.  It is vegan and gluten free  and as the name suggests watermelon rind is used in it.

    Considering the fact, watermelon rind is healthier, I don’t like to waste it. The rind is the white part of the watermelon. It is rich in fibre and aids in digestion.  Usually, I use it in a smoothie or a salad.  Of late, I have another recipe and I make this dosa also. The dosa is made slightly thick and cooked only on one side. Like the regular dosa, this needs to be fermented. This  recipe is adopted from Vinaya Prasad’s blog  Vegetarian Culinary Delights. I am active in a couple of groups on Facebook and this group is one of them. I like the enthusiasm and patience with which she runs the group. Recently, the group reached the 15000 milestone mark. 

    Watermelon Rind Dosa Recipe 

    Ingredients: 

     1. 25 cup  rice
    1/2 cup  urad dal
    1/4 cup flattened rice (poha) 
    1/2 cup   watermelon rind
    1/2 cup  fresh coconut
    1/2 teaspoon methi seeds
    oil for roasting
    water for soaking and grinding
    salt to taste


    Method:

    1. Soak rice, urad dal and methi for 4 hours.
    2. Soak flattened rice (poha) for half an hour.
    3. Cut the rind into small pieces. 
    4. Grind the soaked rice and lentil mixture to a fine batter, remove it in a bowl. Now, grind the rind pieces, soaked poha and  coconut, mix it into the batter. Add salt to it, cover and keep it in a warm place to ferment overnight or 5-6 hours.
    5. Next day, mix the batter, heat a skillet. Smear a little oil if using the cast iron. pour a ladleful of batter, spread a little oil, cover with a lid   and allow to cook. There is no need to cook the other side for this dosa. Once it is cooked, remove and serve hot with coconut chutney. Repeat for the rest of the batter. 


    Take a tip: 

    1. The dosa is made as a set dosa.  The consistency of the batter should be moderately thick.
    2. Use any kind of skillet, iron or non-stick, cover with a lid and cook. There is no need to flip  to the other side. 


    watermelon rind dosa
    watermelon rind dosa


    My family enjoys dosa any day.  Rava dosa is usually prepared during weekends. A dosa batter is handy and used in different ways. You can make masala dosa, uttapam or gundapongal. The other kind of dosa are ragi dosa, jowar dosa, set dosa, neer dosa and mixed flour dosa. 

    watermelon rind dosa

    Watermelon Rind Dosa

    Watermelon rind dosa is soft, spongy dosa. It is ideal to prepare it for breakfast.
    Prep Time 4 hours
    Cook Time 30 minutes
    Fermentation time 6 hours
    Total Time 10 hours 30 minutes
    Course: Breakfast
    Cuisine: Indian, South Indian

    Ingredients
      

    • 25 cup rice
    • 1/2 cup urad dal
    • 1/4 cup flattened rice poha
    • 1/2 cup watermelon rind
    • 1/2 cup fresh coconut
    • 1/2 teaspoon methi seeds
    • oil for roasting
    • water for soaking and grinding
    • salt to taste

    Method
     

    1. Soak rice, urad dal and methi for 4 hours.
    2. Soak flattened rice (poha) for half an hour.
    3. Cut the rind into small pieces.
    4. Grind the soaked rice and lentil mixture to a fine batter, remove it in a bowl. Now, grind the rind pieces, soaked poha and  coconut, mix it into the batter. Add salt to it, cover and keep it in a warm place to ferment overnight or 5-6 hours.
    5. Next day, mix the batter, heat a skillet. Smear a little oil if using the cast iron. pour a ladleful of batter, spread a little oil, cover with a lid   and allow to cook. There is no need to cook the other side for this dosa. Once it is cooked, remove and serve hot with coconut chutney. Repeat for the rest of the batter.

    Notes

    The dosa is made as a set dosa.  The consistency of the batter should be moderately thick.
    Use any kind of skillet, iron or non-stick, cover with a lid and cook. There is no need to flip  to the other side. 

    Pin it for later:

    Watermelon rind dosa is soft, supple and porous. It is a good way to use the rind  of the fruit which is usually discarded. Watermelon rind is rich in fibre and minerals. Give a try to this variation of dosa.
    watermelon rind dosa

    If you ever make this dosa recipe or any of my dishes,  do take a picture and tag @foodiejayashree on Instagram or @evergreendishes on Facebook or Twitter. I will be glad to see your creation and share it further. Let’s be connected, do follow on social media platforms. Until next time, let’s stay connected.  Subscribe to get all updates in your inbox. Happy Cooking ! 


  • Kashmiri Tomato Chutney | Spicy Tomato Chutney Recipe

    Kashmiri Tomato Chutney | Spicy Tomato Chutney Recipe

    Jump to Recipe Print Recipe

    Kashmiri Tomato Chutney is flavoursome with a hint of spices, it is versatile to use with chapati, idli or dosa.

    I was browsing through my diary and I found this recipe scribbled in the middle of the book. Recently, we visited Kashmir and it was a wonderful trip. We witnessed snow fall in Gulmarg and it was amazingly beautiful experience. The drastic climate change  one has to bear if we are visiting different parts of the world.

    Seeing the recipe, I thought I must try it now. It was tasty. I served with thalipeeth. It is ideal to serve with chapati or phulka. I liked the way the flavours complemented so well, taste of the spices was minimal without harming the tanginess of tomato. I will be making it again. Give a try to the spicy tomato chutney and let me know how it was.

    Why should you make this chutney ?

    • it is vegan
    • it is gluten-free
    • it is made with easy to make ingredients in the kitchen
    • it is ready in a few minutes
    • it makes a good accompaniment with many dishes as chapathi, idli and dosa.

    kashmiri tomato chutney
    kashmiri tomato chutney

    Ingredients:

    • Spices  as clove, cardamom, fennel and cinnamon are dry roasted and ground to a powder.
    • Onion : Cut it into small bits
    • Tomato : Cut it into small bits
    • Oil : Any neutral cooking oil is needed.
    • Mustard seed: A little bit in the seasoning
    • Cumin: For the taste it delivers
    • Turmeric powder: Dash of haldi helps in not only giving  colour but also has anti-bacterial properties
    • Curry leaves : a few
    • Green chilli
    • Salt

    Method:

    Print Recipe

    kashmiri tomato chutney
    Evergreendishesdev

    Kashmiri Tomato Chutney

    Kashmiri tomato chutney is flavoursome with a hint of spices. It is ideal to pair with chapati, idli, dosa or even paratha.
    Prep Time 10 minutes
    Cook Time 10 minutes
    Total Time 20 minutes
    Course: Breakfast, lunch ideas
    Cuisine: Indian, Kashmiri

    Ingredients
      

    • 2 clove
    • 1 cardamom
    • 1 teaspoon fennel
    • 1 inch cinnamon
    • 2 teaspoon oil
    • 1/2 teaspoon mustard
    • 1 teaspoon cumin
    • 1/4 teaspoon turmeric powder
    • a few curry leaves
    • 3 green chilli
    • 1 onion
    • 8 to mato
    • salt
    • chilli powder

    Method
     

    1. Cut the onion and tomato into small pieces.
    2. Dry roast cinnamon, cardamom, clove and fennel on a low flame until you get a good aroma. Keep them aside, grind to a powder when cool.
    3. Take oil in a pan, add mustard seed, once it splutter throw in cumin, turmeric powder and the curry leaves. Put the chilli pieces, saute and add the onion.
    4. Once it is golden in colour, put the ground spice powder. Add chilli powder, mix and now put the tomatoes. Put salt and allow to cook. Let it be mushy.
    5. Spicy tomato chutney is ready. One can grind it if needed.


    Pin it for later:

    Kashmiri tomato chutney is tasty and full of flavours. It makes a good accompaniment with chapati, idli or dosa.
    Kashmiri Tomato Chutney

    More chutney varieties:

    If you love using sorrel leaves in your cooking, give a try to this sorrel leaf chutney. Have you tried using peels in making a chutney? Are you avoiding kitchen wastes ? Some peels make tasty side dishes. Check out the orange peel chutney and ridge gourd chutney. If you are making a sandwich, this green chutney is all that you need.

    If you ever make this recipe, take a picture and share it by tagging @foodiejayashree on Instagram or @evergreendishes on Facebook. I will be glad to see and share your creation further.
    Check out my e-books on Amazon. Do not miss any post, subscribe to get all updates and an e-book for free !

  • Milagai Podi/ Idli Podi

    Milagai Podi/ Idli Podi

    Milagai Podi (pudi) is a lentil based spice powder stored in the kitchen shelves. It is ideal with idli and dosa. It is commonly made in Tamilnadu cuisine.

    I love the flavours of Tamilnadu, variety of dosa and idli with delicious chutney and flavoursome sambar, not to mention the crispy vada. They also have a variety of tasty snacks such as murukku and thattai. Among the rice dishes, puliodarai and lemon rice are commonly prepared.

    But, why am I speaking of Tamil Nadu cuisine ? The Shhhh secretly cooking group is preparing from this state for the month of September and I was paired with Kalyani. Kalyani gave me black gram and dry red chilly as the secret ingredients and I decided to make this humble Milgai Podi.

    The secret ingredients given by me were bengal gram and dry red chilly, she has prepared the Arichivitta Mulangi Sambar . Do check it out, it pairs well with hot steamed rice.

    Now, coming to the Milagai Podi, this is one of the essentials in any Tamilian home. It is a lentil based, dry chutney powder, preserved all round the year. They serve it with idli as an additional accompaniment along with chutney and sambar. It is usually mixed with sesame oil or ghee, the nutty flavour of sesame is really good.

    The other uses of Milagai Podi :

    • It can also be used with hot steamed rice. It tastes good with chapati and roti too.
    • In times of urgency, one can serve it immediately with idly or dosa. It is also handy during travelling.
    • You can use the left over idlis, lightly roast them on a skillet with ghee and sprinkle this chutney powder over it.
    • It makes a good accompaniment with curds rice.

    Milagai Podi / Idli Podi

    Ingredients:

    • 1 cup bengal gram
    • 1 cup black gram
    • 1 cup sesame
    • 8-10 dry red chilly
    • a few curry leaves
    • a small piece tamarind
    • jaggery
    • salt
    • 1/4 teaspoon asafoetida

    Method:

    1. Dry roast the sesame seed until they splutter and lend a good aroma.
    2. dry roast the curry leaves.
    3. Take half a teaspoon of oil and roast bengal gram on a low flame. Let them turn golden in colour.
    4. Now, similarly roast the black gram with a little oil
    5. Put half teaspoon of oil and roast the red chillies. Once, it is done, put asafoetida over it.
    6. Take a small piece of tamarind and slightly toss it in the pan.
    7. Grind the lentils and sesame seed together, do not pulse for a long time. Grind for a few seconds and again repeat it, the sesame seeds may ooze the oil out of them. Then, add the red chillly, salt, tamarind and jaggery to it, pulse it again. The chutney powder should be coarse.
    8. Once it is done, store in a clean, air tight jar.

    Take a tip:

    • Different versions of milagai podi are prepared. The quantity of bengal gram may be reduced, but I used both equally.
    • Tamarind and jaggery may be avoided, but they do give a good taste to it.
    milagai podi
    Milagai Podi
    Evergreendishesdev

    Milagai Podi

    Milagai Podi is a earthy, nutty, flavoursome side dish used with idly and dosa.
    Prep Time 10 minutes
    Total Time 10 minutes
    Servings: 2 cups of powder
    Course: condiments
    Cuisine: south india

    Ingredients
      

    • 1/2 cup bengal gram
    • 1/2 cup black gram
    • 1/2 cup sesame seed
    • 6-8 dry red chilli
    • 2 teaspoon oil
    • 1 small piece tamarind
    • 1/4 teaspoon jaggery
    • salt

    Method
     

    1. Dry roast the sesame seeds. they splutter and give a good aroma. Similarly, dry roast the curry leaves.
    2. Take half a teaspoon of oil and roast the bengal gram. It should be golden in colour. Put it aside.
    3. Similarly, roast the black gram.
    4. Put the tamarind and toss it in the kadai for sometime.
    5. Take a little oil and roast the red chillies.
    6. Once the ingredients, cool down, at first grind the lentils and sesame. Do not run it for long, the oil may ooze out from the sesame seeds.
    7. Then, add the red chillies, salt, jaggery and tamarind. Grind them once again.
    8. Once, it is a coarse powder, remove and store in an airtight container.

    Pin it for later :

    Milagai Podi (Pinterest)
    milagai podi

    If you have liked this post, do share it further. If you ever make it, take a picture and tag @foodiejayashree on Instagram or @evergreendishes on Facebook.

    Let’s be connected, follow us on Twitter, YouTube, Instagram, Facebook and Pinterest

    Subscribe to get all updates and an e-book for free !

    shhhhh secret cooking challenge
    shhhhh secret cooking challenge


  • Veg Jadoh | Meghalaya cuisine

    Veg Jadoh | Meghalaya cuisine

    Veg Jadoh is a delicious rice dish from Meghalaya cuisine. Rice is usually cooked with pork or meat with a few spices, but here is a vegetarian version of the same. I have used potato cubes, it makes a good brunch or a weekend meal. (more…)

  • Black eyed bean veggie

    Black eyed bean veggie

    Black eyed bean veggie makes a tasty accompaniment with chapati for lunch or dinner. It is loved by children and thus ideal to pack in the lunch box. 


    Today, I am sharing a stir fry with winter vegetable. Fresh black eyed pea are tasty and make a good accompaniment with chapati or jowar roti. This is a simple yet tasty accompaniment that children will surely love. 

    Black eyed pea is nutritious and makes a good accompaniment for children in the lunch box. You can use the frozen ones that are easily available.   As the fresh ones cook quickly, this can be done in under 30 minutes. 

    This post is part of BM#96 

    black eyed bean veggie
    black eyed bean veggie

    Ingredients:

    • 1 cup black eyed bean/ pea
    • water
    • 2 onion
    • 1 tomato
    • 1 tablespoon oil
    • 1/2 teaspoon cumin
    • 1/4 teaspoon asafoetida
    • 1/4 teaspoon turmeric powder
    • 2 green chilly
    • 1/2 inch ginger
    • coriander
    • salt

    Method:

    Cook the black eyed bean in a pressure cooker for one whistle. Take oil in a pan, add cumin, as it splutters put turmeric powder, asafoetida, green chilly , onion and ginger. Let cook, then add tomato and saute it. Put salt to it. Finally, add the cooked beans to it and boil for three minutes. Garnish with fresh coriander.

    Tupperware is widely used everywhere. This lunch box is ideal for school children as it is user friendly

    Here is a trendy lunch box from Tupperware for office use. It has four containers, the lids are tight, microwave safe and can be cleaned easily. 

    Evergreendishesdev

    Black eyed pea stir fry

    Black eyed pea stir fry makes a tasty accompaniment with chapati or jowar roti. Pack it in the lunch box to give a healthy meal for children. 
    Prep Time 10 minutes
    Cook Time 15 minutes
    Total Time 25 minutes
    Course: accompaniments, lunch box
    Cuisine: South Indian

    Ingredients
      

    • 1 cup black eyed pea
    • water
    • 2 onion
    • 1 tomato
    • 1 tablespoon oil
    • 1/2 teaspoon cumin
    • 1/4 teaspoon asafoetida
    • 1/4 teaspoon turmeric powder
    • 2 green chilly
    • 1/2 inch ginger
    • coriander
    • salt

    Method
     

    1. Wash, add water to the black eyed bean and cook in pressure cooker for one whistle. 
    2. Cut the onion and tomato into small pieces. Grate the ginger and keep it aside. 
    3. Take oil in a pan, add cumin as it splutters put turmeric powder, asafoetida, green chilly, ginger and onion. Let cook.
    4. Add tomato and saute it. Put salt to it. 
    5. Finally, add cooked  beans to it and boil for three minutes. 
    6. Garnish with fresh coriander.

    Notes

    • Frozen black eyed peas can be used.
    • When fresh ones are available, I like to use them.
    • Remove the pea from the pod and store them in the refrigerator, it will be handy to use. 


    black eyed bean veggie
    black eyed bean veggie

    If you have liked this post, leave a comment and pin it for later. 

    black eyed bean stir fry
    black eyed bean stir fry

    I am sending this post to the Kids Event hosted by Bhawana under the theme, “Lunch Box Ideas in 30 minutes”


    BMLogo Check out the Blogging Marathon page for the other Blogging Marathoners doing this BM#96

    Follow evergreendishes on Facebook, Twitter, Instagram and Pinterest.

    If you ever recreate this dish, do take a picture and share it on Instagram by tagging @foodiejayashree


  • How to make drumstick rasam |Nuggekayi saaru

    How to make drumstick rasam |Nuggekayi saaru

    Drum stick rasam is a tasty and lesser known accompaniment served with steamed rice in South India. The taste and smell of drum stick is good and it is spicy, sour and sweet in taste. 

    Benefits of using drum stick:

    I have seen that drumstick is not used in many households, some do not use as per tradition while a few detest it. But drumstick can be used in various ways, it is usually used in sambar. A stir fry made along with tomatoes tastes good. The leaves of drumstick are used in dal and considered healthy.

    Did you know using drumstick has numerous benefits? It regulates blood sugar level and boosts immunity. They are excellent source of Vitamin B. It helps in purifying blood. It also helps in boosying the overall immunity of the system. Thus, regular usage has many benefits.


    drumstick rasam
    drumstick rasam

    Rasam is called as Saaru in Karnataka and Chaaru in Andhra Pradesh. Drumstick rasam is more popular as Murungakai Rasam in Tamilnadu and Mulakkada Charu in Andhra Pradesh.  It is a comfort food for South Indians. The scientific name for drumstick is Moringa Oleifera.  It is slender, cylindrical pods popular as moringa,  nuggekayi, murungakkai.

    Are you a rasam lover ? Here are a few rasam recipes which will tantalize your taste buds.

     
    ajwain leaf rasam

    lemon rasam
    lemon rasam

    How to make Drumstick Rasam

    Ingredients:

    • 4 drumsticks
    • 1 small cup tur dal  (1 cup= 50 ml)
    • 2 tomato
    • 2 teaspoon ghee
    • 1/4 teaspoon mustard seeds
    • 1/4 teaspoon asafoetida
    • 1/4 teaspoon turmeric powder
    • lemon size ball of tamarind
    • 2 teaspoon rasam powder
    • a small piece jaggery
    • water

    Method: 

    • Soak tamarind in water.
    • Wash tur dal, add water and and some turmeric powder to it. Cook it in the pressure cooker. 
    • Cut the drumstick in five or six pieces, two inch in length. Cook them in a pan with some water. 
    • Cut the tomato into small pieces.
    • Take ghee in a pan, add mustard seed, as it splutters, put asafoetida and turmeric powder, throw in the tomato pieces. Add salt and some water. Let cook.
    • Extract pulp from the soaked tamarind.
    • Stir the tomatoes, add tamarind pulp, jaggery, curry leaves and rasam powder. Let boil. 
    • Take the cooked tur dal, mix it well. It should be well cooked. Put the tur dal to it, cooked drum stick and water. Let it cook on a low flame.
    • Once it boils, garnish with fresh coriander. It is ready to serve.
    Drumstick rasam
    Drumstick rasam
    drumstick rasam

    Drumstick Rasam

    5 from 7 votes
    Course: lunch
    Cuisine: Indian, karnataka

    Ingredients
      

    • 4 drumstick
    • 1 cup tur dal 1 cup =50 ml
    • 2 tomato
    • 2 teaspoon ghee
    • 1/2 teaspoon mustard seed
    • 1/4 teaspoon turmeric powder
    • 1/4 teaspoon asafoetida
    • salt to taste
    • lemon ball size tamarind
    • jaggery a small piece
    • 2 teaspoon rasam powder
    • curry leaves
    • water

    Method
     

    1. Soak the tamarind in water.
    2. Wash the tur dal and cook it in the pressure cooker with a little turmeric powder.
    3. Cut the drum stick into two inch pieces. Cook them in a pan with some water.
    4. Cut the tomato into small pieces.
    5. In a pan, add ghee and make the seasoning. Add mustard seeds, as it splutters, put asafoetida and turmeric powder, throw in the tomato with salt and some water. Let cook.
    6. Extract the pulp from the tamarind.
    7. Once the tomato are cooked, add tamarind pulp, rasam powder and curry leaves to it. Let boil. 
    8. Add cooked tur da and boiled drumstick to it. Put water, letcook on a low flame. 
    9. Once it boils, garnish with coriander leaves. Drumstick rasam is ready to serve.
    Drumstick Rasam / Nuggekayi Saaru
    Drumstick Rasam / Nuggekayi Saru


  • Maharashtrian Bharli Bhendi / Stuffed Okra

    Maharashtrian Bharli Bhendi / Stuffed Okra

    Maharashtrian Bharli Bhendi is okra stuffed with spices and cooked. It is tasty and pairs well with chapati or as a side dish with rice and amti..

    Maharashtrian cuisine is spicy, tasty, has a distinctive taste and makes a good meal anytime. It is mostly vegetarian though not restricted, the jowar roti and the chapati are essentials in daily meals. A few dishes  which one can resonate with Maharashtrian cuisine are junka, patal bhaji, bharli baingan and amti. Snacks such as wada pav, surlicha wadi, pav bhaji, kothimbircha wadi, dahi puri, bhel puri to name a few, so tempting isn’t it ?

    The Shhhhh Cooking Secretly Challenge group is now all set to explore the beautiful state of Maharashtra, a cuisine which a foodie cherishes and a blogger love to create the myriad dishes from that state. I was paired with Poonam and she gave me groundnut and jaggery, I prepared Bharli Bhendi, it was tasty and we enjoyed it. Bharli Bhendi is a Marathi word which means  stuffed okra. Poonam writes at www.poonambachhav.com. Do check her blog for a wide range of dishes. She has many dishes from Maharashtrian cuisine. I had given wheat flour and milk and she had prepared the tasty Goad Dashmi.

    If you are following my blog regularly, you know  that we love okra at home. A few more okra recipes are here Okra with tomatoes, Okra Stir Fry, Kurkuri Bhendi,

    Bharli bhendi /stuffed okra
    Bharli bhendi / stuffed okra

    A few tips while making stuffed bhindi :

    1. Choose small size okra.
    2. Lady finger should be tender.
    3. Wash them and pat dry them well.
    4. Increase the quantity of ingredients proportionately if you are using varied measurements.

    Bharli Bhindi Recipe :

    Ingredients:

    • 1/2 kilogram okra
    • 2 tablespoon roasted peanuts
    • 1/2 cup coriander
    • 4 cloves garlic
    • 1 green chilly
    • 1/2 cup fresh coconut
    • 4 teaspoon goda masala
    • 1/2 teaspoon chilli powder
    • 1/2 teaspoon turmeric
    • 1 teaspoon cumin
    • a little jaggery
    • salt

    Method: 

    1. Wash the bhendi and  pat dry.
    2. Make an incision in the centre with a sharp knife.
    3. For the stuffing, grind these together : peanuts, coriander, garlic, green chilly, fresh coconut, goda masala, turmeric powder, jaggery and lemon juice.
    4. Put the stuffing into the slit vegetable, keep the remaining mixture, can be used later.
    5. Heat oil in a pan, add mustard  seeds, turmeric powder and asafoetida, once it splutters, put the stuffed bhendi into it.
    6. Let cook for sometime.
    7. Toss in between, it needs to be well cooked on all sides. Put the remaining mixture into it. Let cook for a few more minutes, remove and serve Bharli Bhendi with any flat bread.

    Bharli bhendi / stuffed okra
    Maharashtrian Bharli bhendi / stuffed okra

    Bharali bhendi
    Evergreendishesdev

    Maharashtrian Bharli Bhendi / Stuffed Okra

    Maharashtrian Bharli Bhendi is stuffed okra stir fry from Maharashtrian cuisine. Fresh coconut is mixed with other ground ingredients and made into a filling. 
    Servings: 4 people
    Course: dry sabzi, lunch ideas, Main Course
    Cuisine: Indian, Maharashtrian

    Ingredients
      

    • 1/2 kilogram bhendi / okra/ lady finger
    • 2 tablespoon roasted peanut
    • 1/2 cup coriander
    • 4 cloves garlic
    • 1 green chilly
    • 1/2 cup fresh coconut
    • 4 teaspoon goda masala
    • 1/2 teaspoon chilli powder
    • 1/2 teaspoon turmeric
    • 1 teaspoon cumin
    • a little jaggery

    Method
     

    1. Wash the bhendi and  pat dry. Make an incision in the centre with a sharp knife.
    2. For the stuffing, grind these together : peanuts, coriander, garlic, green chilly, fresh coconut, goda masala, turmeric powder, jaggery and lemon juice.
    3. Put the stuffing into the slit vegetable, keep the remaining mixture, can be used later.
    4. Heat oil in a pan, add mustard seeds, turmeric powder and asafoetida, once it splutters, put the stuffed bhendi into it. Let cook for sometime.
    5. Toss in between, it needs to be well cooked on all sides. Put the remaining mixture into it. Let cook for a few more minutes, remove and serve Bharli Bhendi with any flat bread. 

    Notes

    • Use tender lady finger for filling. 
    • The grated coconut can be directly mixed with the ground mixture and then filled. But, I did grind it.
    • Sugar can be used instead of jaggery.


    If you have liked this post, do share it further. All comments motivate me to write more.

    Let’s be connected : Facebook, Twitter, Pinterest and Instagram

    I hope you are getting updates from us in your inbox.

  • Tomato and Garlic Focaccia – Guest Post Series

    Tomato and Garlic Focaccia – Guest Post Series

    Focaccia is a type of Italian flatbread which has the basic ingredients yeast, olive oil, salt and herbs added to the dough. The topping can vary from plain just with herbs and oil to meat. This post is  a part of the guest post series that I run on my blog. (more…)