Author: Evergreendishesdev

  • Chocolate and Vanilla Floral Cookies | Video included

    Chocolate and Vanilla Floral Cookies | Video included

    Jump to Recipe 

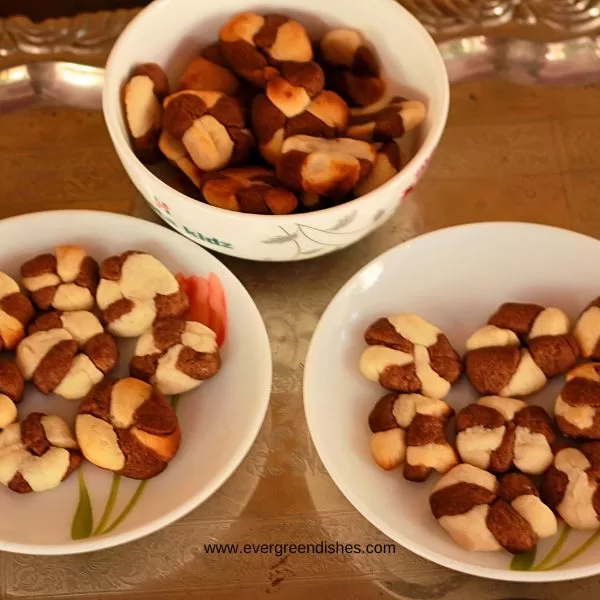
    Flloral cookies  are tasty and have a dainty look. They are chocolate and vanilla flavoure, a taste  with each bite.

    Cookies are loved by all, here is another kind of cookie that you can make during the holidays. It is ideal to serve for children, they will love the design based cookie.

    Lockdown has made  me do some good things, these cookies were one of them. It was fun making these cookies, the flavours of vanilla and chocolate blends so well, it gives a good taste.

    One can make different kind using these two dough. Checker board cookies, marble cookies. braided and floral cookies are the different kind that you can make.

    Today, I am sharing the floral kind of cookie.


    The other kind of cookies that I keep on making are Cornflakes Cookies, Polvorones, Butter Cookies, Ghee Cookies

    floral cookies

    Chocolate and Vanilla Floral Cookies Recipe

    Ingredients:

    • 1/2 cup butter
    • 1/2 cup castor sugar
    • 1 cup maida
    • 1 tbsp cornflour
    • little milk
    • 1/2 tsp baking powder
    • vanilla essence
    • 1 tbsp cocoa powder

    Method :

    1. Take the butter and sugar in a bowl. Whisk it well.
    2. Add maida and cornflour to it. Mix them together with a little milk.
    3. Put vanilla essence.
    4. Divide the dough into two parts.
    5. In one part, add cocoa powder and set it aside.
    6. Now, you have two kinds of dough. Take the vanilla dough, knead it lightly, take a small ball of the dough and roll into a long coil like structure. Cut into small pieces with a knife
    7. Similarly, do the step for the chocolate dough.
    8. Now, take three small pieces of vanilla and chocolate, roll them into a ball  and place them like a flower.
    9. Press them between palm.
    10. Repeat the same.
    11. Pre-heat the oven. Keep them in the oven for 10 minutes at 160 degree celsius. bake.
    12. Once they cool down, keep in an air-tight container.

    Take a tip:

    • Wheat flour may be used instead of maida.
    • You can use a mix of both, wheat flour and maida.
    • Baking time varies, do know the ideal time for your oven.
    Print Recipe

    Chocolate and Vanilla Floral Cookies

    4.80 from 5 votes
    Chocolate and Vanilla floral cookies are dainty, eggless cookies. They are not only tasty but look exquisite.
    Course: evening snacks
    Cuisine: international

    Ingredients
      

    • 1/2 cup butter
    • 1/2 cup castor sugar……beat both together
    • 1 cup maida
    • 1 tbsp cornflour
    • little milk
    • 1/2 tsp baking powder
    • vanilla essence
    • 1 tbsp cocoa powder

    Method
     

    1. Take the butter and sugar in a bowl. Whisk it well.
    2. Add maida and cornflour to it. Mix them together with a little milk.
    3. Put vanilla essence.
    4. Divide the dough into two parts.
    5. In one part, add cocoa powder and set it aside.
    6. Now, you have two kinds of dough. Take the vanilla dough, knead it lightly, take a small ball of the dough and roll into a coil. cut into small pieces with a knife
    7. Similarly, do the step for the chocolate dough.
    8. Now, take three small pieces of vanilla and chocolate, roll them into a ball  and place them like a flower.
    9. Press them between palm.
    10. Repeat the same.
    11. Pre-heat the oven. Keep them in the oven for 10 minutes at 160 degree celsius. bake.
    12. Once they cool down, keep in an air-tight container.

    Notes

    Wheat flour may be used instead of maida.
    You can use a mix of both, wheat flour and maida. 
    Baking time varies, do know the ideal time for your oven. 

    Video

     pin it for later :

    chocolate vanilla floral cookies
    chocolate vanilla floral cookies


    If you have liked these Chocolate and Vanilla Floral Cookies recipe,  do share it with your family and friends. If you ever make this, take a picture and share it by tagging @foodiejayashree on Instagram or @evergreendishes on Facebook or Twitter.

    Subscribe to get all updates and an e-book for free!


  • Peanut Curd / Vegan Curd

    Peanut Curd / Vegan Curd

    Jump to Recipe Print Recipe

    Peanut Curd is a vegan curd made using peanuts. It is tasty and ideal to use regularly.

    Many people are adopting veganism, it is refraining from eating or using any animal product. It is a kind of vegetarian diet that excludes meat, eggs, dairy products and all other animal derived ingredients.  Alternative products used by vegans are almond milk, soy milk, cashew milk, peanut and rice milk. Today, more and more people are adopting vegan diet.

    I am neither a vegan nor have changed myself into one. When I saw this peanut curd posted by friend Poornima, I wanted to try it. It was the first time I heard about it and I really wanted to see how it tasted.

    peanut curd
    peanut curd

    Peanut curd is different in taste but surprisingly looks like our own kind. It has the nutty taste in it and those who like peanuts will surely like it.

    It involves the soaking, grinding, boiling, sieving and setting of curd. Let us look into it in depth.

    peanut curd
    peanut curd


    About the event:

    Sending this to our fortnightly event “Go Nits For Nuts” at Healthy Wellthy Cuisines, the theme is Peanuts, it was suggested by me. The other peanut recipes by my co-bloggers are


    Peanut Curd

    Ingredients:

    • 1 cup peanut
    • 2 cup water
    •  pro-biotic powder / vegan curd / regular curd for non-vegans

    Method:

    1. Wash and soak the peanut for atleast six hours.
    2. Remove the water, wash it. Put it in a jar along with water and grind it to a fine paste.
    3. Remove it in a thick bottom bowl. Add a glass of water and bring it to a boil it on a medium flame.  Keep stirring it. Once it begins to boil, put it aside to cool.
    4. Filter it through a muslin cloth.
    5. Put a little curd and keep it to set in a warm place.
    6. Peanut curd will be ready in a few hours.

    Take a tip:

    • Vegans should  use pro-biotic powder or vegan curd that you have.
    • Even green chillies with crown can be used to set it.
    • If you are allergic to peanuts, kindly do not try this recipe.

    Peanut Curd

    Peanut Curd is a vegan curd made using peanuts. It is ideal for those who do not eat any animal produce.
    Prep Time 10 minutes
    Cook Time 15 minutes
    Setting time 4 hours
    Course: vegan
    Cuisine: international

    Ingredients
      

    • 1 cup peanut
    • 2 cup water
    • a little vegan curd / pro-biotic powder / a little curd for non-vegans

    Method
     

    1. Wash and soak the peanut for atleast six hours.
    2. Remove the water, wash it. Put it in a jar along with water and grind it to a fine paste.
    3. Remove it in a thick bottom bowl. Add a glass of water and bring it to a boil it on a medium flame.  Keep stirring it. Once it begins to boil, put it aside to cool.
    4. Filter it through a muslin cloth.
    5. Put a little curd and keep it to set in a warm place.
    6. Peanut curd will be ready in a few hours.

    Notes

    • If you are a vegan use  pro-biotic powder or vegan curd that you have.
    • Even green chillies with crown are used to set, but I have not tried it. 
    • If you are allergic to peanuts, do not try this recipe. 

    This curd is ideal substitute to the normal curd. I used it in curds rice too.

    Well, if you have liked this post, do share it further.

    Pin it for later:

    Peanut Curd is a vegan curd made using peanuts. It is tasty and ideal to use regularly.
    Peanut Curd

    If you have liked this post, do share it with your family and friends. If you ever make this, take a picture and share it by tagging @foodiejayashree on Instagram or @evergreendishes on Facebook or Twitter.

    Let’s be connected, the follow buttons are on the side bar. Subscribe to get all updates and an e-book for free!


  • Mangalore Buns / Banana Puri | Udupi Cuisine

    Mangalore Buns / Banana Puri | Udupi Cuisine

    Jump to Recipe Print Recipe

    Mangalore buns/ Banana Puri  is a famous breakfast  in the  coastal Karnataka region. It is mildly sweet, soft and fluffy like a bun. 

    Mangalore bun / banana puri is an amazing dish , it has the texture of a bun but it is deep-fried like a puri. Ripe bananas are used to mix in it and the dough is allowed to rest for sometime. Thus, it is a leavened bread.  It can be eaten by itself  but it  is also served with chutney or potato sagu. The mildly sweet puri pairs well with them. It is popular in the regions of Mangalore and Udupi and served for breakfast or as a snack in the evenings.


    About the Udupi cuisine:

    Udupi is a popular tourist and pilgrimage place in Karnataka. It is famous for the Krishna temple and the Kanakana Kindi. It is also known for its cuisine. Udupi cuisine is one of the cuisines that you find in South India. Mostly vegetables such as pumpkin, ash gourd and lentils are used in the daily cooking. Rice is the staple food and rasam is the soul food of most people. A variety of chutneys and tambli is often made as an accompaniment.   The hallmark of their cooking is the use of fresh coconut and coconut oil in almost all the dishes, it elevates the taste of the dish.  Dosa and Idli are commonly prepared and one must see the many variety  that are made here. Sweets that are commonly made are a variety of payasams, halbai and fudges.


    Mangalore Bun / Banana Puri    mangalore buns /banana puri

    Ingredients:

    • 1 big ripe banana
    • 2 tablespoon sugar
    • 1/2  teaspoon cumin powder
    • a little salt
    • 1/8 teaspoon baking soda
    • 2 tablespoon sour yoghurt
    • 1.5 cup wheat flour
    • 1 teaspoon ghee
    • oil for deep frying

    Method:

    • In a bowl, mash the banana with a fork or potato masher. Add yoghurt, sugar, baking soda, ghee and salt to it. Mix them well.Add wheat flour with a tablespoon, one spoon at a time. The dough should be soft and pliable. Knead it well. Cover it with a thin, damp cloth and keep it in a warm place  for five hours or preferably overnight.
    • Take the dough and knead it, make them into small balls. Take a ball, dust it with flour and roll it into a disc of 3 inch. Make a couple of them.
    • Heat oil in a pan, check by dropping a small piece of the dough. If it rises to the surface, the oil is ready to deep fry. Slowly, put two of the discs and deep fry.
    • Once they are golden, remove them with a slotted spoon and repeat for the rest of the dough.
    • Serve hot as it is or with coconut chutney.

    Take a tip:

    • Usually, maida is  used to make this bun. You can also use both, the wheat flour and maida in equal quantities.
    • Cumin may also be used instead of cumin powder. Toast them a little and put, it will give good fragrance.
    • Ripe bananas make the puris soft and give a good texture to it. You may blend it in a mixie.
    • Make sure you remove the excess water from the damp cloth.
    • If you are planning to make it in the evening as a snack, mix the dough in the morning. If you are planning to make it for breakfast, keep it overnight.

      About the event:

      The  theme for this month at Shhhhh Secretly Cooking group is ” Udupi Cuisine” and the theme is suggested by me. Thanks to Mayuri Patel and Renu Agarwal for giving me this opportunity. I was paired with Preethi Prasad. The ingredients given to me were  salt and ghee and I have made these  mangalore buns, it was in my to-do list since a long time. I gave Preethi, coconut oil and fenugreek seed, she made the aromatic  rasam powder.

      shhhhh secret cooking challenge
      shhhhh secret cooking challenge


    Mangalore Buns

    Mangalore buns is a leavened, mildly sweet flatbread from Udupi cuisine. It is ideal for breakfast or as a snack in the evening.
    Course: Breakfast, Snack
    Cuisine: karnataka, mangalore, udupi

    Ingredients
      

    • 1 big ripe banana
    • 2 tablespoon sugar
    • 1/2 teaspoon cumin powder
    • a little salt
    • 1/8 teaspoon baking soda
    • 2 tablespoon yoghurt
    • 1.5 cup wheat flour
    • 1 teaspoon ghee
    • oil for deep frying

    Method
     

    1. In a bowl, mash the banana with a fork or potato masher. Add yoghurt, sugar, baking soda, ghee and salt to it. Mix them well.Add wheat flour with a tablespoon, one spoon at a time. The dough should be soft and pliable. Knead it well. Cover it with a thin, damp cloth and keep it in a warm place  for five hours or preferably overnight.
    2. Take the dough and knead it, make it small balls. Take a ball, dust it with flour and roll it into a disc of 3 inch. Make a couple of them.
    3. Heat oil in a pan, check by dropping a small piece of the dough. If it rises to the surface, the oil is ready to deep fry. Slowly, put two of the discs and deep fry.
    4. Once they are golden, remove them with a slotted spoon and repeat for the rest of the dough.
    5. Serve hot as it is or with coconut chutney.

    Notes

    Usually, maida is  used to make this bun. You can also use both, the wheat flour and maida in equal quantities.
    Cumin may also be used instead of cumin powder. Toast them a little and put, it will give good fragrance.
    Ripe bananas make the puris soft and give a good texture to it. You may blend it in a mixie. 
    Make sure you remove the excess water from the damp cloth. 
    If you are planning to make it in the evening as a snack, mix the dough in the morning. If you are planning to make it for breakfast, keep it overnight. 

    Pin it for later :

     Mangalore buns is a famous breakfast of the people of coastal Karnataka region. It is mildly sweet, fluffy and soft. It is also known as Banana Puri. Site title Title Primary category Separator
    Mangalore Buns / Banana Puri

    If you have liked this post, do share it with your family and friends. If you ever make this, take a picture and share it by tagging @foodiejayashree on Instagram or @evergreendishes on Facebook or Twitter.

    Let’s be connected, the follow buttons are on the side bar. Subscribe to get all updates and an e-book for free!


  • Mango Panna Cotta  | Italian dessert

    Mango Panna Cotta | Italian dessert

    Jump to Recipe Print Recipe

    Mango Panna Cotta is a quick Italian dessert, ideal to serve anytime. This is a vegetarian version as agar agar  (or agar) is used here.

    Panna Cotta is a classic Italian dessert  that is made by cooking heavy cream. Addition of mango makes a subtle change to the taste and hence the name as Mango Panna Cotta. This is a vegetarian version of the dessert.

    I wanted to make this panna cotta since a long time but somehow it was delayed. Now, I have made it with mangoes as it is the season of king of fruits. Looking at the internet, I figured there were many ways to make this classic dessert. Soon, I decided that it would be vegetarian with the easy way that I could make. The final outcome was good but I think I could add some more mango pulp as the colour is cream. But, on other thoughts, had I added it, I would need more of agar agar to set it properly. Anyway, here is the recipe of my mango panna cotta.

    A few other mango recipes, as breakfast  you might like to try mango kesari, or amba bhat for lunch along with chapati and sabzi. If you like to explore other cuisines then do check this mumbazha pulissery, a dish from the state of kerala or the ambua from Himachal Pradesh.

    About Agar Agar

    Agar Agar or Agar  is a vegetarian substitute that is used instead of gelatine in making desserts. It is a jelly-like substance obtained from red algae. It is a mixture of two substances namely: agarose and agaropectin. It is mainly used in desserts and in soups as a thickening agent. As it is a rich source of dietary fibre, it can also be used as a laxative.

    It is available as white translucent strands. I read that the powder form is also available but I have not found it yet. It needs to be cooked in a little water until the strands dissolve.


    mango panna cotta
    mango panna cotta

    Mango Panna Cotta

    Ingredients:

    • 1 cup milk  (1 cup = 240 ml)
    • 1 tin fresh cream ( I used Amul’s cream)
    • 1/2 cup sugar
    • 1 tablespoon agar agar
    • a little water
    • 1 cup mango puree

    Method:

    1. Cut the agar agar strands into small pieces and soak them in a little water. After sometime, boil it for on a low flame, the granules need to break and mix easily.
    2. In a pan, add milk, cream and sugar. Heat it gently on a low flame. Once the sugar melts and it is warm, put it aside.
    3. Meanwhile, extract the mango pulp and whisk it to a puree.
    4. Now, add the dissolved  agar agar to the milk and cream mixture and give a stir.
    5. After sometime, put the mango pulp to it and mix it well.
    6. Pour it into moulds, ramekins or glass bowls and allow it to set for at least 4 hours.
    7. Serve chilled.


    About the event :

    I am sending this to 87 HWCG where the theme is ” Cool Desserts”. The theme is suggested by Vanita Bhat who is a good cook and photographer. I loved her Alsande Batata Sukke Sabzi, would love to try it sometime. Here are the other desserts  by co-bloggers :

    Carrot Kheer by Preethi, Mango Phirni by Vanitha, Basundi by Narmadha, Mint Rasgulla by Sujatha, Pineapple Sorbet by Sasmita,


    mango panna cotta
    Evergreendishesdev

    Mango Panna Cotta

    Mango Panna Cotta is a quick Italian dessert ideal to serve for parties or get-together. This is a vegetarian version of the dessert.
    Prep Time 10 minutes
    Cook Time 10 minutes
    Setting Time 4 hours
    Total Time 4 hours 20 minutes
    Course: Dessert
    Cuisine: Italian

    Ingredients
      

    • 1 cup milk
    • 1 tin fresh cream I used Amul’s cream
    • 1/2 cup sugar
    • 1 tablespoon agar agar
    • a little water
    • 1 cup mango puree

    Method
     

    1. Cut the agar agar strands into small pieces and soak them in a little water. After sometime, boil it for on a low flame, the granules need to break and mix easily.
    2. In a pan, add milk, cream and sugar. Heat it gently on a low flame. Once the sugar melts and it is warm, put it aside.
    3. Meanwhile, extract the mango pulp and whisk it to a puree.
    4. Now, add the dissolved  agar agar to the milk and cream mixture and give a stir.
    5. After sometime, put the mango pulp to it and mix it well.
    6. Pour it into moulds, ramekins or glass bowls and allow it to set for atleast 4 hours.
    7. Serve chilled.

    Notes

    Agar agar is a substitute for gelatine.
    Do not reduce the quantity of it as it may not set properly.
    Heating the agar agar for sometime is an essential step.

    Pin it for later:

    Mango Panna Cotta is a quick Italian dessert, ideal to serve anytime. This is a vegetarian version as agar agar  (or agar) is used here.
    Mango Panna Cotta

    If you have liked this post, do share it with your family and friends. If you ever make this, take a picture and share it by tagging @foodiejayashree on Instagram or @evergreendishes on Facebook or Twitter.

    Let’s be connected, the follow buttons are on the side bar. Subscribe to get all updates and an e-book for free!

  • Watermelon Rind Smoothie

    Watermelon Rind Smoothie

    Jump to Recipe Print Recipe

    Watermelon Rind Smoothie is tasty and healthy drink. It makes use of the summer fruit and vegetables. It is vegan and gluten-free with no added sugar.

    Sometimes, a taste acquainted lasts for a long time. These days, I am looking for ways to add the watermelon rind in my diet. Earlier, I had made a salad  and today I tried making this smoothie and believe me, it’s really good.

    Smoothies are the ideal choice for those who are calorie conscious. It is believed that they are filling and naturally keeps one going for a longer time with little food.

    Watermelon Rind Smoothie has only three ingredients and no added sugar. It is naturally sweet. It is vegan and gluten-free. Do give a try to this and let me know how it was.


    Watermelon Rind Smoothie
    Watermelon Rind Smoothie

    Watermelon rind is the white part of the fruit that is usually discarded. Scrape it slowly with a knife and later cut into pieces.

    The best way to use it is to separate the rind and keep it refrigerated.

    Watermelon Rind Smoothie is a simple recipe that makes use of all the summer fruits and vegetables.


    Ingredients :

    • 1 cup watermelon rind
    • 1 cup cucumber pieces
    • 1 cup grapes
    • water as needed

    Method:

    1. Cut the rind into small pieces.
    2. Put them in a blender and pulse it.
    3. Add little water, pulse it again.
    4. Pour it in a glass and serve.


    A few other ways to use the rind from my co-bloggers. Mayuri uses the rind to make a tasty salad. 

    while Seema makes a tasty thogayal that is served with any dish. Priya uses it make a different kind of dosa.

    Evergreendishesdev

    Watermelon Rind Smoothie

    Watermelon Rind Smoothie is a tasty and healthy drink.
    Prep Time 5 minutes
    Total Time 5 minutes
    Servings: 2 glasses
    Course: Breakfast
    Cuisine: international

    Ingredients
      

    • 1 cup watermelon rind
    • 1 cup cucumber pieces
    • 1 cup grapes
    • water as needed

    Method
     

    1. Cut the rind into small pieces.
    2. Put them in a blender and pulse it.
    3. Add little water, pulse it again.
    4. Pour it in a glass and serve.

    Here is the video recipe :

    Pin it for later :

    Watermelon Rind Smoothie is a tasty and healthy drink. It is filling and a fuss free recipe. It is vegan and gluten-free.
    Watermelon Rind Smoothie

    If you have liked this post, do share it with your family and friends. If you ever make this, take a picture and share it by tagging @foodiejayashree on Instagram or @evergreendishes on Facebook or Twitter.

    Let’s be connected, the follow buttons are on the side bar. Subscribe to get all updates and an e-book for free.


  • 3 quick snacks for evening cravings

    3 quick snacks for evening cravings

    3 quick easy snacks for evening snacks, it’s ideal for busy moms.

    When will the lockdown end? When will normal life recommence? Well, no one knows for sure.But what you can do is comfort yourself and feel rejuvenated from getting stuck at home and working from home. You can have a great experience by preparing some delicious recipes.These can become your easy evening snacks. Let us check out some common recipes at a glance.

    1. Paneer cutlet – Everyone enjoys fried things such as cutlet. With paneer as main ingredient and besan (bengal gram flour) as the other when you mix these two, you are destined to find a heavenly combination – paneer cutlet so, these can be used as a patty for vegetable burgers or added to a chaat. We need these ingredients – a cup of crumbled paneer, about the same amount of mashed, mixed veggies / boiled and mashed potato / coarsely pulsed sweet corn, 2 or 3 chopped green chillies, a fourth cup of bread crumbs, a tablespoon of ginger, 1/4 tsp of cumin (jeera), a medium-sized onion, 3/4 tsp garam masala powder, 1/8 tsp of turmeric powder, salt and a handful of coriander leaves.

    The veggies need to be boiled until they are soft. Sweet corn needs to be boiled well and then pulsed in a blender. Add these and paneer along with bread crumbs, cumin, salt, turmeric, ginger, coriander leaves, garam masala and green chillies. You need to make a dough, and if they are too soft, more bread crumbs can be added. The patties made from the mixture should not be too thick or too thin. A pan needs to be greased with oil and heated gently.  Fry both sides till golden and make one of the easy snack recipes Indian people love.

    cutlets
    cutlets
    1. Cheesy garlic bread – The lockdown cannot get any better than a warm slice of cheesy garlic
      bread delivered from the oven. It is time to take a look at the ingredients for the cheesy garlic bread recipe – salted butter, Italian or French bread, fresh granulated garlic, olive,salt and pepper, fresh parsley, shredded parmesan and shredded mozzarella

    The oven needs to be preheated, and the bread needs to be sliced in half, lengthwise. Butter, garlic, olive oil, salt and pepper needs to be mixed well in a mixing bowl. The mixture needs to be spread over both the halves. The bread needs to be wrapped with foil and baked for 10 minutes. The cheese has to be sprinkled after removing the bread from the oven, it should be golden and bubbly. These are among the best quick snack recipes.

    garlic bread
    garlic bread

    3.Noodle recipe – Noodles can be cooked with a variety of different veggies, making them healthy and nutritious. You need two packets of noodles, olive oil (2 – 3 tbsp), 1 tbsp of chopped garlic, 1 to 3 slit green chillies, a small onion, 2 to 3 cups of mixed veggies and a little salt and pepper. You also need a tbsp of sauce, 1 tsp of vinegar and 1-2 tsp of hot sauce.

    Bring 5 cups of water to boil. Add noodles and cook them without making them mushy. Drain the water and rinse these under cold water. Sprinkle some oil so that they do not become sticky. Now you need to add oil to a hot pan and put it on high flame. Sauté green chillies and garlic for a minute, you may onions too. Bell pepper, carrots and cabbage (or whatever veggies you have) need to be added. Fry them until they are half done, but still crunchy. Soya sauce, vinegar and hot sauce can be added. Now, add the cooked noodles, some salt and pepper; stir-fry for a few minutes and your easy noodle recipe is ready to be hot.

    noodles
    noodles

    (All  Pics Source : Unsplash.com )

    These quick snacks are great for all the evenings you spend at home. I hope you try them soon and let me know in the comment section or on social media.

    Let’s be connected, the follow buttons are on the side bar, do click on them. Subscribe to get a book of handy hints for free ! I have been updating my YouTube Channel do take a look. Do subscribe and press the bell icon to be notified of all updates.


  • Watermelon Rind Salad

    Watermelon Rind Salad

    Jump to Recipe Print Recipe

    Watermelon rind salad is tasty, crunchy, packed with nutrients and easy to prepare.

    Summer calls for fruits, juices and salads. Watermelon is a summer fruit and ideal to eat as a snack. The red fruit is sweet and quenches the thirst with every bite. But, do you know that every part of the water melon is edible, seeds, rind and of course the fruit.

    The seeds can be eaten directly ( there’s no tree growing within the belly) though the best way is sprouted, shelled and dried. They are power house of nutrients.

    Water melon rind is the white part that is usually discarded. But, do you know that these peels have lot more nutrients and it’s time we find ways of using them. Moreover, the waste that is thrown is also reduced.

    It is rich in Vitamin B and  Vitamin C. Recent studies have also shown that it consists of citrulline, a compound linked to many benefits is stated by Journal of Chromatography in June 2005 issue. Although, some notes suggest that the green part too is edible, I have not tried it. I am using only the white part of the rind. You can easily scrape it with a sharp knife.

    The rind can be used in amazing ways. It is crunchy and resembles the cucumber in taste. I am making  good use of the rind these days, do keep a watch on this space for more ideas.

    Today, I have a salad recipe for you. The salad is easy to make and delicious, serve it as a snack or as an accompaniment with any meal.


    Watermelon Rind Salad                            watermelon rind salad

    Ingredients:

    • 1 cup watermelon rind
    • 1 cup cucumber
    • 1 onion
    • 1/2 cup pomegranate arils
    • 1 tomato
    • salt
    • 1/2 teaspoon pepper powder
    • 1 teaspoon lemon juice.

    Method :

    • Cut the rind into small pieces.
    • Cut the cucumber into small pieces.  I have used the long variety of cucumber.
    • Chop the onion finely.
    • Use firm tomato for salads.
    • In a wide bowl, add the rind pieces, cucumber, onion, tomato, and pomegranate arils.
    • Add salt and pepper powder to it. Put lemon juice and mix it.
    • Watermelon Rind Salad is ready to serve.


    Here’s the video clip

    Here are a few other ways to use the rind. Shailendra Sharma innovatively used the rind  to make tuty fruity. Lata uses it to make a left over rind halwa.

    watermelon rind salad

    Watermelon Rind Salad

    Watermelon rind salad is tasty, crunchy, packed with nutrients and ideal way to use the peel of fruits.
    Prep Time 10 minutes
    Course: dinner ideas, healthy snacks, lunch ideas
    Cuisine: Indian

    Ingredients
      

    • 1 cup watermelon rind
    • 1 cup cucumber pieces
    • 1 onion
    • 1/2 cup pomegranate arils
    • 1 to mato
    • salt
    • 1/2 teaspoon pepper powder
    • 1 teaspoon lemon juice

    Method
     

    1. Cut the rind into small pieces.
    2. Cut the cucumber into small pieces.  I have used the long variety of cucumber.
    3. Chop the onion finely.
    4. Use firm tomato for salads.
    5. In a wide bowl, add the rind pieces, cucumber, onion, tomato, and pomegranate arils.
    6. Add salt and pepper powder to it. Put lemon juice and mix it.
    7. Watermelon Rind Salad is ready to serve.


    If you have liked this post, do share it with your family and friends. If you ever make this, take a picture and share it by tagging @foodiejayashree on Instagram or @evergreendishes on Facebook or Twitter.

    Let’s be connected, the follow buttons are on the side bar. Subscribe to get all updates and an e-book for free.


  • How to make mint pulao | Pudina rice recipe | Pudina Pulao

    How to make mint pulao | Pudina rice recipe | Pudina Pulao

    Jump to Recipe Print Recipe

    Mint Pulao / Pudina Rice is a flavoursome, one pot dish ideal to serve for lunch, brunch or dinner. A simple raita pairs well with it.

    Those who follow my blog regularly, do know that I love making these one-pot recipes. Ever since these children grew up, I find making these rice dishes way simpler. Hence, I keep rotating Vegetable Pulav, Jeera Rice and a few other ones. Well, today I am sharing Mint Pulao Recipe. Do check the fuss free recipes collection that I have.

    Mint is abundantly used in Indian cooking to give a good flavour to the dishes, a few leaves and it spreads a good aroma all around. It is usually used in chutneys and pulao.

    What goes in this Mint Pulao / Pudina Rice

    Mint leaves : Use fresh leaves to make this dish.

    Coriander leaves: You may skip adding this, but I have added.

    Green chilli : This gives the spiciness to the dish.

    Ginger and garlic: It is one of the essentials in pulao.

    Fresh coconut : It gives a good taste

    Onion: It gives good flavour to the dish, I have used it in two forms, a small quantity is put in the paste and the rest is sauted.

    Vegetables to be used:

    You can use any vegetables here. I have used beans, carrot, peas and   cauliflower in small quantities. I have added onion pieces also.

    Rice variety to be used :

    Basmati rice is ideal for making pulao. You can use sona masuri also.

    About the event:

    I am sending this to Healthy Wellthy cuisines, the theme is “One Pot Dish”. The theme for this fortnight is suggested by Shalu Jain, a wonderful blogger, who has amazing recipes on Sunny Kitchenette. I want to try her Berry Blast Coconut Ladoos. Here are the other recipes from co-bloggers :


    Let’s get to the recipe of Mint Pulao / Pudina Rice.


    Mint Pulao / Pudina Rice
    Mint Pulao / Pudina Rice


    Ingredients:

    • 1 cup basmati rice
    • 2 tbsp oil and ghee
    • 2 cloves
    • 2 cardamom
    • 4 pepper
    • 1 stick cinnamon
    • 1 bay leaf
    • 1 cup vegetables ( I used carrot, peas, beetroot, cauliflower)
    • 1 big onion
    • salt
    • water

    For the paste :

    • 1 cup mint
    • 1/2 cup coriander
    • 2 green chillies
    • 1 tablespoon coconut
    • 1/2 inch ginger
    • 4 cloves garlic
    • 1 small onion
    • water

    Method:

    1. Wash the rice, drain the water and keep it aside for 15 minutes.
    2. Cut the vegetables in small pieces.
    3. Grind the ingredients together under the section, ” For the paste”
    4. Take a pan or pressure cooker.
    5. Add oil and ghee to it, put the spices into it.  Saute it.
    6. Add the onion, saute it. Put the veggies and saute for two minutes.
    7. Now, add the paste to it. Continue to saute for two minutes.
    8. Add the rice and gently saute it for a minute.
    9. Put water and salt to it.
    10. Give a stir, close the lid and put the whistle.
    11. Switch off after the first whistle.
    12. Let the pressure release by itself.
    13. Gently mix it. Serve hot with raita.

    Take a tip:

    • You may avoid using coriander leaves.
    • Use any vegetables that you want.
    • As I do not soak the rice in water, 1: 2 ratio works good for me.
    • You may add one more chilly for spiciness.

    Pin it for later:

    Mint pulao / Pudina rice is a tasty and easy to make, one pot dish. Serve it for lunch or as a weekend dinner.
    Mint Pulav / Pudina Rice
    Mint Pulao / Pudina Rice

    Mint Pulao / Pudina Rice

    Mint Pulao / Pudina Rice is a delicious, easy to make, one pot meal.
    Prep Time 15 minutes
    Cook Time 15 minutes
    Soaking time 15 minutes
    Total Time 45 minutes
    Course: lunch ideas, Main Course
    Cuisine: Indian

    Ingredients
      

    • 1 cup basmati rice
    • 2 tbsp oil and ghee
    • 2 cloves
    • 2 cardamom
    • 4 pepper
    • 1 stick cinnamon
    • 1 bay leaf
    • 1 cup vegetables I used carrot, peas, beetroot, cauliflower
    • 1 big onion
    • salt
    • water
    • For the paste :
    • 1 cup mint
    • 1/2 cup coriander
    • 2 green chillies
    • 1 tablespoon coconut
    • 1/2 inch ginger
    • 4 cloves garlic
    • 1 small onion
    • water

    Method
     

    1. Wash the rice, drain the water and keep it aside for 15 minutes.
    2. Cut the vegetables in small pieces.
    3. Grind the ingredients together under the section, ” For the paste”
    4. Take a pan or pressure cooker.
    5. Add oil and ghee to it, put the spices into it.  Saute it.
    6. Add the onion, saute it. Put the veggies and saute for two minutes.
    7. Now, add the paste to it. Continue to saute for two minutes.
    8. Add the rice and gently saute it for a minute.
    9. Put water and salt to it.
    10. Give a stir, close the lid and put the whistle.
    11. Switch off after the first whistle.
    12. Let the pressure release by itself.
    13. Gently mix it. Serve hot with raita.

    Notes

    You may avoid using coriander leaves.
    Use any vegetables that you want.
    As I do not soak the rice in water, 1: 2 ratio works good for me. 
    You may add one more chilly for spiciness. 

    If you have liked this post, do share it with your family and friends. If you ever make this, take a picture and share it by tagging @foodiejayashree on Instagram or @evergreendishes on Facebook or Twitter.

    Let’s be connected, the follow buttons are on the side bar. Subscribe to get all updates and an e-book for free.


  • Instant ragi dosa | Ragi dosa recipe | Finger millet dosa

    Instant ragi dosa | Ragi dosa recipe | Finger millet dosa

    (Disclosure : As an Amazon Associate, I will get a small commission for qualifying purchases without no addition cost to you.)

    Jump to Recipe Print Recipe

    Instant ragi dosa is tasty, healthy, easy to make  and ideal to serve either for breakfast or as a snack. It is vegan and gluten-free.

    Millets are the new age food. Many people are now aware of the benefits and including them regularly in their diet.

    What is a millet ?

    Millet is a small cereal that belongs to the grass family, Poaceae. It was first grown in Africa, soon spread to Asia. Different varieties of millets are grown in the world.

    What are the benefits of millet?

    Millet is rich in nutrients. It is rich in dietary fibre and contains minerals as calcium, magnesium, phosphorous, selenium as well as  vitamins like folate,  pantothenic acid,  riboflavin, Vitamin B6, C, E and K. The high fibre content found in it helps to reduce bad  cholesterol (LDL) while boosting good cholesterol(HDL). The phosphorous content helps the body to repair itself and also in the formation of cells. The iron and folate helps prevent anaemia  by maintaining adequate hemoglobin levels. The millets are usually prepared from the whole meal, the nutrients are retained in the food that is consumed.

    What are the different kind of millet ?

    The different type of millets are jowar, foxtail millet, finger millet, pearl millet, barnyard millet, kodo millet, little millet, proso millet.

    What is finger millet ?

    Finger millet or Ragi as it is commonly known as, is an important cop grown and consumed in India. It is rich in minerals, calcium, dietary fibre and anti-oxidants. Ragi mudde is the staple food of many people. It is also used in making sweets and other dishes. I regularly make Ragi Idli and Ragi Thalipeeth.


    Instant Ragi Dosa
    Instant Ragi Dosa

    What goes in the instant Ragi Dosa?


    • Ragi flour : Ragi flour is the main ingredient to make ragi dosa. Use good and fresh ragi flour. A flour which does not smell good is not worth wasting any time.
    • salt to taste
    • Onion: Chop it finely. I love to use vegetable cutter, it is so handy and useful to chop onion. No tears, no mess.
    • Coriander : Use fresh coriander
    • Water as needed to make the batter. Once you mix the batter, keep it aside for ten minutes.
    • oil to drizzle
    • Green chillies may be added.
    • Cumin may be added.

    Are there any variation to this ragi dosa ?

    Add half a cup of rice flour and mix it to a dosa batter consistency. Make it like the usual dosa.

    About the event:

    In the month of April, the theme at Shhhhh Secretly Cooking Challenge is Millets, it was suggested by Aruna Saras Chandra, a wonderful blogger at Vasus Veg Kitchen. I liked her bread gulab jamun, it is a quick-fix sweet that you can make. I love cooking with millets and jumped the bandwagon. My partner was Narmadha from Nams Corner, she gave me oil and coriander as the secret ingredients and I decided to make this Instant Ragi Dosa. I gave her salt and sugar and the outcome is the delicious Foxtail Millet Sweet Pongal, 

    Instant Ragi Dosa comes as a rescue, you can make it easily and it is a straight forward recipe.

    Instant Ragi Dosa

    Instant Ragi Dosa / Finger Millet Dosa

    Instant ragi dosa is crispy, tasty and easy to make. It is vegan and gluten-free.
    Prep Time 10 minutes
    Cook Time 15 minutes
    Resting time 10 minutes
    Course: Breakfast
    Cuisine: South Indian

    Ingredients
      

    • 1 cup ragi flour
    • 1 onion
    • 1 tbsp coriander
    • salt to taste
    • water as required
    • oil to drizzle

    Equipment

    • skillet
    • turner
    • ladle
    • big bowl
    • small bowl
    • small spoon
    • serving plate

    Method
     

    1. Chop the onion finely.
    2. Wash and cut the coriander.
    3. Take ragi flour in a bowl.
    4. Add salt, chopped onion, coriander to it. Mix them.
    5. Add water and mix the batter without any lumps. Let the consistency be thin as rawa dosa batter.
    6. Keep it aside for ten minutes.
    7. Heat a skillet. Take a ladleful of batter and pour it from outside to inside like a rawa dosa.
    8. Drizzle oil, let it cook for sometime.
    9. Once the dosa is done, you can easily remove it, the edges come off.
    10. Fold it and serve immediately.

    Notes

    Green chillies may be added.
    Cumin may be added.
    Adding of onion is optional. 
    Keep the batter aside for ten minutes. 
    Instant ragi dosa is tasty, healthy, easy to make  and ideal to serve either for breakfast or as a snack. It is vegan and gluten-free.
    Instant Ragi Dosa | Finger Millet Dosa

    If you have liked this post, do share it with your family and friends. If you ever make this, take a picture and share it by tagging @foodiejayashree on Instagram or @evergreendishes on Facebook or Twitter.

    Let’s be connected, the follow buttons are on the side bar. Subscribe to get all updates and an e-book for free.

    (Disclosure : As an Amazon Associate, I will get a small commission for qualifying purchases without no addition cost to you.)


  • Fuss free recipes

    Fuss free recipes

    Life has gone a series of changes throughout the world and it will take sometime before things are back to normal. The best thing is to stay safe at home, prepare easy meals and enjoy the time with your loved ones. Make the best use of the time that you have. Learn a skill that you have been thinking or read that book that you wanted. Or simply, cook and enjoy the time with your children. Spend quality time with them, you might never get this time again.

    Here are some fuss free recipes from the blog. I have selected those keeping in minnd, the ingredients that one can possibly have at home. Feel free to browse the blog for more.

    Avalakki  Upkari : It is made using thin flattened rice. Give a try to this.


    avalakki upkari
    avalakki upkari

    Wada: Urad dal wadas are loved by all and now seems to be the perfect time to enjoy these Indian doughnuts.

    urad dal wada
    urad dal wada

    Aloo Puri : Bored of the usual cooking, make these puris.

    aloo puri

    Thepla, we love it and it is ideal for breakfast or lunch.

    Gujarati thepla, methi paratha
    Gujarati thepla, methi paratha

    Jowar dosa, a twist to the usual one.

    Jowar dosa
    Jowar dosa

    Neer Dosa, this is again another kind I love making. The good thing is it needs no fermentation.

    neer dosa
    neer dosa

    Masala Dosa : It is cherished by all South Indians and a dosa batter in the refrigerator saves a busy day.

    Masala Dosa
    Masala Dosa

    Potato and Pea Paratha : I bet you agree with me, this combination works likes a charm.

    potato and pea paratha
    potato and pea paratha

    Ragi Idli: No, this is not the instant version. It is fermented and super soft.

    Ragi Idli
    Ragi Idli

    Dahi Vada: This is ideal for summer, it is loved by both, kids and adults.

    Dahi Wada
    Dahi Vada

    Gundapongal: It is another popular dish that you can easily make anytime and serve, if you have the batter.

    gundapongal
    gundapongal

    Masala Bhat: I know we are in lockdown and getting all kinds of veggies is difficult. I have used potato, peas and capsicum.

    masala bhath
    masala bhath

    Spanish rice: If you have the ready sauce, you can make it in a jiffy.

    spanish rice
    spanish rice

    Spring onion and corn pulao: Something different to try for your weekend.

    spring onion and corn pulao
    spring onion and corn pulao

    Veg Pulav: This is such a life saver for me, I keep making it quite often.

    veg pulav
    veg pulav

    Lemon rice : When every other dish fails to appease me, this one lights up my day.

    lemon rice

    Corn and Peas Pulao : I always keep sweet corn kernels and green peas in my freezer, they can be used in many dishes.

    corn and peas pulao
    corn and peas pulao

    Spiced Yoghurt: This is a simple yet tasty dish that you can make in a few minutes.

    Spiced Yoghurt

    Dal with methi : It is a comfort food for me, I make it at least twice in a month.

    dal with methi

    Sambar : Ask any South Indian and they are happy with a rice and sambar along with a few roasted papad.

    sambar
    sambar

    Drumstick rasam : I love the flavour of this rasam.

    drumstick rasam
    drumstick rasam

    Authentic Chana Masala 

    chana masala

    Kafuli : This pairs good with any meal.

    Kafuli

    Alu Methi: It is no onion garlic recipe and can be easily made for lunch or dinner.

    alu methi
    alu methi

    Palak Tambli : A simple dish but it is a comfort food for many. It tastes good with hot steamed rice.

    palak tambli
    palak tambli

    Methi delight: It can be easily if you have fenugreek leaves at home.

    methi delight
    methi delight

    Happy Cooking ! Stay safe and healthy.

    Pin it for later :

    Fuss free recipes are essential to keep these days going, we are passing through a difficult phase but we shall soon overcome.
    Fuss Free Recipes


    If you have liked this post, do share it with your family and friends. You can save the above image on Pinterest for further reference.

    If you ever make this recipe, do take a picture and tag @foodiejayashree on Instagram or @evergreendishes on Facebook

    Subscribe to get a book of handyhints for free !