Blog

  • Veg manchurian | dry veg manchurian recipe

    Veg manchurian | dry veg manchurian recipe

    Jump to Recipe Print Recipe

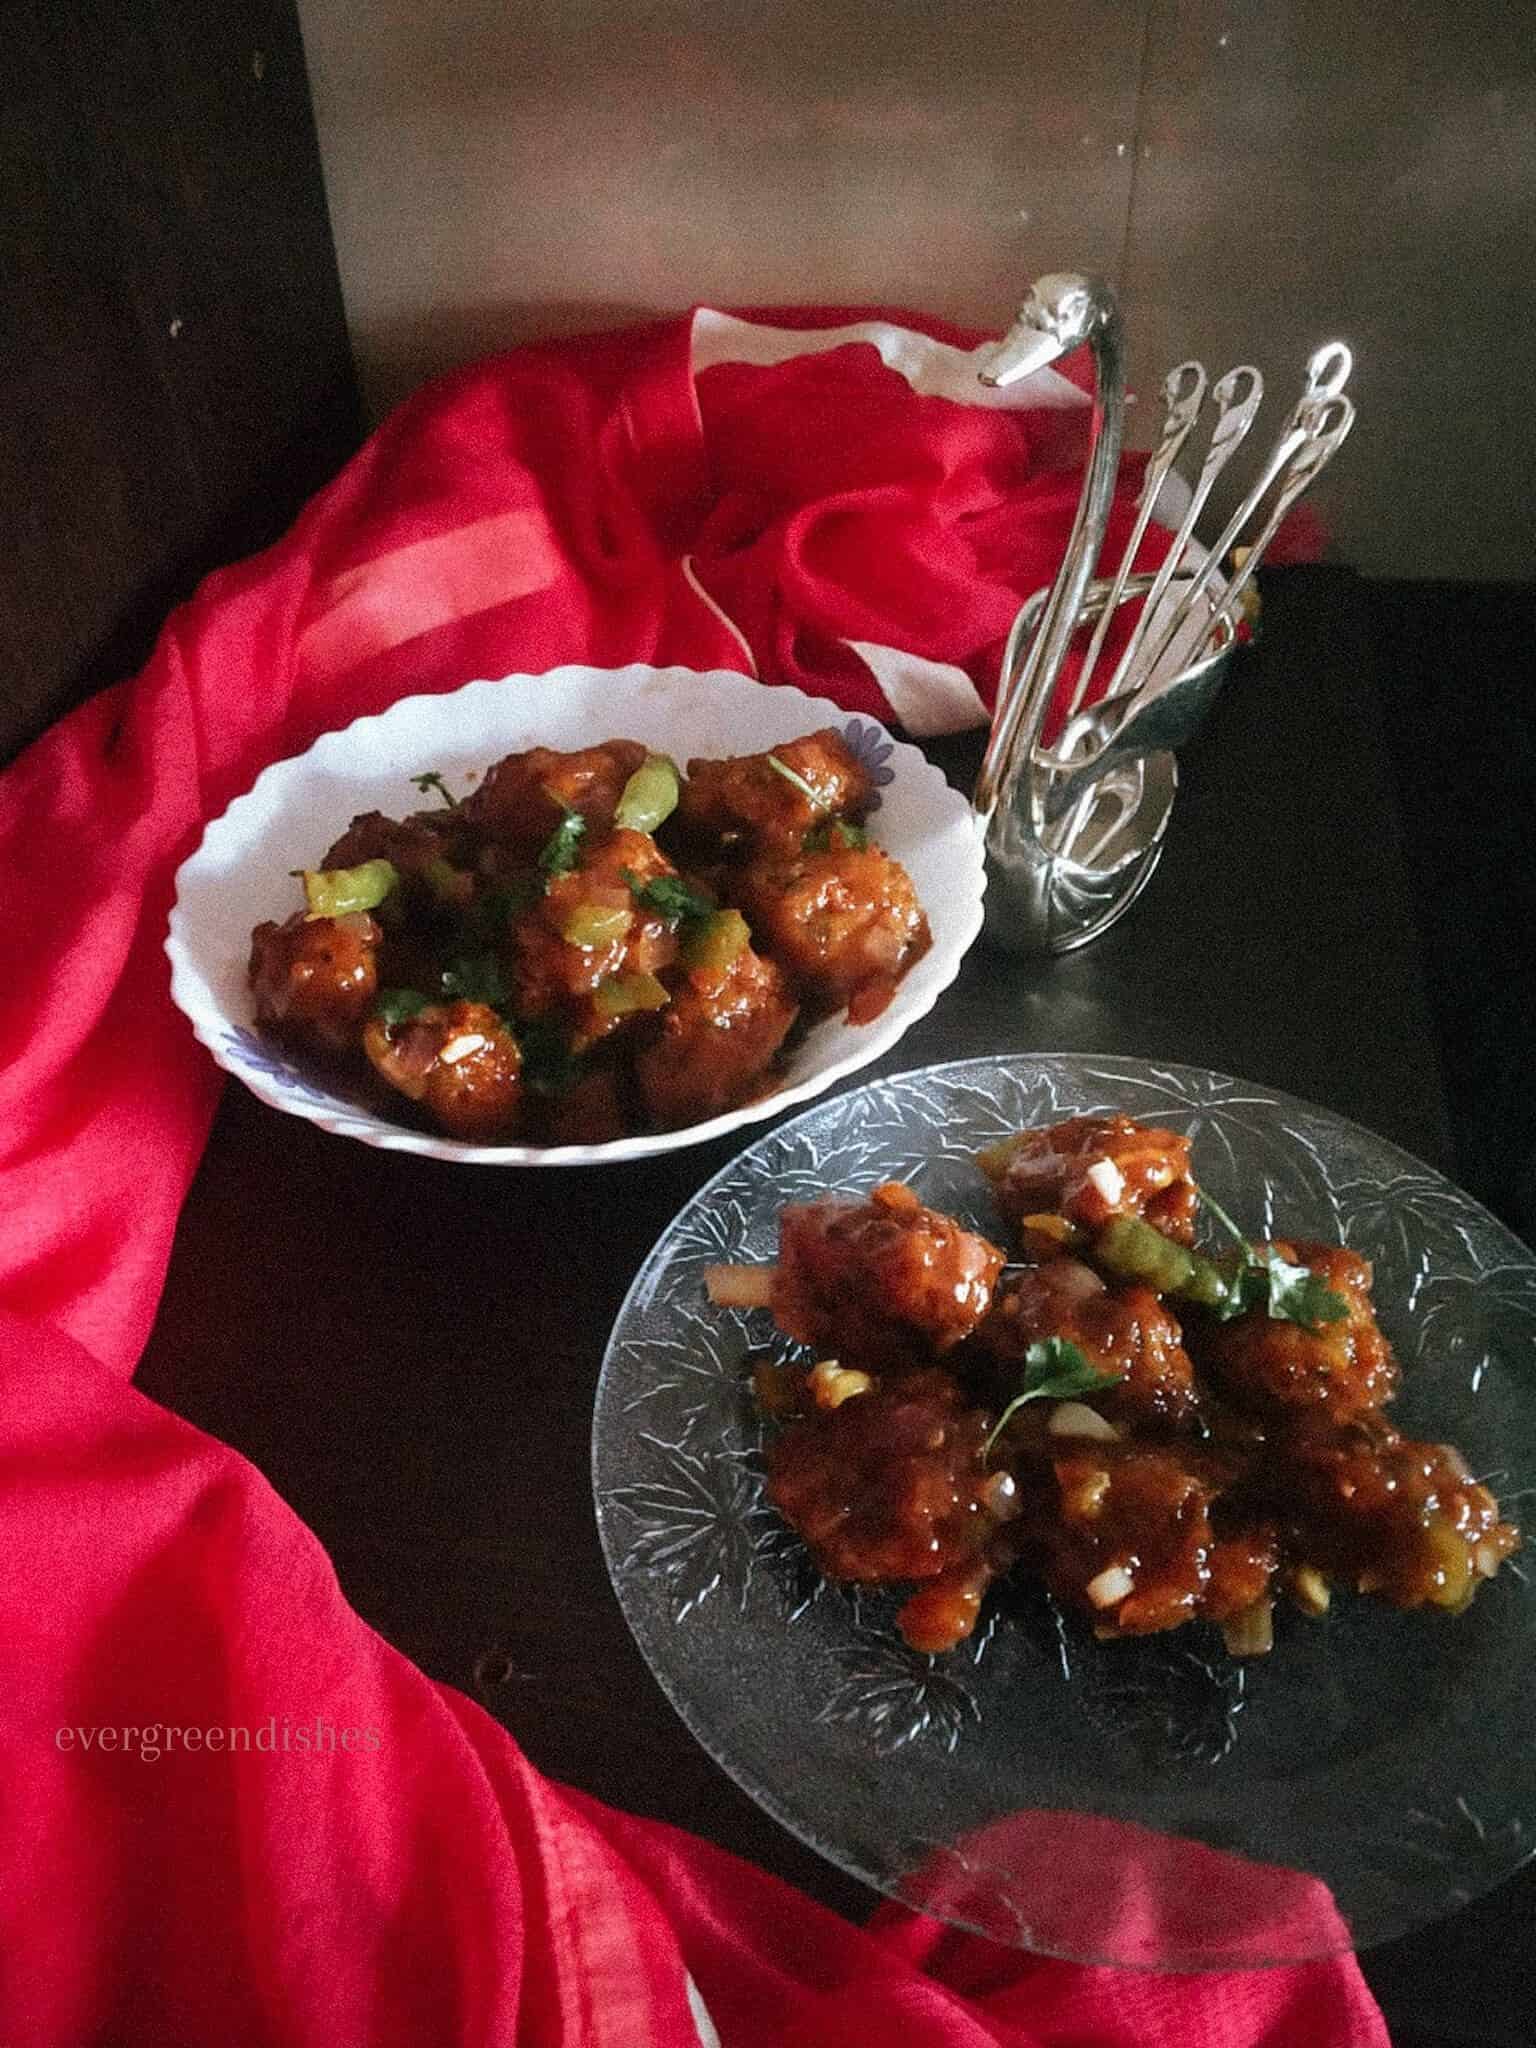
    Veg Manchurian is a popular Indo-Chinese snack. It is often served as an appetiser or an evening snack. It is delicious, bursting with many flavours of hot, sweet and spicy making it simply irresistible.  Vegetable balls are deep fried and cooked in a medley of sauces, it makes a good appetizer. This is the recipe of dry veg manchurian.

    Indo-Chinese cuisine is loved by many Indians. It is a cuisine which is made suitable to the Indian taste. Earlier I have shared hakka noodles  and veg fried rice  a favourite of my children. The other recipes shared are gobi manchurian, Alu 65, healthy carrot soup, vegetable manchow soup

    The popularity of gobi manchurian or veg manchurian is spread throughout the country. It is a street food which is served at many places. It overtook the popularity of bhel puri and sev puri among college students. 

    Veg Manchurian Recipe

    Ingredients:


    For the balls:

    • 1 onion
    • 2 carrot grated
    • 1/2 head cauliflower
    • 2 potato peeled and grated
    • 10 beans
    • 1/2 capsicum
    • 1/2 tsp pepper powder
    • salt
    • 1.5 tbsp cornflour
    • 1.5 tbsp maida

    For the manchurian sauce:

    • 1 tbsp tomato sauce
    • 1/2 tbsp soya sauce
    • 1.5 tbsp red chilli sauce
    • 1/2 tsp vinegar
    • 1 tbsp cornflour
    • 2 tbsp water
    • oil
    • 6 cloves garlic
    • 1 inch ginger
    • 1/2 capsicum
    • 1 onion
    •  

    Method :

    To make the balls :

    1. Cut the cauliflower florets and put them in water with a little salt and turmeric. After ten minutes, remove it, put  in a colander for sometime and grate it.
    2. Chop the onion finely.
    3. Grate the carrot.
    4. Peel the potato and grate it. Put it in water to avoid discolouration.
    5. Cut beans and capsicum into small bits.
    6. In a bowl, add all the vegetables, salt, pepper powder, cornflour, maida and mix them together to form a dough like substance. If the mixture is dry, use little water. 
    7. Heat oil in a pan, take a small quantity of the mixture and shape into a ball.
    8. Once the oil is hot, add a few balls and deep fry on medium heat until golden in colour. Keep tossing them in between with the slotted spoon.
    9. Remove them and repeat for the rest of the mixture. 

    To make the dry manchurian sauce :

    1. Grate ginger and cut garlic into small pieces. Cut onion into small pieces, keep it separately.
    2. Mix tomato sauce, soy sauce, red chilli sauce and vinegar in a bowl.
    3. Mix cornflour with a small quantity of water. 
    4. Take oil in a pan, add ginger and garlic to it. Saute for sometime, take care not to burn them.  Now, add onion to it, continue to saute. Once it is slight pink in colour, throw in the capsicum pieces to it. 
    5. Cook for two minutes, let it be a little crunchy. Put the sauce mixture to it. Add little salt as the sauces contain salt in them. Now, put the corn flour slurry to it and give a stir. After a minute, once it boils switch off the flame and put the fried balls to it. Mix it properly. Garnish with spring onion greens. 

    Take a tip:

    • Cabbage is usually used in veg manchurian. 
    • Spring onion is also used in this dish. It is garnished with spring onion leaves. 
    • You can use vegetables of your choice to make the balls. Cut them finely into small bits. 
    • You can add the sauces directly to the pan while cooking. 
    veg manchurian
    veg manchurian
    veg manchurian

    Veg Manchurian

    Veg Manchurian is a tasty snack dish from Indo-Chinese cuisine. It is usually served as a starter.

    Ingredients
      

    • For the balls:
    • 1 onion
    • 2 carrot grated
    • 1/2 head cauliflower
    • 2 potato peeled and grated
    • 10 beans
    • 1/2 capsicum
    • 1/2 tsp pepper powder
    • salt
    • 1.5 tbsp cornflour
    • 1.5 tbsp maida
    • For the manchurian sauce:
    • 1 tbsp tomato sauce
    • 1/2 tbsp soya sauce
    • 1.5 tbsp red chilli sauce
    • 1/2 tsp vinegar
    • 1 tbsp cornflour
    • 2 tbsp water
    • oil
    • 6 cloves garlic
    • 1 inch ginger
    • 1/2 capsicum
    • 1 onion

    Method
     

    1. To make the balls :
    2. Cut the cauliflower florets and put them in water with a little salt and turmeric. After ten minutes, remove it, put  in a colander for sometime and grate it.
    3. Chop the onion finely.
    4. Grate the carrot.
    5. Peel the potato and grate it. Put it in water to avoid discolouration.
    6. Cut beans and capsicum into small bits.
    7. In a bowl, add all the vegetables, salt, pepper powder, cornflour, maida and mix them together to form a dough like substance. If the mixture is dry, use little water.
    8. Heat oil in a pan, take a small quantity of the mixture and shape into a ball.
    9. Once the oil is hot, add a few balls and deep fry on medium heat until golden in colour. Keep tossing them in between with the slotted spoon.
    10. Remove them and repeat for the rest of the mixture.
    11. To make the dry manchurian sauce :
    12. Grate ginger and cut garlic into small pieces. Cut onion into small pieces, keep it separately.
    13. Mix tomato sauce, soy sauce, red chilli sauce and vinegar in a bowl.
    14. Mix cornflour with a small quantity of water.
    15. Take oil in a pan, add ginger and garlic to it. Saute for sometime, take care not to burn them.  Now, add onion to it, continue to saute. Once it is slight pink in colour, throw in the capsicum pieces to it.
    16. Cook for two minutes, let it be a little crunchy. Put the sauce mixture to it. Add little salt as the sauces contain salt in them. Now, put the corn flour slurry to it and give a stir. After a minute, once it boils switch off the flame and put the fried balls to it. Mix it properly. Garnish with spring onion greens.

    Notes

    Cabbage is usually used in veg manchurian. 
    Spring onion is also used in this dish. It is garnished with spring onion leaves. 
    You can use vegetables of your choice to make the balls. Cut them finely into small bits. 
    You can add the sauces directly to the pan while cooking. 

    Pin it for later: 

    veg manchurian
    Veg Manchurian is a classic dish from Indo-Chinese cuisine. This is the dry version, ideal as a snack or appetizer.

    If you ever make this veg manchurian recipe, do take a picture and tag @foodiejayashree on Instagram or @evergreendishes on Facebook or Twitter. I will be glad to see your creation and share it further. Let’s be connected, do follow on social media platforms. Until next time, let’s stay connected.  Subscribe to get all updates in your inbox. Happy Cooking ! 


  • Watermelon Rind Dosa | Watermelon Rind Recipes

    Watermelon Rind Dosa | Watermelon Rind Recipes

    Jump to RecipePrint Recipe


    Watermelon Rind Dosa is a delicious and unique breakfast option. It is soft, spongy and porous.  It is vegan and gluten free  and as the name suggests watermelon rind is used in it.

    Considering the fact, watermelon rind is healthier, I don’t like to waste it. The rind is the white part of the watermelon. It is rich in fibre and aids in digestion.  Usually, I use it in a smoothie or a salad.  Of late, I have another recipe and I make this dosa also. The dosa is made slightly thick and cooked only on one side. Like the regular dosa, this needs to be fermented. This  recipe is adopted from Vinaya Prasad’s blog  Vegetarian Culinary Delights. I am active in a couple of groups on Facebook and this group is one of them. I like the enthusiasm and patience with which she runs the group. Recently, the group reached the 15000 milestone mark. 

    Watermelon Rind Dosa Recipe 

    Ingredients: 

     1. 25 cup  rice
    1/2 cup  urad dal
    1/4 cup flattened rice (poha) 
    1/2 cup   watermelon rind
    1/2 cup  fresh coconut
    1/2 teaspoon methi seeds
    oil for roasting
    water for soaking and grinding
    salt to taste


    Method:

    1. Soak rice, urad dal and methi for 4 hours.
    2. Soak flattened rice (poha) for half an hour.
    3. Cut the rind into small pieces. 
    4. Grind the soaked rice and lentil mixture to a fine batter, remove it in a bowl. Now, grind the rind pieces, soaked poha and  coconut, mix it into the batter. Add salt to it, cover and keep it in a warm place to ferment overnight or 5-6 hours.
    5. Next day, mix the batter, heat a skillet. Smear a little oil if using the cast iron. pour a ladleful of batter, spread a little oil, cover with a lid   and allow to cook. There is no need to cook the other side for this dosa. Once it is cooked, remove and serve hot with coconut chutney. Repeat for the rest of the batter. 


    Take a tip: 

    1. The dosa is made as a set dosa.  The consistency of the batter should be moderately thick.
    2. Use any kind of skillet, iron or non-stick, cover with a lid and cook. There is no need to flip  to the other side. 


    watermelon rind dosa
    watermelon rind dosa


    My family enjoys dosa any day.  Rava dosa is usually prepared during weekends. A dosa batter is handy and used in different ways. You can make masala dosa, uttapam or gundapongal. The other kind of dosa are ragi dosa, jowar dosa, set dosa, neer dosa and mixed flour dosa. 

    watermelon rind dosa

    Watermelon Rind Dosa

    Watermelon rind dosa is soft, spongy dosa. It is ideal to prepare it for breakfast.
    Prep Time 4 hours
    Cook Time 30 minutes
    Fermentation time 6 hours
    Total Time 10 hours 30 minutes
    Course: Breakfast
    Cuisine: Indian, South Indian

    Ingredients
      

    • 25 cup rice
    • 1/2 cup urad dal
    • 1/4 cup flattened rice poha
    • 1/2 cup watermelon rind
    • 1/2 cup fresh coconut
    • 1/2 teaspoon methi seeds
    • oil for roasting
    • water for soaking and grinding
    • salt to taste

    Method
     

    1. Soak rice, urad dal and methi for 4 hours.
    2. Soak flattened rice (poha) for half an hour.
    3. Cut the rind into small pieces.
    4. Grind the soaked rice and lentil mixture to a fine batter, remove it in a bowl. Now, grind the rind pieces, soaked poha and  coconut, mix it into the batter. Add salt to it, cover and keep it in a warm place to ferment overnight or 5-6 hours.
    5. Next day, mix the batter, heat a skillet. Smear a little oil if using the cast iron. pour a ladleful of batter, spread a little oil, cover with a lid   and allow to cook. There is no need to cook the other side for this dosa. Once it is cooked, remove and serve hot with coconut chutney. Repeat for the rest of the batter.

    Notes

    The dosa is made as a set dosa.  The consistency of the batter should be moderately thick.
    Use any kind of skillet, iron or non-stick, cover with a lid and cook. There is no need to flip  to the other side. 

    Pin it for later:

    Watermelon rind dosa is soft, supple and porous. It is a good way to use the rind  of the fruit which is usually discarded. Watermelon rind is rich in fibre and minerals. Give a try to this variation of dosa.
    watermelon rind dosa

    If you ever make this dosa recipe or any of my dishes,  do take a picture and tag @foodiejayashree on Instagram or @evergreendishes on Facebook or Twitter. I will be glad to see your creation and share it further. Let’s be connected, do follow on social media platforms. Until next time, let’s stay connected.  Subscribe to get all updates in your inbox. Happy Cooking ! 


  • Masala Tea Powder | Chai Masala Powder Recipe

    Masala Tea Powder | Chai Masala Powder Recipe

    Jump to Recipe Print Recipe

     Masala Tea Powder | Chai Masala Powder  is a spice mix used along with tea leaves in the preparation of tea. It makes the tea flavoursome and a good immunity booster. Masala Chai is a popular tea variety in Indian sub-continent. With the on set of monsoon, this tea is mostly preferred by all. 


    Tea is of various kind, from the simple, regular tea to Irani Tea. Since the Covid period started, it’s been a testing time for all of us. We take many precautions to keep safe and healthy.  I regularly add some spices to the tea past two years.  Earlier, it used to be cardamom tea or ginger tea. For the past two weeks, I am using this masala tea powder and will be a regular affair for the next few months. It’s monsoon and we love to have this kind of Masala Chai regularly.  The season is perfect for some hot pakoras and masala chai. 

    Benefits of Masala Tea:


    Masala Tea consists of spices as cardamom, cloves, cinnamon, ginger and pepper. Spices have anti-inflammatory, anti-bacterial and anti-fungal properties. It helps to prevent cold, cough and nasal congestion. It helps in reducing inflammation and boosts the immunity power. The regular use of spice mix helps in improving the metabolism of the body.
    Medical studies have proven the ingredients used aids in the prevention of diabetes and cancer.

    Difference between Cassia Cinnamon and Ceylon  Cinnamon


    Cinnamon is made from the inner bark of the Cinnamon tree. The unique property  is the presence of  essential oils, Cinnamaldehyde. Cinnamon is basically of two kinds : Cassia Cinnamon and Ceylon Cinnamon. The regular cinnamon which is widely used is the Cassia cinnamon. It is curled inward from both the sides.  It has stronger flavour and reddish brown in colour. It is ideal to use in savoury dishes.   The sticks of Ceylon cinnamon curl in a telescopic form. It is warmer in tone, has a sweet flavour and tan in colour.  The coumarin content is higher in cassia cinnamon. Coumarin is a naturally occurring element found in both Cassia cinnamon and Ceylon cinnamon. High amount of coumarin consumption may have adverse effect on health. Bottom line is, both can be used in cooking. But if you are using regularly, Ceylon cinnamon seems to be the ideal choice. You can read more about it here

    Masala Tea Powder

    Masala Tea Powder Recipe:

    Ingredients:

    • 40 gram cardamom
    • 10 gram cinnamon
    • 10 gram  clove
    • 10 gram pepper
    • 10 gram  dry ginger

    Method: 

    Take all the ingredients and grind them together. Store it in an air tight container. 

    Take a tip:

    I have used the ceylon cinnamon  in this recipe. To get the cup and tablespoon measurement, watch the video below. 


    How to use the prepared masala powder: 

    Add a small quantity (1/4 teaspoon)  of the  prepared masala powder while preparing the tea. I prefer to put in the water and boil. Later, I add the tea leaves, boil,  and strain after sometime. A maximum of half tea spoon of masala powder is sufficient for three cups of water. 

    How to store :

    Store it in a clean, air tight container. 


    Masala Tea Powder/ Chai Masala Powder

    Masala Tea Powder

    Masala Tea Powder gives a good flavour to tea. It is a blend of spices which can be stored in an air-tight container.
    Prep Time 10 minutes
    Total Time 10 minutes
    Course: condiments
    Cuisine: Indian

    Ingredients
      

    • 40 gram cardamom
    • 10 gram cinnamon
    • 10 gram clove
    • 10 gram pepper
    • 10 gram dry ginger

    Method
     

    1. Take all the ingredients and grind them together. Store it in an air tight container.

    Notes

    I have used the Ceylon cinnamon  in this recipe.
    To get the cup and tablespoon measurement, watch the video above.

    Pin it for later: 

    Masala Tea Powder/ Chai Masala is a flavoursome condiment used in the preparation of tea in Indian sub-continent. It is ideal to have it in the kitchen shelf. Give a try to this.
    Masala Tea Powder/Chai Masala

    If you have liked this post, do share it with your family and friends. If you ever make this, take a picture and share it by tagging @foodiejayashree on Instagram or @evergreendishes on Facebook or Twitter.

    Let’s be connected, the follow buttons are on the side bar. Subscribe to get all updates and an e-book for free!

  • Khira Gaintha Recipe | Odisha cuisine

    Khira Gaintha Recipe | Odisha cuisine

    Jump to Recipe Print Recipe

    Khira Gaintha is a delicious sweet dish, rice balls are cooked in thickened milk laced with nuts, cardamom, kesar and coconut. It is from Oriya cuisine and usually made as an offering to the Lord Jaganath. 

    What is a Pitha ? 
     Pitha is a variety of flatbread, dumpling or fritter familiar to Bangladesh and Indian sub-continent. It may be sweet or savoury which is usually made during festivals. It is familiar to states of Orissa, Assam, Nepal, Jharkhand and Bihar. 

    What is the major ingredient used in Pitha? 

    Rice flour is the main ingredient in most Pitha recipes though other ingredients may be used along with it. Gaintha Godi, Malpua Pitha,Suji Kakara Pitha, Tala Pitha,

    What are the variations you find in Pitha? 

    Every state has many different kind of Pitha varieties on it. As I have studied the Odisha Pitha for the event, the different varieties I found were arisi Pitha, Chakuli Pitha, Poda Pitha, Ruka Pitha and Chunchipatra Pitha. 

    About the event: 

    It’s raining Pithas at Shhh  Secretly Cooking Group. The month of May, made us learn about Pitha.  Sasmita of First Timer Cook suggested to make any variety of Pitha. Her blog has many dishes from Oriya cuisine and I would like to try her stir fry from Oriya cuisine  Chhanka Tarkari. It has the goodness of many vegetables in it or one can use any vegetables that they have on hand.  I was paired with Swaty of Food Trails25.  The secret ingredients I gave were pepper and ghee and she prepared the delicious Sooji Kakara Pitha. I am curious to make them soon during some festive occasion.  I was given condensed milk and saffron and I prepared this Khira Gaintha. 

    shhh cooking secretly

    khira gaintha

    Khira Gaintha and Rasmalai

    Pitha and Khira Gaintha are both new to me. I did search on google, looked on youtube and finally made a few changes to the ingredients that I had in hand. Khira Gaintha has rice balls in thickened flavoured milk while rasmalai has dumplings made of paneer. Though, Rasmalai is quite popular, Khira Gaintha is not known to many of us. 

    Let’s get to the recipe of Khira Ghaintha.

    Ingredients:

    For the thickened milk: 

    • 3/4 litre milk
    • 200 ml condensed milk
    • a few strands of saffron
    • 1/4 teaspoon cardamom powder
    • 8 almonds
    • a few coconut pieces

      For the rice balls:

    • 1 cup water
    • 1/4 tsp salt
    • 1 tsp oil
    • 1 cup rice flour
    • 2 tsp ghee

      Method:


    To make the rabdi, boil milk for sometime. Let it reduce in quantity by at least thirty percent. Add saffron strands to it, put condensed milk and cook for a couple of minutes. Put it aside. Finally, add cardamom powder to it. 

    To make the rice balls: Take a cup of water in a pan. Add a pinch of salt and oil to it. Once the water comes to a boil, simmer and slowly mix the rice flour to it. Mix it well. Switch of the stove. Slowly, knead the mixture with a little ghee.

    To make Khira gaintha : Make small balls of it, put them on a plate. Once the balls are formed, slowly put them in the thickened milk and  bring to a boil. Put coconut pieces and almond slivers to it. Let cool. Refrigerate and serve chilled.

    Take a tip: 

    Evaporated milk may be used, then you need to add sugar to it. As I have used condensed milk, no additional sugar is used. 


    Khira Gaintha
    Evergreendishesdev

    Khira Gaintha

    Khira Gaintha is a traditional recipe from Odia cuisine. It is one of the Pitha varieties prepared in that state. It is usually made during festivities.
    Course: Dessert, festive sweet, lunch
    Cuisine: Indian, oriya

    Ingredients
      

    • For the thickened milk:
    • 3/4 litre milk
    • 200 ml condensed milk
    • a few strands of saffron
    • 1/4 teaspoon cardamom powder
    • 8 almonds
    • a few coconut pieces
    • For the rice balls:
    • 1 cup water
    • 1/4 tsp salt
    • 1 tsp oil
    • 1 cup rice flour
    • 2 tsp ghee

    Method
     

    1. To make the rabdi, boil milk for sometime. Let it reduce in quantity by at least thirty percent. Add saffron strands to it, put condensed milk and cook for a couple of minutes. Put it aside. Finally, add cardamom powder to it.
    2. To make the rice balls: Take a cup of water in a pan. Add a pinch of salt and oil to it. Once the water comes to a boil, simmer and slowly mix the rice flour to it. Mix it well. Switch of the stove. Slowly, knead the mixture with a little ghee.
    3. To make Khira gaintha : Make small balls of it, put them on a plate. Once the balls are formed, slowly put them in the thickened milk and  bring to a boil. Put coconut pieces and almond slivers to it. Let cool. Refrigerate and serve chilled.

    Notes

    Evaporated milk may be used, then you need to add sugar to it. As I have used condensed milk, no additional sugar is used. 
    Khira Gaintha is a traditional dish from Odisha cuisine. It is one of the pitha varieties prepared during festivities.
    Khira Gaintha

    The other Oriya dishes shared on the blog are : Aloo Bharta

    If you ever recreate this recipe, take a picture and share it on Instagram by tagging @foodiejayashree or on Facebook by tagging @evergreendishes. I will be glad to see your creation. Have you  check out my e-books ?

    Subscribe to get an e-book of handy hints and all updates in your inbox.

  • Kara Pidi Kozhukottai

    Kara Pidi Kozhukottai

    Jump to RecipePrint Recipe

    Kara  Pidi Kozhukottai is an aromatic, filling  and healthy dish ideal to serve for breakfast. The rice and lentil mixture is twice cooked to make a delicious dish. It is from Tamil cuisine and commonly prepared in Tamil Brahmin households.

    Kozhukottai is a dish familiar to Tamilian cuisine. It is commonly made in  Tamilian households on a regular basis.  They are usually rice dumplings  with or without a filling. It may be sweet or savoury, thus different kinds of kozhukottai are prepared.

    Since I started my blogging, the love to know about different cuisines is even more. Pidi Kozhukottai as I have read in many blogs makes use of only rice. I came across a recipe which made use of lentils too and liked it. Here is the  recipe which I tried recently, I hope you will try and enjoy it. I got this recipe from a book titled Tiffins:Memories and Recipes of Indian Cooking by Rukmini Srinivas


    pidi kozhukottai

    Earlier, I have shared Ammini Kozhukottai recipe, it is tasty and I usually make it for dinner.

    Coming to the recipe, it is not a quick one. It involves three steps. At first, we grind the ingredients and roast them. Next it is cooked with a seasoning like upma.  Once it is ready and cooled, it is then shaped into dumplings and steamed. But, it is healthy and quite easy to make.  I liked as it involved additional mere steaming  for just ten more minutes. Over to the Kara Pidi Kozhukottai Recipe

    Kara Pidi Kozhukottai Recipe

    Ingredients:

    To grind:

    • 1 cup raw rice
    • 1/4 cup tur dal
    • 1 tablespoon chana dal
    • 2 dry chillies
    • 10 peppercorns

    Other ingredients:

    • 2 tablespoon oil
    • 1/2 teaspoon mustard
    • 1 teaspoon bengal gram
    • 2 green chillies
    • few curry leaves
    • 1/4 teaspoon asafoetida
    • 2 cup water
    • 1/2 cup fresh coconut
    • 1/4 cup grated carrot
    • 1/4 cup green peas
    • 1 bunch fenugreek
    • salt

    Method :

    1. Dry grind the ingredients under, “To Grind” to a coarse semolina like texture.
    2. Put the mixture in a pan and dry roast for two minutes. Keep it aside.
    3. Heat oil in a pan, add mustard seeds. As they splutter, put bengal, asafietida and curry leaves. Throw in the green chilly too. As they turn golden, put water and salt to it.
    4. As the water begins to boil, throw in coconut, vegetables and greens.
    5. Bring to a boil, now slowly add one cup of the ground mix to it. Keep stirring as no lumps should be formed.
    6. Cook until water is absorbed.
    7. Allow it to cool.
    8. Make elongated shaped dumplings with the mixture,
    9. Take a steamer or idli cooker. Put water in the beneth.
    10. Grease a bowl, put the dumplings into it.
    11. Put the perforated lid and keep the bowl with dumplings over it.
    12. Let cook for eight minutes, check with a tooth pick
    13. Once it is done, serve hot.

    kara pidi kozhukattai
    Evergreendishesdev

    Kara Pidi Kozhukottai

    Kara Pidi Kozhukottai is a healthy, and tasty recipe from Tamil cuisine. It is ideal to serve for breakfast.
    Course: Breakfast
    Cuisine: Indian, Tamilnadu

    Ingredients
      

    To grind:
    • 1 cup raw rice
    • 1/4 cup tur dal
    • 1 tablespoon chana dal
    • 2 dry chillies
    • 10 peppercorns
    Other ingredients:
    • 2 tablespoon oil
    • 1/2 teaspoon mustard
    • 1 teaspoon bengal gram
    • 2 green chillies
    • few curry leaves
    • 1/4 teaspoon asafoetida
    • 2 cup water
    • 1/2 cup fresh coconut
    • 1/4 cup grated carrot
    • 1/4 cup green peas
    • 1 bunch fenugreek
    • salt

    Method
     

    1. Dry grind the ingredients under, “To Grind” to a coarse semolina like texture.
    2. Put the mixture in a pan and dry roast for two minutes. Keep it aside.
    3. Heat oil in a pan, add mustard seeds. As they splutter, put bengal, asafietida and curry leaves. Throw in the green chilly too. As they turn golden, put water and salt to it.
    4. As the water begins to boil, throw in coconut, vegetables and greens.
    5. Bring to a boil, now slowly add one cup of the ground mix to it. Keep stirring as no lumps should be formed.
    6. Cook until water is absorbed.
    7. Allow it to cool.
    8. Make elongated shaped dumplings with the mixture,
    9. Take a steamer or idli cooker. Put water in the beneth.
    10. Grease a bowl, put the dumplings into it.
    11. Put the perforated lid and keep the bowl with dumplings over it.
    12. Let cook for eight minutes, check with a tooth pick
    13. Once it is done, serve hot.

    Pin it for later:

    Kara Pidi Kozhukottai is a dish from Tamil cuisine. Lentil and rice mixture is cooked and steamed to form a hearty and filling breakfast
    Kara Pidi Kozhukottai

    If you ever recreate this recipe, take a picture and share it on Instagram by tagging @foodiejayashree or on Facebook by tagging @evergreendishes. I will be glad to see your creation. Have you  check out my e-books ?

    Subscribe to get an e-book of handy hints and all updates in your inbox.

  • Baked Katori Chaat | Katori Chaat recipe

    Baked Katori Chaat | Katori Chaat recipe

    Jump to RecipePrint Recipe

    Baked Katori Chaat makes a quick snack to serve as appetiser or weekend menu  when everyone is at home. This is a guilt-free snack one can enjoy. 

    What is Chaat ?

    Chaat is a kind of savoury  snack from the Indian sub-cintinent. The word Chaat is derived from the Hindi word “Chatna” which refers to licking ones fingers  while eating. It is full of flavours, sweet, spicy, tangy and loved by most people.. Chaats are of many kind. Some of the popular ones are Bhel Puri, Sev Puri and Pani Puri. While I love making Ragda Patties, these are  usual ones that we enjoy frequently. Cornflakes Bjhel, Pomegranate Chaat, Dahi Puri, 

    What is Katori? 

    Katori is a small utensil regularly used at home. The chaat is served in a small canopy and hence the name.

    What goes into this chaat ? 

    The baked katori chaat recipe is an easy one to make. It is healthier than the fried version. Like all the  other chaat recipes, tamarind chutney and green chutney are essential in preparing it. . Sev is used for topping.  The filling can be made with potatoes and onion along with sprouted green gram or boiled chana. It is open-end where one can be creative enough to use as per their preferences. 

    baked katori chaat
    baked katori chaat

    Baked Katori Chaat Recipe

    Ingredients:

    For the canopy :


    2 cups maida
    a little salt
    1/2 teaspoon baking powder
    1/4 teaspoon cumin powder
    1/4 cup oil
    3/4  cup milk

    For the filling:

    1 onion
    2 boiled potato
    2 tbsp boiled kala chana
    green chutney
    sweet  chutney
    1 tomato
    sev for garnishing

    Method : 


    To make the katori : 


    1. In a wide bowl add maida, salt and baking powder. Mix it well. Put oil and mix it thoroughly. Now add  milk in small quantity and mix to a smooth dough. Keep it covered. 
    2. Grease the mould. I have used silicon moulds. Take a small ball of the dough, put it in the mould and press it along the sides. Repeat for the number of moulds that you have. Keep the remaining dough covered.
    3. Pre-heat the oven. Put the moulds to bake. I needed about ten minutes for a batch to bake  in my oven. 
    4. Once it is golden to the edges, demold and put the next back of canopy to bake. 
    5. You can make these ahead and keep. 

    To assemble the katori chaat. 


    1. Keep all the ingredients ready. Chop the onion nicely. Cut the tomato into small pieces, avoid using the seeds here. 
    2. Peel and mash the potato. Add a little salt to it. 
    3. Take a small quantity of green chutney and tamarind chutney, dilute them if needed.
    4. Arrange the canopies in a plate. The filling can be put in any order. Here is how I  do it: Put a little bit of potato mixture, followed by boiled chana and onion. Now put a little green chutney and sweet chutney. Put one or two pieces of tomato and top with sev. The quantity of chutney that you put into each canopy will depend on the size of the canopy and the spiciness that you need. 
    5. Serve immediately. 


    Take a tip: 


    • You can make it a no onion garlic recipe. Avoid using them.
    • You can use black or white chana for the filling. I used black chana. 
    • Sprouts may be used.
    • Using boiled potato in small quantity gives a good taste. 
    • A little bit of curd may be added for the topping. I have not put it here as my children preferred without it. 
    • Sweet chutney can be prepared  in two ways, one with the dates and the other without it. The above one is without dates. The dates chutney recipe is put along with bhel puri recipe. You can use either of them. 
    Baked Katori Chaat
    baked katori chaat

    Baked Katori Chaat

    Baked Katori Chaat is a delicious snack. It is a healthy twist as the katoris are baked here.
    Course: evening snacks
    Cuisine: north indian

    Ingredients
      

    For the canopy :
    • 2 cups maida
    • a little salt
    • 1/2 teaspoon baking powder
    • 1/4 teaspoon cumin powder
    • 1/4 cup oil
    • 3/4 cup milk
    For the filling:
    • 1 onion
    • 2 boiled potato
    • 2 tbsp boiled kala chana
    • green chutney
    • sweet chutney
    • 1 to mato
    • sev for garnishing

    Method
     

    To make the katori :
    1. In a wide bowl add maida, salt and baking powder. Mix it well. Put oil and mix it thoroughly. Now add milk in small quantity and mix to a smooth dough. Keep it covered.
    2. Grease the mould. I have used silicon moulds. Take a small ball of the dough, put it in the mould and press it along the sides. Repeat for the number of moulds that you have. Keep the remaining dough covered.
    3. Pre-heat the oven. Put the moulds to bake. I needed about ten minutes for a batch to bake in my oven.
    4. Once it is golden to the edges, demold and put the next back of canopy to bake.
    5. You can make these ahead and keep.
    To assemble the katori chaat.
    1. Keep all the ingredients ready. Chop the onion nicely. Cut the tomato into small pieces, avoid using the seeds here.
    2. Peel and mash the potato. Add a little salt to it.
    3. Take a small quantity of green chutney and tamarind chutney, dilute them if needed.
    4. Arrange the canopies in a plate. The filling can be put in any order. Here is how I do it: Put a little bit of potato mixture, followed by boiled chana and onion. Now put a little green chutney and sweet chutney. Put one or two pieces of tomato and top with sev. The quantity of chutney that you put into each canopy will depend on the size of the canopy and the spiciness that you need.
    5. Serve immediately.

    Notes

    You can make it a no onion garlic recipe. Avoid using them.
    You can use black or white chana for the filling. I used black chana.
    Sprouts may be used.
    Using boiled potato in small quantity gives a good taste.
    A little bit of curd may be added for the topping. I have not put it here as my children preferred without it.
    Sweet chutney can be prepared in two ways, one with the dates and the other without it. The above one is without dates.
    The dates chutney recipe is put along with bhel puri recipe. You can use either of them.

    If you ever recreate this recipe, take a picture and share it on Instagram by tagging @foodiejayashree or on Facebook by tagging @evergreendishes. I will be glad to see your creation. Have you  check out my e-books ?

    Subscribe to get an e-book of handy hints and all updates in your inbox. 

  • Custard Pudding | How to make custard pudding

    Custard Pudding | How to make custard pudding

    Jump to Recipe Print Recipe

    Custard Pudding is a layered, easy to make dessert. It is a good treat during hot summer months. One can customise to their preference by adding different kind of fruits and nuts in it. 

    Custard pudding is one of the desserts I often make.  This dessert  is easy to prepare and  tailor-made to one’s taste and needs. Since it is the season of mangoes, I have used mango pieces today. One can add pomegranate arils and banana pieces too. Adding of chocolate ganache gives a good and rich taste to it.

    A few pointers to make custard : 

    1. Use good quality  custard powder. I prefer using Brown and Polson.
    2. Make sure no lumps are formed. 
    3. Custard can be made either of thin or thick consistency. Here, we need one of moderately thick consistency.
    4. Do not use hot custard in layering.
    custard pudding
    custard pudding


    Ingredients for Custard Pudding: 

          For the first layer: 

    • 15 digestive biscuits
    • 2 tablespoon cocoa powder
    • 2 teaspoon ghee

      For the second Layer: 

    • 1/2 litre milk
    • 1/4 cup sugar
    • 1 tablespoon custard powder
    • a little water or milk for mixing

    For the third layer: 

    • mango pieces
    • nuts
    • berries

    Method : 

    1. At first, let us prepare the custard. Take milk in a thick bottom pan. Take custard powder in a small bowl and mix it with a small quantity of  water or milk. Keep it aside. Once it boils, add sugar and give a stir. Now, add the slurry to it. Keep stirring as you add it. As it boils, it thickens. Put it aside to cool.
    2. Chop the mango and dry fruits.
    3. Take the digestive biscuits and powder it. I have used Marie biscuit, find it ideal for many desserts. You can either put the biscuits in a zip-lock bag and press it with a rolling pin. One can also pulse them in the jar.
    4. Mix the crushed powder with ghee and cocoa powder. 

    To Assemble:

    1. Take small glasses or a small jar. Put the biscuit crumble below and press it with the back of a spoon. 
    2. Put three tablespoon of the cooled custard to it.  Set it for sometime in the freezer. 
    3. Top it with mango pieces, dry fruits and berries.
    4. Chill and serve. 

    Take a tip: 

    1. Different kind of fruits can be added.
    2. A spoon of soaked chia seed tastes good to it.
    3. You may top it with cornflakes.
    4. Instead of fruits, you can top it with chocolate ganache. 
    custard pudding
    Evergreendishesdev

    Custard Pudding

    Custard Pudding is a delicious dessert for the weekend. Give a try to this.
    Servings: 4 people
    Course: Dessert
    Cuisine: international

    Ingredients
      

    For the first layer:
    • 15 digestive biscuits
    • 2 tablespoon cocoa powder
    • 2 teaspoon ghee
    For the second Layer:
    • 1/2 litre milk
    • 1/4 cup sugar
    • 1 tablespoon custard powder
    • a little water or milk for mixing
    For the third layer:
    • mango pieces
    • nuts
    • berries

    Method
     

    1. At first, let us prepare the custard. Take milk in a thick bottom pan. Take custard powder in a small bowl and mix it with a small quantity of  water or milk. Keep it aside. Once it boils, add sugar and give a stir. Now, add the slurry to it. Keep stirring as you add it. As it boils, it thickens. Put it aside to cool.
    2. Chop the mango and dry fruits.
    3. Take the digestive biscuits and powder it. I have used Marie biscuit, find it ideal for many desserts. You can either put the biscuits in a zip-lock bag and press it with a rolling pin. One can also pulse them in the jar.
    4. Mix the crushed powder with ghee and cocoa powder.
    To Assemble:
    1. Take small glasses or a small jar. Put the biscuit crumble below and press it with the back of a spoon.
    2. Put three tablespoon of the cooled custard to it.  Set it for sometime in the freezer.
    3. Top it with mango pieces, dry fruits and berries.
    4. Chill and serve.

    Notes

    Different kind of fruits can be added.
    A spoon of soaked chia seed tastes good to it.
    You may top it with cornflakes.
    Instead of fruits, you can top it with chocolate ganache. 

    Pin it for later : 

    Custard Pudding is a layered, easy to make dessert. It is a good treat during hot summer months
    Custard Pudding

    Looking for more recipes with mango? Here is a compilation of different kind of recipes using mango

    If you ever recreate this recipe, take a picture and share it on Instagram by tagging @foodiejayashree or on Facebook by tagging @evergreendishes. I will be glad to see your creation. Have you  check out my e-books ?

    Subscribe to get an e-book of handy hints and all updates in your inbox. 

  • Mixed Fruit Popsicle Recipe

    Mixed Fruit Popsicle Recipe

    Jump to Recipe Print Recipe

    Mixed Fruit Popsicle is a delightful summer snack. It is easy to make with natural ingredients and has no added sugar in it. 

    Summer and frozen treats such as ice cream, popsicles and sorbet go hand in hand. It is one of the essentials of scorching heat as the body needs something cool.

    Popsicles are the easiest and best treats one can make at home. They are water or milk based frozen snack on a stick. It is called by different names in different parts of the world as ice pops, freezer pop, paleta, icy pole, ice candy, ice block or ice drop. Different flavours are available in super markets. One can easily make at home It is the best treat you will be giving yourself by sparing a few minutes. You are in control of the ingredients that goes into it. Seasonal fruits are the ideal choice. Sugar may be avoided and more over you can play around different flavours according to the likes of your children. 

    Different kind of popsicles :

    The different kind of popsicles are fruit based, juice, yoghurt or milk based. One kind makes use of coconut milk also. 

    Today, I am presenting a mixed fruit popsicle. It is a fun  recipe ready in few minutes, the only wait is the freezing time.

    Why should you prepare this one? 

    • seasonal fruits are used
    • no artificial colours or flavours
    • no added sugar
    • easy to prepare
    • kids will like it

    mixed fruit popsicle

    What goes into this popsicle ? 

    • Watermelon: It is truly a summer fruit, one can eat loads of it.
    • Mango: It is the king of fruits and the season is here right now. This is the only time we can enjoy these luscious fruit.
    • Apple: One cannot deny the many benefits of apple. It gives a good texture to the candy.
    • Chia seed: Much has been said about, I used it in small quantity.
    • Water: I have used a small quantity of water. 

    You may add :

    • Honey : If you need more sweetness. Sugar can also be used. 
    • Lime juice : I have not used it.

    Let’s get to the recipe of Mixed Fruit Popsicle:

    Ingredients: 

    • 1 Mango
    • 1/2 apple
    • 1 cup of watermelon chunks
    • 1 teaspoon chia seed
    • 1/2 cup water

    Method: 

    1. Soak the chia seed in water for sometime.
    2. Cut the mango and apple into small pieces.
    3. Remove the seeds from the watermelon. 
    4. Blend them into a puree with little water. Add watermelon chunks and give a pulse.
    5. Remove the puree in a glass.
    6. Pour it into the molds. Add some chia seeds to it and put the stick over them.
    7. Freeze them for six hours or overnight. 
    8. To unmold, hold them under running water for ten seconds, it comes out easily. 

    Take a tip:

    • I did not use any sweetener as the fruits were naturally sweet.
    • You can add honey or sugar while grinding. 
    • Use ripe fruits to make popsicles. 


    About the  event: 

    Frozen Treats is the theme for the month of April in Shhhh Secretly Cooking Challenge. Theme was suggested by Pavani of Pavanis Kitchen. I liked her Oreo Ice cream prepared for the current theme,  a surely loved one by children. Here, we are paired  and the partners exchange secret ingredients. The recipe is prepared accordingly and later the ingredients are guessed in the group by other members.My partner for this month is Sasmita. She has prepared a lovely sorbet with the cumin and amchur   that I gave. I was given apple and chia seed. prepared this fruit popsicle. 

    shhh cooking secretly


    mixed fruit popsicle

    Mixed Fruit Popsicle

    Mixed Fruit Popsicle is a tasty summer treat. It is made with real fruits, makes a good choice to serve.
    Prep Time 10 minutes
    Freezing time 6 hours
    Total Time 6 hours 10 minutes
    Course: Dessert
    Cuisine: Indian

    Ingredients
      

    • 1 Mango
    • 1/2 apple
    • 1 cup of watermelon chunks
    • 1 teaspoon chia seed
    • 1/2 cup water

    Method
     

    1. Soak the chia seed in water for sometime.
    2. Cut the mango and apple into small pieces.
    3. Remove the seeds from the watermelon.
    4. Blend them into a puree with little water. Add watermelon chunks and give a pulse.
    5. Remove the puree in a glass.
    6. Pour it into the molds. Add some chia seeds to it and put the stick over them.
    7. Freeze them for six hours or overnight.
    8. To unmold, hold them under running water for ten seconds, it comes out easily.

    Notes

    I did not use any sweetener as the fruits were naturally sweet.
    You can add honey or sugar while blending.
    Use ripe fruits to make popsicles.


    Pin it for later: 

    Mixed Fruit Popsicle is a delightful summer snack. It is easy to make with natural ingredients and has no added sugar in it. 
    Mixed fruit popsicle

    Other dessert recipes that I have shared earlier are mango pannacotta, strawberry ice cream, royal kulfi, choco banana icecream


    If you ever make this recipe, take a picture and share it by tagging @foodiejayashree on Instagram or @evergreendishes on Facebook. I will be glad to see and share your creation further.
    Check out my e-books on Amazon. Do not miss any post, subscribe to get all updates and an e-book for free !

  • Kashmiri Tomato Chutney | Spicy Tomato Chutney Recipe

    Kashmiri Tomato Chutney | Spicy Tomato Chutney Recipe

    Jump to Recipe Print Recipe

    Kashmiri Tomato Chutney is flavoursome with a hint of spices, it is versatile to use with chapati, idli or dosa.

    I was browsing through my diary and I found this recipe scribbled in the middle of the book. Recently, we visited Kashmir and it was a wonderful trip. We witnessed snow fall in Gulmarg and it was amazingly beautiful experience. The drastic climate change  one has to bear if we are visiting different parts of the world.

    Seeing the recipe, I thought I must try it now. It was tasty. I served with thalipeeth. It is ideal to serve with chapati or phulka. I liked the way the flavours complemented so well, taste of the spices was minimal without harming the tanginess of tomato. I will be making it again. Give a try to the spicy tomato chutney and let me know how it was.

    Why should you make this chutney ?

    • it is vegan
    • it is gluten-free
    • it is made with easy to make ingredients in the kitchen
    • it is ready in a few minutes
    • it makes a good accompaniment with many dishes as chapathi, idli and dosa.

    kashmiri tomato chutney
    kashmiri tomato chutney

    Ingredients:

    • Spices  as clove, cardamom, fennel and cinnamon are dry roasted and ground to a powder.
    • Onion : Cut it into small bits
    • Tomato : Cut it into small bits
    • Oil : Any neutral cooking oil is needed.
    • Mustard seed: A little bit in the seasoning
    • Cumin: For the taste it delivers
    • Turmeric powder: Dash of haldi helps in not only giving  colour but also has anti-bacterial properties
    • Curry leaves : a few
    • Green chilli
    • Salt

    Method:

    Print Recipe

    kashmiri tomato chutney
    Evergreendishesdev

    Kashmiri Tomato Chutney

    Kashmiri tomato chutney is flavoursome with a hint of spices. It is ideal to pair with chapati, idli, dosa or even paratha.
    Prep Time 10 minutes
    Cook Time 10 minutes
    Total Time 20 minutes
    Course: Breakfast, lunch ideas
    Cuisine: Indian, Kashmiri

    Ingredients
      

    • 2 clove
    • 1 cardamom
    • 1 teaspoon fennel
    • 1 inch cinnamon
    • 2 teaspoon oil
    • 1/2 teaspoon mustard
    • 1 teaspoon cumin
    • 1/4 teaspoon turmeric powder
    • a few curry leaves
    • 3 green chilli
    • 1 onion
    • 8 to mato
    • salt
    • chilli powder

    Method
     

    1. Cut the onion and tomato into small pieces.
    2. Dry roast cinnamon, cardamom, clove and fennel on a low flame until you get a good aroma. Keep them aside, grind to a powder when cool.
    3. Take oil in a pan, add mustard seed, once it splutter throw in cumin, turmeric powder and the curry leaves. Put the chilli pieces, saute and add the onion.
    4. Once it is golden in colour, put the ground spice powder. Add chilli powder, mix and now put the tomatoes. Put salt and allow to cook. Let it be mushy.
    5. Spicy tomato chutney is ready. One can grind it if needed.


    Pin it for later:

    Kashmiri tomato chutney is tasty and full of flavours. It makes a good accompaniment with chapati, idli or dosa.
    Kashmiri Tomato Chutney

    More chutney varieties:

    If you love using sorrel leaves in your cooking, give a try to this sorrel leaf chutney. Have you tried using peels in making a chutney? Are you avoiding kitchen wastes ? Some peels make tasty side dishes. Check out the orange peel chutney and ridge gourd chutney. If you are making a sandwich, this green chutney is all that you need.

    If you ever make this recipe, take a picture and share it by tagging @foodiejayashree on Instagram or @evergreendishes on Facebook. I will be glad to see and share your creation further.
    Check out my e-books on Amazon. Do not miss any post, subscribe to get all updates and an e-book for free !

  • Badam Phirni Recipe | Badam Firni | Quick Badam Phirni Recipe

    Badam Phirni Recipe | Badam Firni | Quick Badam Phirni Recipe

    Jump to Recipe Print Recipe

    Phirni is a popular sweet from North India. It is tasty and ideal for any festive occasions. Badam Phirni is rich, tasty and easy to prepare.

    Years back, I learnt to make this recipe and it’s been loved by all at home. Thus, I have never tried making the authentic way. May be, the next time I will try for once and see the difference in the two methods. The traditional method involves soaking of rice and grinding to a paste. Here, I use the ready flour that is available at home. One needs to keep on stirring  as lumps will be formed easily.

    Badam Phirni is a quick dessert recipe ideal to serve for any celebrations or festivities. It is a good way to feed fussy children. Please do note this is not the authentic recipe of making phirni. The authentic recipe requires to soak rice and use the paste.

    badam phirni
    badam phirni

    Ingredients:

    • 1 litre milk
    • 15 almonds
    • 2 tablespoon rice flour
    • 6-8 strands saffron
    • 1/4 cup sugar
    • 1/4 teaspoon cardamom powder

    Method:

    1. Put milk in a thick bottom pan and put it to boil on a low flame.
    2. In two tablespoon of warm milk, soak the saffron strands.
    3. Grind the almonds to a fine powder. Put it in the milk.
    4. Add sugar to it. Give a stir.
    5. Now, slowly add the rice flour to it. Keep stirring as lumps are easily formed.
    6. Once it thickens, add cardamom powder and the soaked saffron to it. Give a stir and put it aside.
    7. Serve it chilled.

    Take a tip:

    1. Alternatively, soak two tablespoon of rice in water for half an hour. Grind it to a paste and put it in the milk.
    2. Almonds may be soaked in water but I prefer to use it this way.
    3. A mixture of cashew and almonds may be powdered and used.
    4. Instead of cardamom powder and saffron strands, vanilla flavour may be used.

    badam phirni
    Evergreendishesdev

    Badam Phirni

    5 from 4 votes
    Badam Phirni is a delicious and easy to make dessert ideal to serve for any occasion.
    Prep Time 10 minutes
    Cook Time 10 minutes
    Chilling 2 hours
    Total Time 2 hours 20 minutes
    Course: dinner, lunch
    Cuisine: Indian

    Ingredients
      

    • 1 litre milk
    • 15 almonds
    • 2 tablespoon rice flour
    • 6-8 strands saffron
    • 1/4 cup sugar
    • 1/4 teaspoon cardamom powder

    Method
     

    1. Put milk in a thick bottom pan and put it to boil on a low flame.
    2. In two tablespoon of warm milk, soak the saffron strands.
    3. Grind the almonds to a fine powder. Put it in the milk.
    4. Add sugar to it. Give a stir.
    5. Now, slowly add the rice flour to it. Keep stirring as lumps are easily formed.
    6. Once it thickens, add cardamom powder and the soaked saffron to it. Give a stir and put it aside.
    7. Serve it chilled.

    Notes

    Alternatively, soak two tablespoon of rice in water for half an hour. Grind it to a paste and put it in the milk.
    Almonds may be soaked in water but I prefer to use it this way.
    A mixture of cashew and almonds may be powdered and used.
    Instead of cardamom powder and saffron strands, vanilla flavour may be used.

    Pin it for later:

    Badam Phirni recipe is a good sweet dish to make for any celebrations. It is tasty, easy to prepare and ready in a few minutes.
    Badam Phirni


    The other easy sweet recipes shared  on my blog are carrot halwa, mango sheera, daliya payasam 

    If you ever make this recipe, take a picture and share it by tagging @foodiejayashree on Instagram or @evergreendishes on Facebook. I will be glad to see and share your creation further.
    Check out my e-books on Amazon. Do not miss any post, subscribe to get all updates and an e-book for free !