Author: Evergreendishesdev

  • Dreaming Big : Indians over 50 no longer see age as a barrier to #LiveNonstop

    Times have changed. India’s golden agers lead far more active lives and lifestyles than they used to. Indian men and women over 50 have a broader outlook towards life today, living with the zest and optimism that is so common among millennials. They understand that their bodies require more attention than they used to, but also want to ensure that it doesn’t hamper their golden years.

    (more…)

  • Mango sheera | Mango Kesari in two ways

    Mango sheera | Mango Kesari in two ways

    Mango Kesari or Mango Sheera is a delicious dessert made using semolina and mango puree. It is a good way to use some mangoes for cooking.

    It’s the season of mangoes, time to indulge and try recipes with it. Sheera or rawa kesari is often made in all homes. Do give a try with mango, it’s tasty. Mango Sheera is soft and smooth pudding like sweet delicacy made with mango pulp and semolina. Here I am sharing two kind of recipes, one is using sugar andd the other with jaggery. Earlier, I used to make with sugar. Presently we are using a little bit more of jaggery, so I have made with jaggery now.


    mango sheera with sugar
    mango sheera


    The importance of kesari in Indian cuisine:

    Rava Kesari is one of the sweets commonly prepared in Indian tradition. Any good occassion, starts with a Satyanarauyan pooja and it is the the kesari which is prepared with banana in it. You have sudden guests at home and the only thing thats pops up in our mind is a good rava kesari. Upma and Kesari is the combination found in most restaurants.


    My other mango recipes are here, do check them out.

     mango and coconut burfi, sweet mango rice, mango pannacotta, virgin mango mojito, mango parfait

    Instant mango pickle recipe was a big hit last time.

    Let’s get to the recipe of Mango Sheera

    Mango Sheera 1

    Ingredients:

    • 1 cup semolina (bombay rawa)
    • 1 cup mango pulp (2 medium mangoes)
    • 3/4 cup sugar
    • 1 1/2 cup water
    • 2 tbsp ghee
    • a few strands saffron
    • 4 cardamom powdered

    Method:

    1. Extract the pulp of mango and whisk it.
    2. Take a spoon of ghee and roast the semolina along with dry fruits. It should be light brown in colour and give a good aroma. Remove the roasted semolina and put it aside.
    3. Put water along with sugar and saffron strands and put it to boil. Once the water boils, put the mango pulp and give a stir.
    4. Now, add the roasted semolina slowly. Keep stirring in between, lest lumps are formed.
    5. Let cook for sometime. The consistency should be thick.
    6. Finally, add cardamom powder to it.
    mango sheera
    mango sheera

    Mango Sheera 2 :

    Ingredients:

    • 1 cup semolina
    • 2 teaspoon +2tablespoon ghee
    • almonds and raisins
    • 1 cup jaggery
    • 1 cup mango pulp
    • 2.5 cup water
    • a few strands of saffron
    • a pinch of cardamom powder

    Method:

    1. Extract the mango pulp and keep it aside.
    2. Take ghee in a pan, add semolina to it along with almond pieces. Roast for sometime.Put the raisin after sometime.
    3. Once it is light brown in colour, put it aside.
    4. Take water in a pan and put jaggery to it..You may sieve it at this stage, once the jaggery melts  to remove impurities. Add the saffron strands into it.
    5. Once the water begins to boil, slowly put the roasted semolina and miix it. Put ghee to it.
    6. Finally, add cardamom powder to it.

    mango kesari with jaggery

    mango sheera
    Evergreendishesdev

    Mango sheera, mango kesari

    5 from 4 votes
    Mango sheera is a sweet delicacy made of semolina and mango pulp. It is tasty and makes a good choice for breakfast or lunch.
    Prep Time 15 minutes
    Cook Time 15 minutes
    Total Time 30 minutes
    Servings: 4 people
    Course: Breakfast, Dessert
    Cuisine: Indian

    Ingredients
      

    Mango Sheera 1 :
    • Ingredients:
    • 1 cup semolina bombay rawa
    • 1 cup mango pulp 2 medium mangoes
    • 3/4 cup sugar
    • 1 1/2 cup water
    • 2 tbsp ghee
    • a few strands saffron
    • 4 cardamom powdered
    Mango sheera 2
    • Ingredients:
    • 1 cup semolina
    • 2 teaspoon +2tablespoon ghee
    • almonds and raisins
    • 1 cup jaggery
    • 1 cup mango pulp
    • 2.5 cup water
    • a few strands of saffron
    • a pinch of cardamom powder

    Method
     

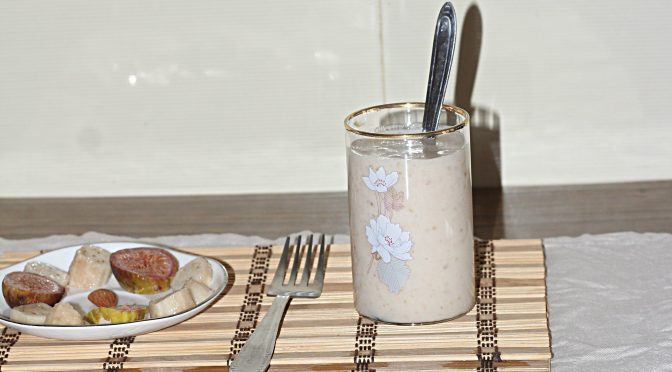
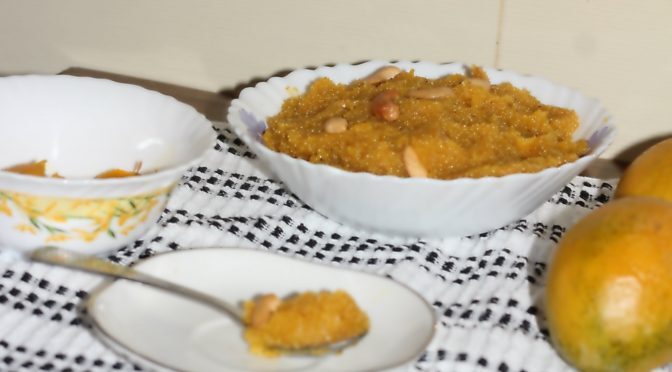
    Mango Sheera 1 Method 1 :
    1. Extract the pulp of mango and whisk it.
    2. Take a spoon of ghee and roast the semolina along with dry fruits. It should be light brown in colour and give a good aroma. Remove the roasted semolina and put it aside.
    3. Put water along with sugar and saffron strands and put it to boil. Once the water boils, put the mango pulp and give a stir.
    4. Now, add the roasted semolina slowly. Keep stirring in between, lest lumps are formed.
    5. Let cook for sometime. The consistency should be thick.
    6. Finally, add cardamom powder to it.
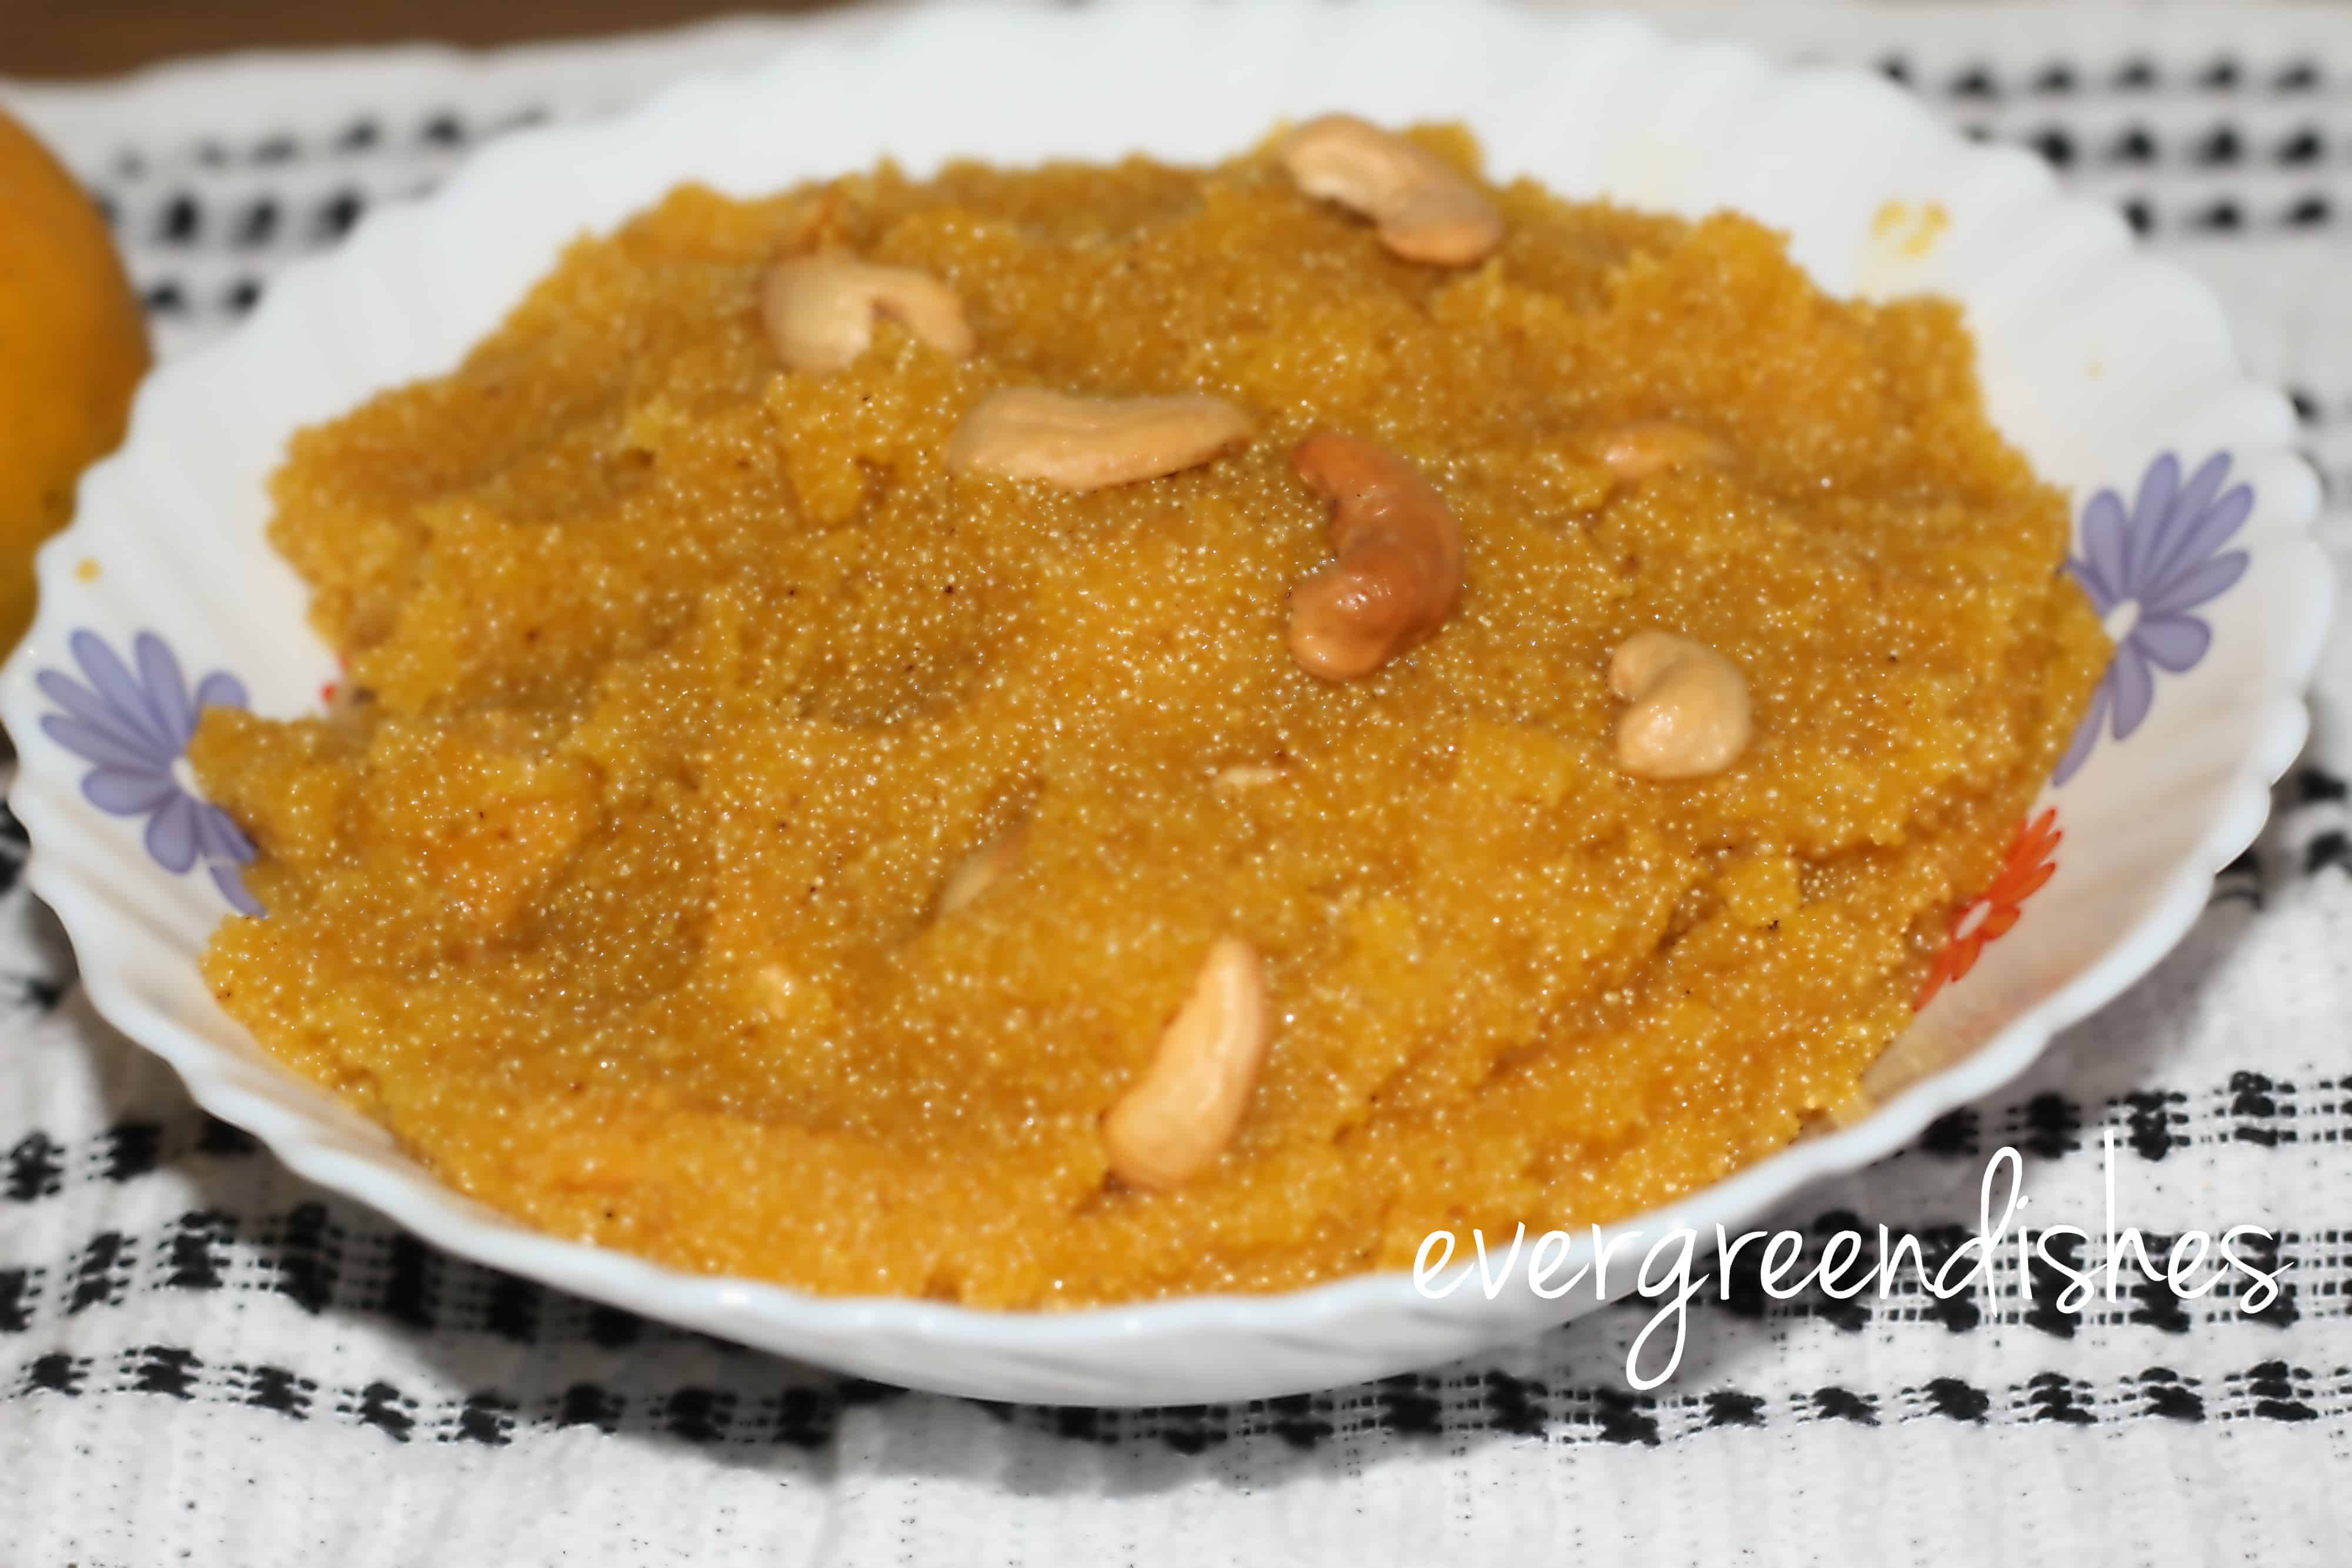
    mango sheera 2 Method 2
    1. Extract the mango pulp and keep it aside.
    2. Take ghee in a pan, add semolina to it along with almond pieces. Roast for sometime.Put the raisin after sometime.
    3. Once it is light brown in colour, put it aside.
    4. Take water in a pan and put jaggery to it..You may sieve it at this stage, once the jaggery melts  to remove impurities. Add the saffron strands into it.
    5. Once the water begins to boil, slowly put the roasted semolina and miix it. Put ghee to it.
    6. Finally, add cardamom powder to it.

    Notes

    • You can use other dry fruits.
    • Oil should not be used, it imparts a different flavour and smell.
    • Mangoes should be ripe and non fibrous. 
    • It is good to use fresh mango pulp.
    mango sheera
    mango sheera


    If you have liked this post, do share it with your family and friends. If you ever make Mango Kesari, take a picture and share it by tagging @foodiejayashree on Instagram or @evergreendishes on Facebook or Twitter.

    Let’s be connected, the follow buttons are on the side bar. Subscribe to get all updates and an e-book for free!

  • Fab milkshake summer special

    Fab milkshake summer special

    It’s been sometime I have put any milkshake recipe here.  My recent creation is this Fab milkshake, a name which I have given to it. It has figs, banana and almonds in it, F is  for fig,  A for almond and B for banana, hence, the name. (more…)

  • How to make lemon iced tea

    How to make lemon iced tea

    Lemon Iced Tea is a refreshing drink to beat the heat. Make it easily at home in 10 minutes and enjoy.

    Summer and cool, refreshing drinks, go hand in hand. Well, there’s no end to being thirsty these days. Days are getting hotter. Tea is a beverage which we can enjoy as both hot and cold.

    The lemon tea is not only refreshing but also provides Vitamin C to the body. Thus, it is ideal to have it during summer. One can easily reduce the amount of sugar that goes into it.

    lemon iced tea
    lemon iced tea
    lemon iced tea
    lemon iced tea
    making of lemon iced tea
    making of lemon iced tea

    A few other summer drinks to relish are Cucumber lassi, refreshing watermelon juice, imli ka amlana

    Let’s get making Lemon Iced Tea

    Ingredients:

    • 2 cups water
    • 2 teaspoon tea powder
    • 2-3 tsp sugar
    • juice of one lemon
    • 2-3 mint leaves
    • ice cubes

    Method :

    • Boil two cups of water.
    • Add two teaspoon of tea powder and turn of the stove.
    • Keep closed with a lid for five minutes.
    • Strain it.
    • Add sugar and lime juice.
    • Garnish with mint leaves and ice cubes.

    Take a tip:

    • Do not boil the tea leaves.
    • Adjust sugar as per your need.
    • Honey may be added instead of sugar.
    lemon iced tea
    Evergreendishesdev

    How to make lemon iced tea

    Lemon iced tea is a refreshing and healthy drink for summer
    Prep Time 10 minutes
    Total Time 10 minutes
    Servings: 2
    Course: Drinks
    Cuisine: international

    Ingredients
      

    • 2 cups water
    • 2-3 teaspoon sugar
    • 2 teaspoon tea powder
    • 1 big lemon (juice)
    • 2 mint leaves
    • ice cubes

    Method
     

    1. Boil water.
    2. Add tea powder and switch off the stove.
    3. Keep it closed for five minutes.
    4. Strain, add sugar and lime juice to it.
    5. Garnish with mint leaves and ice cubes.

    Notes

    • Do not boil the tea leaves. It will taste bitter.
    • Adjust sugar to your taste.
    • Use only one ice cube, otherwise the tea may be diluted.

    Pin it for later:

    Lemon Iced Tea
    Lemon Iced Tea

    If you have liked this post, do share it with your family and friends. If you ever make this, take a picture and share it by tagging @foodiejayashree on Instagram or @evergreendishes on Facebook or Twitter.

    Let’s be connected, the follow buttons are on the side bar. Subscribe to get all updates and an e-book for free!


  • Alasande  wada | Black eyed beans fritters

    Alasande wada | Black eyed beans fritters

    Jump to Recipe Print Recipe

    Alasande  wada (black eyed beans) are one of the tastiest fritters.  It is also known as lobia and karamani. They are crispy on the outside and soft on the inside. It’s the season of fresh black-eyed beans.

    Stir fry and sambar are the usual ones that I make using black eyed beans. Alasande wade  was on the to do list since a long time. Finally, I made it during the weekend. It was tasty and made a good treat.

    You can make it with dried beans also. Soak them overnight.  For the fresh ones, I soaked for two hours.

    alasande wade
    alasande wade

    My other snack recipes are nawabi cutlets kothimbir vadi

    Alasande wada| black- eyed beans fritters

    Ingredients:       Measurement: 1 cup =250 ml

    • 1 cup alasande kalu/  black-eyed bean
    • 2 onions
    • 2-3 green chillies
    •  2 tbsp coriander
    • 1 inch ginger
    • 1 tsp cumin
    • salt to taste

    Method :

    • Soak the black-eyed beans for two hours. If you are using dry ones, soak it over night.
    • Cut onion into small pieces.
    • Put the beans sans water in a jar. Add green chilly, cumin, coriander and ginger to it. Grind to a coarse paste.
    • Add onion and  salt to it. Mix well.
    • Heat oil in a pan.
    • Take a small portion of the mixture and shape it to a fritter.
    • Slowly, put it in the oil. Add a couple more.
    • Deep fry on medium flames. Slowly turn it to the other side.
    • Remove it on a tissue or absorbent paper.
    • Serve hot with tea or as an accompaniment with meals.
    alasande wade | black eyed bean fritter
    alasande wade |black eyed bean fritter
    alasande kalu wade, black eyed bean fritter
    alasande kalu wade, black eyed bean fritter

    alasande wade
    Evergreendishesdev

    Alasande wade, black eyed bean fritters

    5 from 5 votes
    Alasande wade are popular in South India. Black eyed bean is also known as lobia and karamani. They are crispy on the outside and soft within. It makes a good snack with a cup of tea or as an accompaniment with lunch.
    Prep Time 2 hours
    Cook Time 30 minutes
    Total Time 2 hours 30 minutes
    Servings: 15 fritters
    Cuisine: Indian

    Ingredients
      

    • 1 cup alasande
    • 2 onion
    • 2-3 green chilly
    • 1 tsp cumin
    • 2 tbsp coriander
    • 1 inch ginger
    • salt to taste
    • oil for frying

    Method
     

    1. Soak the black eyed beans for two hours. If you are using dried ones, you need to soak over night.
    2. Cut onions into small pieces.
    3. Drain the water from the beans, grind it to a coarse paste along green chilly, ginger, coriander and cumin.
    4. Remove it to a bowl. Add salt and onions to it. Mix well.
    5. Heat oil in a pan. 
    6. Take a small portion of the batter and make it into a flattened disc. 
    7. Slowly, let it in the oil. Repeat for two or more fritters.
    8. Deep fry on medium flame. Turn them to the other side, once they are crisp and light brown in colour, remove them on a tissue or absorbent paper.
    9. Serve hot with tea or as an accompaniment with lunch.

    Notes

    1. Soaking of beans is necessary. Dried beans need to be soaked over night.
    2. Do not add water while grinding.
    3. Adjust green chillies as per taste.

    Pin it for later :

    alasande wada
    alasande wada

    If you ever make this recipe, take a picture and share it by tagging @foodiejayashree on Instagram or @evergreendishes on Facebook. I will be glad to see and share your creation further.
    Check out my e-books on Amazon. Do not miss any post, subscribe to get all updates and an e-book for free !


  • Review of Philips Hand Blender


    Summer has begun to show its colours. The mercury level seems to be increasing with each passing year.  Thus we need cool soothing food. Ice creams, milkshakes and sorbet are ideal and easy to make.


    Hand blender is one essential and most useful gadget in the kitchen. It is one of the appliances that I can never really live without, a gadget I use everyday. Milkshakes,  ice creams, cakes, buttermilk,  lassi, butter are some of the things that I use this appliance the most.

    Milkshakes are tasty and healthy. Kids and adults both like it. You can make variety of milk shakes. Some of them are banana milkshake, banana and dates milk shake, mango milk shake. Smoothies are also healthier and ideal for weight watchers.

    Buttermilk is good for digestion and ideal for people of all ages. Whip the curds for a few seconds and you have a nice frothy one!

    Lassi is sweetened buttermilk with a dash of cream and nuts. It is ideal for summer. Children will love this one.

    Ice creams and sorbets are summer foods. One can eat it to hearts content.

    It can be used to make a puree of vegetables or fruits to feed babies.

    Butter can be churned very easily.

    Here are some of the recipes using blender :

    Pear ice cream, Strawberry Ice cream, Fig Milk shake with chocolate sauce, Mango milk shake, Punjabi Lassi

    Philips hand blender is a good gadget. I have been using it past two years and it is in good condition. It is sturdy and easy to use.

    It has powerful 600 watts motor with double action blade. It has soft touch grip and buttons. A  chopper accessory is provided which is very handy to cut green chilly or ginger. It also comes with an half litre measurement beaker. You can check the link below

    Cleaning of blender is easy. It can be detached and washed under running water.  You can even  take some water in a bowl with liquid cleaner. Give a swirl and all the grime is removed easily.

    Disclaimer: All views and opinions are of the author. It is not a sponsored post.

    [social_share style=”bar” align=”horizontal” heading_align=”inline” text=”” heading=”” facebook=”1″ twitter=”1″ google_plus=”1″ linkedin=”1″ pinterest=”1″ link=”” /]

    Subscribe to get a book of handyhints for free!

  • Bisebelebath | Karnataka cuisine

    Bisebelebath | Karnataka cuisine

    Bisebelebath is a popular dish from Karnataka cuisine. It is a rice and lentil based dish cooked with vegetables and a different spice miix. It is usually prepared during festivities.
    It’s that time of the year, when the weather is wonderful and our heart calls out to enjoy. It’s the season of fun and frolic. Time to celebrate with colours, yes it’s Holi.  To mark this ocassion I present  to  all of you, a dish very close dish to my heart, Bisebelebath.  It is a one pot meal which can be relished on many occasions. A rice savoury with lentils and vegetables makes a good meal with some papad.
    bisebelebath

    Bisebelebath is a kannada phrase which translates to Hot Lentil Rice. Bisi is the kannada term for hot. Bele translates to lentil and bath is a rice dish. It is a one pot, hearty meal. You can serve it potato chips and fryums. Curd based salads also pair well with it.

    At home, bisebelebath is usually prepared during lunch. But, one can serve it for breakfast, brunch or dinner. The traditional method of cooking is generally followed by me. It is more tastier and makes a delicious meal. But, it does require more time. One can allow it to cook on slow flame while doing other chores.

    Over to the recipe of Bisebelebath 

    • Preparation time: 15 minutes
    • Cook time: 1 hour
    • Total time: 1hour 15 minutes
    • Serves: 4
    • Cuisine: South India
    • Type: Main Course


    Ingredients:                           Measurement: 1cup = 150 ml

    • 1 cup tuvar dal (arhar dal)
    • 1.5 cup rice
    • 20 french beans
    • 1 potato
    • 1 bowl green peas
    • lemon sized ball tamarind
    • 4 teaspoon spice mix
    • salt to taste
    • 12-15 cups water
    • ¼ teaspoon turmeric powder

    For the seasoning:

    • 2 tablespoon oil
    • 2 tablespoon ghee
    • ½ teaspoon mustard seeds
    • 1 teaspoon chana dal
    • 1 teaspoon urad dal
    • ¼  teaspoon turmeric powder
    • 1/3 teaspoon asafetida
    • 4 cashew broken into pieces (optional)
    • curry leaves

    For the spice mix:

    • ¼ cup urad dal
    • ¼ cup bengal gram
    • 1 cup coriander seeds
    • 1 tsp cumin
    • 1 tsp methi
    • 1 tsp pepper corns
    • ½ cup desiccated coconut
    • ½ inch cinnamon stick
    • 2 cloves
    • 8-10 red chilly
    • 2 teaspoon oil


    Method :

    1. Cut the potatoes into big chunks and put them in water. Remove the string of the beans and break them into medium sized pieces ( around an inch).
    2. Soak tamarind in water and keep it aside.
    3. Take a thick bottom pan, put water and keep it to boil. Wash tur dal and put into boiling water. Add a little turmeric powder to it.
    4. Let it cook on a low flame. In the mean time, make the spice mix. Roast each one separately with a little oil. Once it cools, grind them together to a powder. Keep it aside.
    5. Once the tur dal is half-cooked, put beans into it.
    6. A little later put the green peas.
    7. After five minutes, wash the rice and put into it. Give a stir. Adjust the level of water accordingly.
    8. Lastly, put the potato pieces.
    9. Allow them to cook well. The rice should not only be cooked but mushy also.
    10.  Extract the pulp from the soaked tamarind.
    11.  Put spice mix in the tamarind pulp and pour it over  the rice dal mixture.
    12.  Mix well and let cook.
    13.  Make seasoning in another pan. Take oil and ghee mixture, put mustard seeds, as it splutters add bengal gram, urad dal, cashew pieces and curry leaves. Finally, put asafetida and turmeric powder, pour it over the dish and give astir
    14. Serve bisebelebath with fryums and papads. Ghee may be  added over it.


    Take a tip;

    • Adjust spice mix according to your taste.
    • Groundnuts may be used instead of green peas.
    • Other vegetables as carrot and capsicum may be added. You can use varied vegetables but keep a check on the quantity used. 
    • Keeping a lid over the vessel fastens cooking.
    Evergreendishesdev

    Bisebelebath

    Bisebelebath is a popular dish from Karnataka. A rice variety which is cooked along with lentils and vegetables makes a good food anytime.
    Prep Time 15 minutes
    Cook Time 1 hour
    Total Time 1 hour 15 minutes
    Servings: 4 people
    Course: Main Course
    Cuisine: Indian

    Ingredients
      

    • 1 cup tuvar dal
    • 1.5 cup rice
    • 20 french beans
    • 1 potato
    • 1 cup green peas
    • 1 lemon sized ball tamarind
    • salt to taste
    • 12-15 cups water
    • 1/4 tsp turmeric powder
    • 4 tsp spice mix
    For the seasoning:
    • 2 tbsp oil
    • 2 tbsp ghee
    • 1/2 tsp mustard seeds
    • 1/3 tsp asafoetida
    • 1/4 tsp turmeric powder
    • 1 tsp bengal gram
    • 1 tsp urad dal
    • 4 cashewnuts broken into pieces
    • a few curry leaves
    For the spice mix:
    • 1/4 cup bengal gram
    • 1/4 cup urad dal
    • 1 cup coriander seeds
    • 1 tsp cumin
    • 1 tsp pepper
    • 1 tsp methi
    • 2 cloves
    • 1/2 inch cinnamon
    • 1/2 cup dessicated coconut
    • 8-10 red chilly
    • 2 tsp oil

    Method
     

    1. Cut the potatoes into big chunks and put it in water. String the beans and break them into long pieces (about an inch)
    2. Soak tamarind in water.
    3. Take a thick bottom pan, put water and keep it to boil. Wash tur dal and put it into it along with a pinch of turmeric powder.
    4. Once tur dal is half cooked, put beans into it. A little later put green peas into it.
    5. In the mean time, prepare the spice mix. Roast each ingredient seperately with a little water. Grind it to a powder and keep it aside.
    6. After five minutes, wash the rice and put into it. Adjust the level of water accordingly.
    7. Lastly, put potatoes.
    8. Allow it to cook for sometime. Keep stirring in between. It should not only be well cooked but mushy. Put salt to it.
    9. Extract the tamarind pulp.
    10. Add spice mix to the tamarind pulp. Put it over the rice dal mixture. Give a stir. Let the flavours imbibe for sometime.
    11. In another pan, make the seasoning. Take the oil and ghee mixture, add mustard seeds, as it crackles put bengal gram and urad dal. Then add cashew pieces, asafoetida, turmeric powder and curry leaves. Pour it over the bisebelebath. 
    12. Bisebelebath is ready to serve,

    Notes

    • Adjust the spice mix accordingly.
    • The remaining spice mix can be stored and used later.
    • Adjust the consistency by adding more water to it.
    • Keep stirring in between.
    • Other vegetables as groundnuts, capsicum may be used.
    • If you do not have vegetables, then make it only with a few ground nuts.
    • A little ghee over it tastes good.

    About the event :

    Recently, I had prepared Bisebelebath and clicked some pictures. I thought of putting better pictures here. Sending this to Foodies_Redoing Old Post 82, a fortnightly event. Here. I have only modified the picture of the dish, the recipe remains the same.

    Pin it for later :

    a bowl of bisebelebath served with papad and fryums
    bisebelebath


    Wishing one and all a happy Holi ! May the year be filled with colourful events for all.

    Subscribe to get a book of handy hints for free! If you have liked this post, do share it further. If you ever make this dish, take a picture and tag us on Facebook or Instagram by tagging @evergreendishes and @foodiejayashree respectively. I will be glad to see it and shall share it further. 


  • Strawberry ice cream recipe

    Strawberry ice cream recipe

    Strawberry Ice cream is a delectable dessert made from fresh strawberries.

    Summer and ice creams go hand in hand. They are delicious treats which keeps the body cool and mind warm. Strawberry ice cream is one such delectable dessert.

    It is the season of strawberries. Deep red, luscious berry are simple joys which most of us can indulge these days. This strawberry ice cream recipe ce cream has the goodness of strawberrry pieces in it. Do give a try, I am sure you will like it.

    The other ways to use strawberry are  Strawberry Lassi, Strawberry Jam and Strawberry Mousse.

    strawberry ice cream
    strawberry ice cream
    strawberry icecream
    strawberry icecream


    Strawberry Ice Cream Recipe :

    Ingredients:

    • 400 grams milkmaid
    • 200 ml fresh cream
    • 12 strawberry (medium sized)
    • 1 teaspoon sugar

    Method:

    Remove the stalk and wash the strawberry. Pat dry.

    strawberry pieces in sugar
    strawberry pieces in sugar

    Take two strawberry, cut them into small pieces. Add a spoon of sugar to it and keep it aside.

    strawberry puree
    strawberry puree

    Blend the berries to a puree.

    pour the ingredients
    pour the ingredients

    Pour condensed milk and fresh cream to it.

    give a swirl
    give a swirl

    Give a swirl for thirty second. Again for another fifteen to twenty seconds.

    pour the ice cream mixture
    pour the ice cream mixture

    <
    Pour the ice cream mixture to a container.

    top it with pieces of strawberry
    top it with pieces of strawberry

    Top it with soaked strawberry pieces. Close the lid  and refrigerate for three hours.

    strawberry icecream
    strawberry icecream

    Strawberry ice cream is ready to serve.

    strawberry icecream
    Evergreendishesdev

    Delicious Strawberry Icecream

    5 from 4 votes
    Strawberrry ice cream is delicious and an all time favourite. The fresh pieces of the fruit in it gives a nice taste.
    Prep Time 10 minutes
    Cook Time 3 hours
    Total Time 3 hours 10 minutes
    Servings: 6 people
    Course: Dessert
    Cuisine: international

    Ingredients
      

    • 12 strawberry medium sized
    • 400 ml condensed milk
    • 200 ml fresh cream
    • 1 teaspoon sugar

    Method
     

    1. wash the strawberry and pat dry. Take two of them, cut into small pieces, put in sugar and keep it aside.
    2. Blend the strawberries to a puree. Pour condensed milk and fresh cream to it. 
    3. Give a swirl for thirty second. Again repeat for ten seconds.
    4. pour into ice cream container. 
    5. Top it with pieces of strawberry.
    6. Deep freeze for three hours. Strawberry ice cream is ready to serve.

    Notes

    Do not blend for a long time. It will be sticky and hard.

    If you ever make Strawberry Ice Cream  recipe, do take a picture and share by tagging @foodiejayashree on Instagram or @evergreendishes on Facebook. Subscribe to get all updates and an e-book for free !


  • Vanilla pudding, how to make vanilla pudding

    Vanilla pudding, how to make vanilla pudding

    Summer has begun to show its colours. It’s time to bring all our dessert recipes on roll again. Why not try something different this season? Vanilla pudding is delicious and easy to make dessert. It can be made easily. (more…)

  • Tasty pickles online

    Tasty pickles online

    Pickles need no introduction. It is commonly used along with meals as an accompaniment. It is stacked in earthen jars for annual consumption in most households. They are  side dishes which makes the food appealing, bring liveliness to the platter and gives a sense of contentment.  (more…)