Category: healthy recipes

  • Whole Wheat Strawberry Cake / healthy strawberry cake

    Whole Wheat Strawberry Cake / healthy strawberry cake

    Jump to Recipe Print Recipe

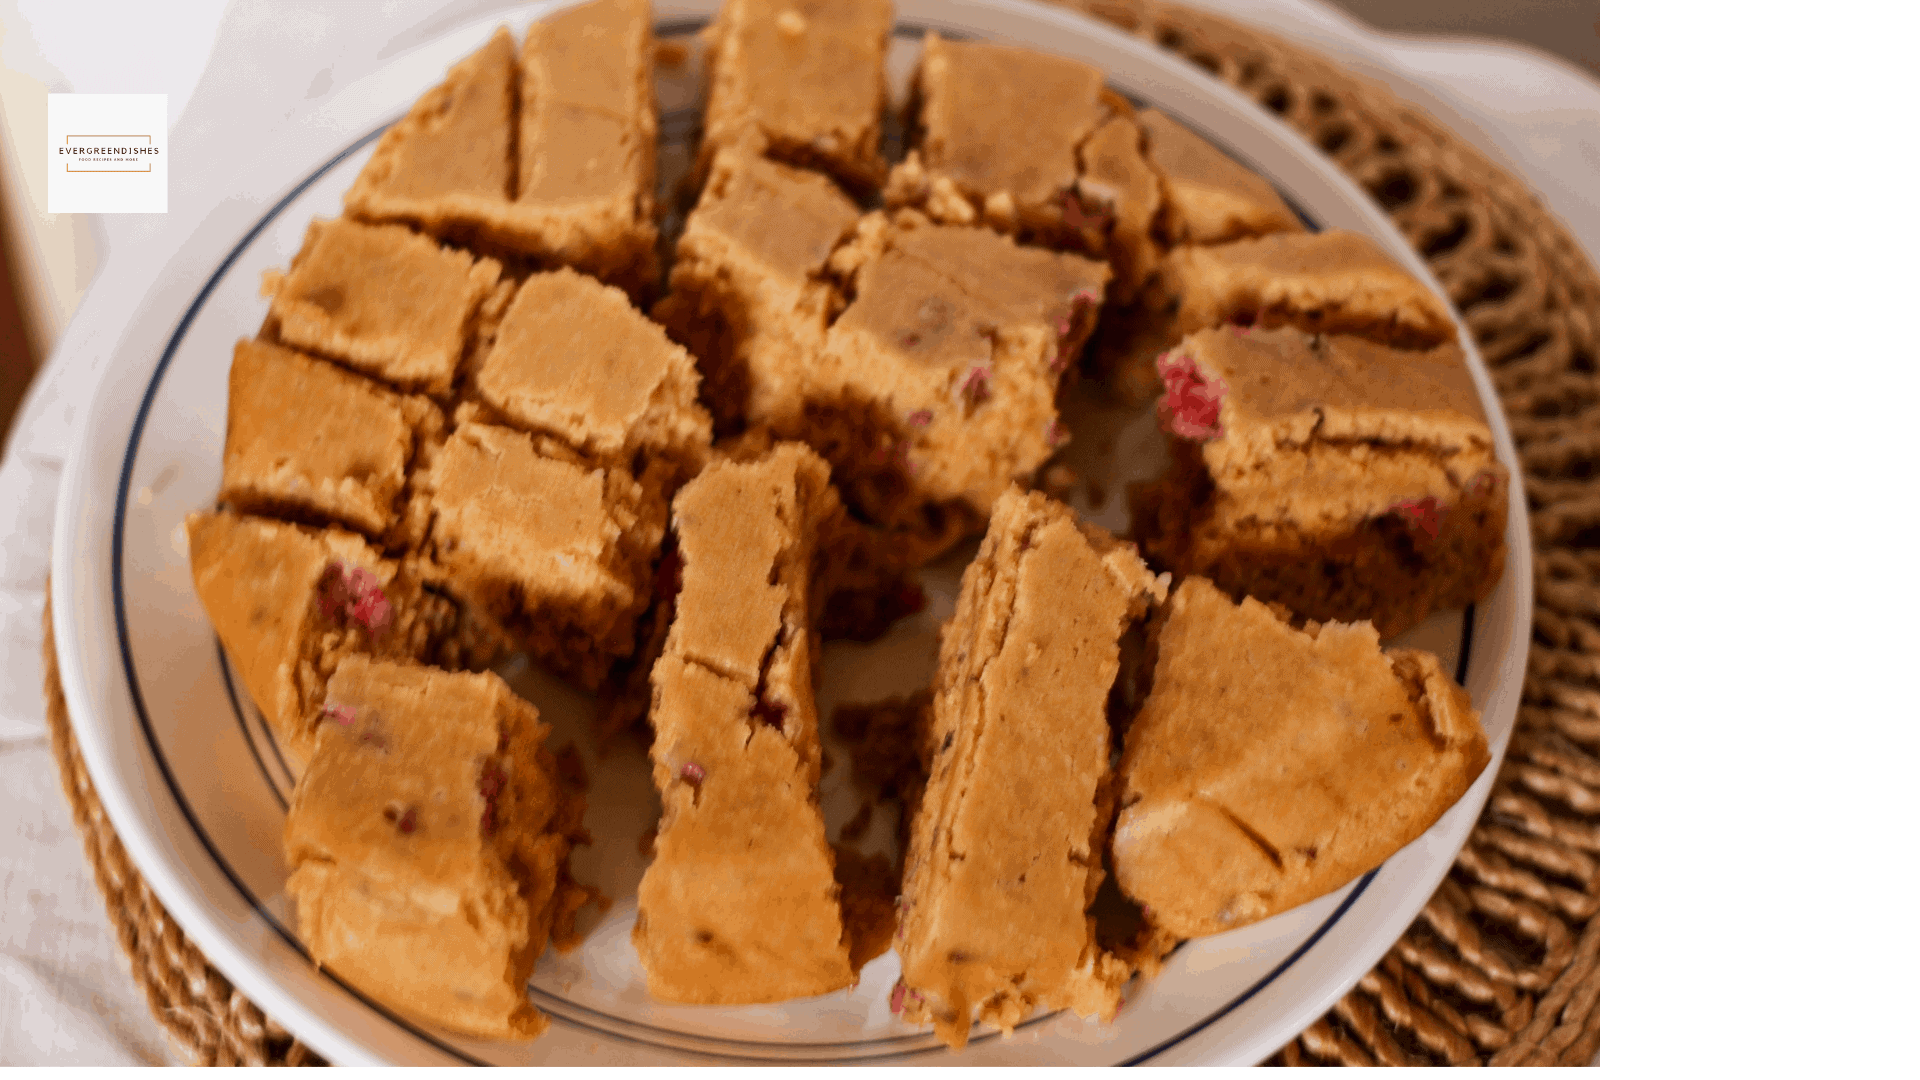
    Whole wheat strawberry cake is tasty and naturally healthy. It has no butter, sugar or egg in it. Strawberries give a good taste to this bake.

    When it’s raining strawberries, you need to bake at least once isn’t it ? Life is good living and enjoying each moment. Baking is therapeutic and helps to relax the senses.

    Today, it’s a healthy bake with strawberry. Let us see what ingredients are used to make it healthier and the other options that you have here:

    • Wheat flour: Atta or wheat flour is naturally healthy and better than all purpose flour.
    • Corn flour: As cakes made with corn flour turn out dense, a little corn flour is added. Do not skip on sieving the flour.
    • Honey : As I thought of baking a healthy cake, I have used honey here. Castor sugar or brown sugar may be used.
    • Curd : It is the replacement for egg.
    • Baking powder and baking soda : They are the essentials of baking.
    • Milk : Milk is added to get the right consistency of the batter.
    • Strawberries: Use fresh strawberries.

    The other healthy bakes shared earlier are baked wheat crackers, mocha banana cake,

    The other strawberry recipes shared earlier : Strawberry Mojito, Strawberry Yoghurt, Strawberry Chia Souffle, Strawberry Jam. Children will surely love the jam and yoghurt.


    whole wheat strawberry cake
    whole wheat strawberry cake

    Whole Wheat Strawberry Cake Recipe

    Ingredients:

    • 1.75 cup wheat flour/ atta      (measurement used 1 cup=250ml)
    • 2 tbsp cornflour
    • 1 teaspoon baking powder
    • 1/2 teaspoon baking soda
    • 1/2 cup honey
    • 1/2 cup milk
    • 3/4 cup curd
    • 1/2 cup oil
    • 8 strawberries

    Method:

    Wash and cut the strawberries into medium sized chunks. Take the dry ingredients and sieve them together twice.
    Mix oil, curd, honey and milk. Whisk them together.
    Add the dry ingredients and slowly mix them together.Add the strawberry pieces to it.
    Heat the microwave oven.
    Take the baking tray, line it with a parchment paper. Pour the cake mixture and bake it for ten minutes. A toothpick inserted should come out clean. Once it is done, allow to cool completely. Cut and serve.

    Take a tip:

    • The strawberries that I used were large in size.
    • You may bake it in the oven.
    • Sieve the flour as the cakes with wheat flour are dense.


    whole wheat strawberry cake

    Whole Wheat Strawberry Cake

    Whole wheat strawberry cake is tasty and a healthy twist to the usual one. It has no sugar, egg or butter in it.
    Prep Time 15 minutes
    Cook Time 20 minutes
    Resting time 15 minutes
    Total Time 50 minutes
    Course: dry snack, evening snacks
    Cuisine: international

    Ingredients
      

    • 1.75 cup wheat flour/ atta
    • 2 tbsp cornflour
    • 1 teaspoon baking powder
    • 1/2 teaspoon baking soda
    • 1/2 cup honey
    • 1/2 cup milk
    • 3/4 cup curd
    • 1/2 cup oil
    • 8 strawberries

    Method
     

    1. Wash and cut the strawberry into medium size pieces.
    2. Take the dry ingredients and sieve them together.
    3. Mix oil, curd, honey and milk. Whisk them together.
    4. Add the dry ingredients and slowly mix them together.Add the strawberry pieces to it.
    5. Heat the microwave oven.
    6. Take the baking tray, line it with a parchment paper. Pour the cake mixture and bake it for ten minutes. A toothpick inserted should come out clean.
    7. Once it is done, allow it to cool completely. Cut and serve.

    Notes

    All purpose flour may be used.
    Powdered sugar may be used. If using sieve it with the dry ingredients. 
    The strawberries that I used were large in size. 
    You may bake it in the oven. 

    Pin it for later :

    Whole wheat strawberry cake is tasty and healthy. It has no added sugar, butter, egg in it, a good way to enjoy strawberries.
    Whole wheat strawberry cake

    f you ever make this recipe, take a picture and share it by tagging @foodiejayashree on Instagram or @evergreendishes on Facebook. I will be glad to see and share your creation further.
    Check out my e-books on Amazon. Do not miss any post, subscribe to get all updates and an e-book for free !

  • Strawberry Yoghurt / flavoured yoghurt

    Strawberry Yoghurt / flavoured yoghurt

    Jump to Recipe Print Recipe

    Strawberry Yoghurt is flavoursome and makes a good dessert. It is ideal to serve as breakfast with a topping of cereal and nuts.

    Flavoured yoghurts are tasty and make a good dessert anytime. One can serve it as breakfast along with cereals. Top it with nuts and it is tasty and ready in a few minutes.

    I often go to the super market and buy these flavoured yoghurts, isn’t that ridiculous when you can easily make it at home.

    Strawberry Yoghurt is healthy and tasty. It’s the season of berries and time to make it now.

    strawberry yoghurt
    strawberry yoghurt

    About Strawberry :

    Strawberries are bright red, juicy and sweet. As the name suggests, most of us conclude that it is a berry. But it is neither a fruit nor a berry. It is the enlarged receptacle of the flower. They are usually consumed raw and fresh. It is also used in jams, jellies, ice creams and delicious milk shakes.

    Other ways to use strawberry:

    You can use it as a refreshing mojito. Strawberry and chia souffle makes a good dessert.

    Nutrition :

    Strawberries are packed with vitamins, carbohydrates, fiber, and anti-oxidants. It is sodium free, fat free, cholesterol-free, low calorie food.

    Health Benefits of Strawberry :

    1. Strawberries is good  for the  heart.
    2. Consuming of strawberries after meal is good for diabetic patients as it slow down the glucose digestion and reduce the spike of glucose and insulin level.
    3. It helps in reducing inflammation and oxidative stress.

    Adverse effects:

    Consuming of strawberries may give an allergy to some, especially children. It contains a protein that cause symptoms in people who are sensitive to birch pollen or apples.

    Bottom line:

    Strawberries are delicious, healthy and low in calories. It has many health benefits. Here is the Strawberry Yoghurt Recipe. Do check it below

    Evergreendishesdev

    Strawberry Yoghurt

    5 from 5 votes
    Strawberry Yoghurt is flavoursome and ideal as a summer treat.
    Course: Dessert
    Cuisine: international

    Ingredients
      

    • 1 cup greek yoghurt
    • 8 strawberries
    • 3 teaspoon sugar
    • 2 teaspoon honey

    Method
     

    1. Take the strawberries, wash, clean and cut them into chunks.
    2. Grind them along with greek yoghurt, honey and sugar.
    3. Remove it in a bowl and chill it for some time.
    4. Strawberry Yoghurt is ready to serve.

    Notes

    Greek yoghurt is easily available in the market. If you do not get it, take the curd and put it in a strainer or cheese cloth. Allow the whey to drain for sometime. Greek yoghurt is ready to use. 

    Pin it for later:

    Strawberry Yoghurt is flavoursome and makes a good dessert. It is ideal to serve as breakfast with a topping of cereal and nuts.
    Strawberry Yoghurt

    Serving options:

    • Serve it chilled as it is.
    • Top it with cereal and nuts.
    • Top it with strawberry pieces and granola.


    If you ever make any of these recipes, take a picture and share it by tagging @foodiejayashree on Instagram or @evergreendishes on Facebook. I will be glad to see and share your creation further.
    Check out my e-books on Amazon. Do not miss any post, subscribe to get all updates and an e-book for free !

  • Muskmelon Lassi

    Muskmelon Lassi

    Jump to RecipePrint Recipe

    Muskmelon Lassi is tasty and makes a good drink. It is ideal to serve for breakfast, filling and healthy.

    Muskmelon is also known as Cantaloupe. It is commonly known as Kharbuja, is ideal to use as fruit smoothies, milkshakes and in fruit salads.

    Nutrients in Muskmelon:

    It is rich in Vitamin A, C, K , B1 and B6. It also contains magnesium, copper and dietary fibre.

    Muskmelon Lassi

    Benefits of Muskmelon:

    Muskmelon provides various health benefits.Thus, one needs to include it regularly in their diet.

    1. Muskmelon  aids in weight loss.
    2. It is rich in Vitamin C that strengthens the immune system.
    3. It regulates the blood sugar level, ideal for people with diabetics.
    4. It is high in water content. It is ideal food for summer, keeps the body hydrated and supplies it with essential nutrients.

    Muskmelon Lassi Recipe:

    Ingredients:

    • 4 to 5 cubes of musk melon
    • 3/4 cup fresh curd
    • 1 teaspoon honey
    • 2 cashew
    • 2 hazelnuts
    • cardamom powder
    • 1/2 cup water

    Method:

    1. Wash and cut the fruit. Discard the seeds.
    2. Blend it to a puree along with cashew.
    3. Put curds and blitz it again. Add water.
    4. Top it with honey.
    5. Put hazelnut  pieces and serve.

    Take a tip:

    • Use fresh curds.
    • Feel free to use sugar.
    • Any other nuts such as almonds may be used instead of hazelnut.
    Evergreendishesdev

    Muskmelon Lassi

    Muskmelon Lassi is a tasty and filling drink. It is ideal for old and young alike.
    Prep Time 10 minutes
    Total Time 10 minutes
    Servings: 1 person
    Course: Breakfast
    Cuisine: Indian

    Ingredients
      

    • 4 to 5 cubes of musk melon
    • 3/4 cup fresh curd
    • 1 teaspoon honey
    • 2 cashew
    • 2 hazelnuts
    • cardamom powder
    • 1/2 cup water

    Method
     

    1. Wash and cut the fruit. Discard the seeds.
    2. Blend it to a puree along with cashew.
    3. Put curds and blitz it again. Add water.
    4. Top it with honey.
    5. Put hazelnut  pieces and serve chilled.

    Notes

    Use fresh curds.
    Feel free to use sugar.
    Any other nuts such as almonds may be used instead of hazelnut.

    Pin it for later:

    Muskmelon Lassi is flavoursome and filling. It is ideal to serve for breakfast.
    muskmelon lassi


    If you have liked this post, do share it further with your family members and friends. If you ever recreate this recipe, take a picture and tag @foodiejayashree on Instagram. Do check out my e-books on Amazon.

    Subscribe to get all updates in your inbox and an e-book for free !

  • Mixed Dal / how to make tasty mixed dal

    Mixed Dal / how to make tasty mixed dal

    Jump to RecipePrint Recipe

    mixed dal |  mixed dal recipe | north indian cooking | lunch ideas

    Mixed Dal is spicy and tasty, it makes a good accompaniment with roti, nan, steamed rice or even jeera rice.

    Dal is one of the essentials of daily cooking. I prefer using a combination of pulses as nutrients from various sources are derived. Being vegetarians, I try to provide a balanced diet by making dal regularly.

    A well prepared dal is not only tasty but goes well with both rice and flat bread. We often pair this with jeera rice too.

    Dal Methi is the one I commonly make at home. I have an e-book on Amazon titled, 30 Tasty Dal Recipes

    Mixed Dal
    Mixed Dal

    Ingredients:

    Measurement used : 1 cup =100 ml

    • 1 cup turdal
    • 1 cup moong dal
    • 1/2 cup masoor dal
    • 4 cup water
    • 1/4 tsp turmeric powder
    • 1 tablespoon oil +ghee
    • 1/2 teaspoon cumin
    • 2 green chilli
    • 1/ tsp turmeric powder
    • a pinch of asafoetida
    • 2 cloves garlic
    • 1 onion
    • 3 tomato
    • 1 teaspoon red chilli powder
    • salt

    Method:

    1. In a bowl, add all the dal in specific quantities. Wash and soak it in water for half an hour.
    2. Cut the onion and tomato finely.
    3. Cook the dal with a little turmeric powder and four cups of water for three whistles. Let the pressure release by itself.
    4. In a pan, add oil and ghee. Add cumin, as it splutters thrown in green chilly and garlic. Sprinkle asafoetida and a little turmeric powder to it. Put onion to it and saute it for sometime.
    5. Once it is golden in colour, put tomato pieces and salt to it. Let cook for five minutes. Sprinkle some water  to it, lest it may burn.
    6. With the back of the ladle, mash the cooked dal. Put it to the pan.
    7. Allow to cook for sometime. Adjust the consistency of the dal.
    8. Garnish with fresh coriander leaves.

    Take a tip :

    • Depending on the quantity that you need, decrease the size of the cup. Otherwise, use a tablespoon of dal instead of a cup. The quantity I have given is sufficient for six people.
    • Adjust the measurement of dal to your preference, I prefer using this measurement.
    • Only oil may be used, but ghee gives a good taste.
    • Reduce the quantity of chilli powder if needed.


    Mixed Dal

    Mixed Dal is spicy and tasty accompaniment with rice or any kind of flat bread.

    Ingredients
      

    • 1 cup turdal
    • 1 cup moong dal
    • 1/2 cup masoor dal
    • 4 cup water
    • 1/4 tsp turmeric powder
    • 1 tablespoon oil +ghee
    • 1/2 teaspoon cumin
    • 2 green chilli
    • 1/ tsp turmeric powder
    • a pinch of asafoetida
    • 2 cloves garlic
    • 1 onion
    • 3 to mato
    • 1 teaspoon red chilli powder
    • salt

    Method
     

    1. In a bowl, add all the dal in specific quantities. Wash and soak it in water for half an hour.
    2. Cut the onion and tomato finely.
    3. Cook the dal with a little turmeric powder and four cups of water for three whistles. Let the pressure release by itself.
    4. In a pan, add oil and ghee. Add cumin, as it splutters thrown in green chilly and garlic. Sprinkle asafoetida and a little turmeric powder to it. Put onion to it and saute it for sometime.
    5. Once it is golden in colour, put tomato pieces and salt to it. Let cook for five minutes. Sprinkle some water  to it, lest it may burn.
    6. With the back of the ladle, mash the cooked dal. Put it to the pan.
    7. Allow to cook for sometime. Adjust the consistency of the dal.
    8. Garnish with fresh coriander leaves.

    Pin it for later:

    Mixed dal is a spicy and tasty accompaniment with any meal. It tastes good with rice as well as flat breads.
    Mixed Dal

    A few dal recipes from my co-bloggers: Sukhi Pudine Ki Dal and Lucknowi Dal 

    If you have liked this post, do share it with your family and friends. If you ever make this, take a picture and share it by tagging @foodiejayashree on Instagram or @evergreendishes on Facebook or Twitter.

  • Peanut Curd / Vegan Curd

    Peanut Curd / Vegan Curd

    Jump to Recipe Print Recipe

    Peanut Curd is a vegan curd made using peanuts. It is tasty and ideal to use regularly.

    Many people are adopting veganism, it is refraining from eating or using any animal product. It is a kind of vegetarian diet that excludes meat, eggs, dairy products and all other animal derived ingredients.  Alternative products used by vegans are almond milk, soy milk, cashew milk, peanut and rice milk. Today, more and more people are adopting vegan diet.

    I am neither a vegan nor have changed myself into one. When I saw this peanut curd posted by friend Poornima, I wanted to try it. It was the first time I heard about it and I really wanted to see how it tasted.

    peanut curd
    peanut curd

    Peanut curd is different in taste but surprisingly looks like our own kind. It has the nutty taste in it and those who like peanuts will surely like it.

    It involves the soaking, grinding, boiling, sieving and setting of curd. Let us look into it in depth.

    peanut curd
    peanut curd


    About the event:

    Sending this to our fortnightly event “Go Nits For Nuts” at Healthy Wellthy Cuisines, the theme is Peanuts, it was suggested by me. The other peanut recipes by my co-bloggers are


    Peanut Curd

    Ingredients:

    • 1 cup peanut
    • 2 cup water
    •  pro-biotic powder / vegan curd / regular curd for non-vegans

    Method:

    1. Wash and soak the peanut for atleast six hours.
    2. Remove the water, wash it. Put it in a jar along with water and grind it to a fine paste.
    3. Remove it in a thick bottom bowl. Add a glass of water and bring it to a boil it on a medium flame.  Keep stirring it. Once it begins to boil, put it aside to cool.
    4. Filter it through a muslin cloth.
    5. Put a little curd and keep it to set in a warm place.
    6. Peanut curd will be ready in a few hours.

    Take a tip:

    • Vegans should  use pro-biotic powder or vegan curd that you have.
    • Even green chillies with crown can be used to set it.
    • If you are allergic to peanuts, kindly do not try this recipe.

    Peanut Curd

    Peanut Curd is a vegan curd made using peanuts. It is ideal for those who do not eat any animal produce.
    Prep Time 10 minutes
    Cook Time 15 minutes
    Setting time 4 hours
    Course: vegan
    Cuisine: international

    Ingredients
      

    • 1 cup peanut
    • 2 cup water
    • a little vegan curd / pro-biotic powder / a little curd for non-vegans

    Method
     

    1. Wash and soak the peanut for atleast six hours.
    2. Remove the water, wash it. Put it in a jar along with water and grind it to a fine paste.
    3. Remove it in a thick bottom bowl. Add a glass of water and bring it to a boil it on a medium flame.  Keep stirring it. Once it begins to boil, put it aside to cool.
    4. Filter it through a muslin cloth.
    5. Put a little curd and keep it to set in a warm place.
    6. Peanut curd will be ready in a few hours.

    Notes

    • If you are a vegan use  pro-biotic powder or vegan curd that you have.
    • Even green chillies with crown are used to set, but I have not tried it. 
    • If you are allergic to peanuts, do not try this recipe. 

    This curd is ideal substitute to the normal curd. I used it in curds rice too.

    Well, if you have liked this post, do share it further.

    Pin it for later:

    Peanut Curd is a vegan curd made using peanuts. It is tasty and ideal to use regularly.
    Peanut Curd

    If you have liked this post, do share it with your family and friends. If you ever make this, take a picture and share it by tagging @foodiejayashree on Instagram or @evergreendishes on Facebook or Twitter.

    Let’s be connected, the follow buttons are on the side bar. Subscribe to get all updates and an e-book for free!


  • Strawberry Banana Milkshake

    Strawberry Banana Milkshake

    Strawberry Banana Milkshake is creamy, tasty and filling. It is ideal to serve along with breakfast.

    Milkshakes are one of my family’s favourite, every season is good for it.  Here is another delicious drink to whip for breakfast. The addition of banana makes it wholesome and filling.

    Banana is a healthy fruit with many nutrients. Banana in all stages ( firm to ripe) is good and the ripe ones are more sweeter. Once the fruit is slightly over ripe, it is hardly eaten  by anyone at home. I put it in the freezer and use it to make milkshake.

    It’s the season of strawberries and I love to make the best use of it. Strawberry Banana milkshake is creamy, tasty and filling. It is ideal to serve along with breakfast. Children might like to relish in the evening after coming back home.

    Milkshakes made with fresh fruits taste awesome but putting the fruit pieces in freezer gives a good texture to it.

    This has no added sugar in it, thus it is a healthy recipe and ideal for weight watchers.

    strawberry banana milkshake

    Ingredients:

    • 1 cup cold milk
    • 1 banana
    • 4 strawberry

    Method:

    Cut the banana. Wash the strawberry. Put them in the blender along with milk and swirl for thirty seconds. Banana milk shake is ready to use.

    Take a tip:

    • A scoop of vanilla or strawberry ice cream may be added but I do not add.
    • Sugar may be added if serving it for  children.
    • Honey may be added.
    • To make it vegan, use almond milk.
    • Freezing strawberry and banana gives a frothy texture to the milkshake.

    A few other recipes using strawberry are Strawberry Lassi, Strawberry Mojito, Strawberry Icecream, Strawberry Mousse, Strawberry Jam

    Strawberry Banana Milkshake

    Strawberry Banana Milkshake is a tasty and filling drink. It is ideal to serve for breakfast.
    Course: Breakfast
    Cuisine: international

    Ingredients
      

    • 1 cup cold milk
    • 1 banana
    • 4 strawberry

    Method
     

    1. Cut the banana. Wash the strawberry. Put them in the blender along with milk and swirl for thirty seconds. Banana milk shake is ready to use.

    Notes

    • A scoop of ice cream may be added.
    • Add sugar if serving for children.
    • Honey may be added.
    • Freezing banana and strawberry gives a frothy texture to the milkshake.

    Pin

    What are the ways you use strawberries in cooking?  Do let me know in the comments section.

    If you have liked this recipe, do share it with your family and friends. If you ever make this recipe, do take a picture and tag me @foodiejayashree on Instagram or @evergreendishes on Facebook, I will share it further.

    Let’s be connected:Facebook, Twitter, Pinterest, Instagram, YouTube

    Subscribe to get all updates and a book of handy hints for free !

  • Oats Khichdi / healthy eating

    Oats Khichdi / healthy eating

    Jump to Recipe Print Recipe

    Oats Khichdi is a flavoursome, nutrition packed dish ideal to serve for breakfast, brunch or dinner. 

    One cannot deny the need of a good breakfast, it should be healthy, filling and tasty. Every morning it is a dilemma, what needs to be prepared, isn’t it? You can use oats a couple of times in a week to prepare variety of dishes.

    I used the Zerobeli Oats to make porridge and it was awesome. It is rich in fiber and protein, gluten free and ISO certified. Moreover, it cooks very easily and is creamy. It needs no topping such as nuts.

    I use oats to make a variety of dishes, it is versatile in use and the taste is liked at home, thus I can easily make it anytime of the day.

    I often make different varieties of khichdi at home and now thought of making it with oats. I used vegetables in it along with some masala powder, the result it was a filling and tasty meal.

    Have you tried making khichdi with oats? Khichdi is quite similar to the savoury pongal that is made in South India. Give a try to it, a few papad and pickle makes a good accompaniment with it. 

    The New Year, New Beginnings and Goals

    Today is the first day of 2020 and I want to make it an awesome one. I do not make big resolutions but something, which I can relate and stick to. I plan to eat healthy food in the coming days and thus oats will be my companion along with salads and fruits.

    oats khichdi
    oats khichdi


    Ingredients:

    • 1/2 cup moong dal
    • 1 cup oats
    • 1 cup mixed vegetables ( I used beans, carrot, peas )
    • 1 onion
    • 4-5  cup water
    • 1 tablespoon oil and ghee
    • 1/2 teaspoon cumin
    • 1 inch ginger
    • 1 green chilly
    • 1/2 teaspoon turmeric powder
    • 1/4 teaspoon asafoetida
    • 1/2 teaspoon chilly powder
    • 1/2 teaspoon pepper powder

    Method:

    1. Wash and soak the moong dal for at least one hour, this helps in proper cooking of the lentil.
    2. Chop the onion.
    3. Take oil and ghee in a pressure pan, add cumin. As it splutters, put grated ginger and green chilly along with some asafoetida. Add onion and saute it for sometime, put the vegetables into it. Saute for two minutes. Put turmeric powder and chilli powder to it.
    4. Now add moong dal to it and saute for a minute.
    5. Add oats and mix well for a minute. 
    6. Put water and salt to it and stir thoroughly.
    7. Close the lid and cook it until two whistles.
    8. Once the pressure releases, mix it and serve hot.

    Take a tip:

    • Soaking of lentil helps in cooking the lentil properly.
    • Soaking for longer time too is not recommended, it becomes slimy. 
    Evergreendishesdev

    Oats Khichdi

    Oats Khichdi is an easy to make, one pot breakfast dish. It is filling, tasty and healthy.
    Prep Time 15 minutes
    Cook Time 15 minutes
    Soaking time 30 minutes
    Servings: 2 people
    Course: Breakfast, lunch
    Cuisine: karnataka

    Ingredients
      

    • 1/2 cup moong dal
    • 1 cup oats
    • 1 cup mixed vegetables
    • 1 onion
    • 4 cup water
    • 1 tablespoon oil and ghee
    • 1/2 teaspoon cumin
    • 1 inch ginger
    • 1 green chilly
    • 1/2 teaspoon turmeric powder
    • 1/4 teaspoon asafoetida
    • 1/2 teaspoon chilli powder
    • 1/2 teaspoon pepper powder

    Method
     

    1. Wash and soak the moong dal for at least one hour, this helps in proper cooking of the lentil.
    2. Chop the onion
    3. Take oil and ghee in a pressure pan, add cumin. As it splutters, put grated ginger and green chilly along with some asafoetida. Add onion and saute it for sometime, put the vegetables into it. Saute for two minutes.
    4. Put turmeric powder and chilli powder to it.Now add moong dal to it and saute for a minute. Add oats and mix it well for a minute. Put water,salt and pepper powder to it and stir thoroughly.Close the lid and cook it until two whistles. Once the pressure releases, mix it and serve hot.

    Do check out the Zerobeli products now. You can either buy from their website on on Amazon.


    Disclaimer: This is a brand collaboration with Zerobeli. I received products from Zerobeli to test and review them. All inputs given are my own.

    Wishing all a fabulous year 2020 ahead ! May the new year be the beginning of many good things.

    Pin it for later:

    oats khichdi
    oats khichdi

    Let’s be connected. If you ever make this dish, take a picture and tag @foodiejayashree on Instagram or @evergreendishes on Facebook

    Subscribe to get all updates and a book of handy hints for free !

  • Dal with Methi

    Dal with Methi

    Dal with methi makes a tasty side dish with any meal. It tastes good with hot steamed rice, jeera rice, pulav or even with chapati or phulka.

    I love making a variety of dals, it is not only filling but packed with vital nutrients essential for carrying on day to day activities. It serves dual purpose, tastes good with both rice and chapati. Moreover, my family members have a special liking for dal, thus I find many good reasons to play round it.

    Dal with methi or fenugreek leaves tastes good, thus I make three kinds of dal with it. One is the south indian dal  (muddipalya) we make  regularly, it is a traditional recipe loved by all elders. Let’s get to the recent addition that I have made in my cooking.

    Dal with Methi

    Measurement: 1 cup = 200 ml

    Ingredients:
    • 1 cup tur dal
    • 1/4 teaspoon turmeric powder
    • 2 teaspoon oil
    • 1 teaspoon cumin
    • 2 cluster of fenugreek leaves
    • 1 onion
    • 2 tomato
    • 2 teaspoon red chilli
    • salt to taste
    Method:
    1. Wash the tur dal and cook it in the pressure cooker with a little turmeric powder.
    2. Cut the onion and tomato.
    3. Cut the stem of the fenugreek leaves, chop the leaves and put them in water for sometime. A little salt may be added, it helps to remove the grime.
    4. Take oil in a pan, add cumin seeds, as they splutter, add onion, turmeric powder and asafoetida. Let cook for sometime.
    5. Now, add the fenugreek leaves to it.
    6. Put the tomatoes and salt. Let cook for sometime.
    7. Once the tomatoes are soft, add chilly powder to it and mix.
    8. Take the cooked dal and mix it thoroughly.
    9. Put the dal and allow to simmer for sometime.
    10. Dal with methi is ready to serve.
    Evergreendishesdev

    Dal with Methi

    Dal with methi is tasty and makes a good accompaniment with both rice and chapati.
    Prep Time 10 minutes
    Cook Time 30 minutes
    Soaking time 30 minutes
    Servings: 4 people
    Course: lunch ideas, Main Course
    Cuisine: north indian

    Ingredients
      

    • 1 cup tur dal
    • 1/4 teaspoon turmeric powder
    • 1 tablespoon oil
    • 1 teaspoon cumin
    • 2 bunch fenugreek leaves
    • 1 onion
    • 2 tomato
    • 2 teaspoon red chilli
    • salt to taste

    Method
     

    1. Take oil in a pan, add cumin seeds, as they splutter, add onion, turmeric powder and asafoetida. Let cook for sometime.Now, add the fenugreek leaves to it.Put the tomatoes and salt. Let cook for sometime. Once the tomatoes are soft, add chilly powder to it and mix.Wash the tur dal and cook it in the pressure cooker with a little turmeric powder.
      Cut the onion and tomato.
      Cut the stem of the fenugreek leaves, chop the leaves and put them in water for sometime. A little salt may be added, it helps to remove the grime.

      Now, add the fenugreek leaves to it.

      Take the cooked dal and mix it thoroughly.
      Put the dal and allow to simmer for sometime.
      Dal with methi is ready to serve.
    2. Wash the tur dal and cook it in the pressure cooker with a little turmeric powder.
      Cut the onion and tomato
    3. Cut the stem of the fenugreek leaves, chop the leaves and put them in water for sometime. A little salt may be added, it helps to remove the grime.
    4. Take oil in a pan, add cumin seeds, as they splutter, add onion, turmeric powder and asafoetida. Let cook for sometime. Now, add the fenugreek leaves.
    5. Put the tomatoes and salt. Let cook for sometime.
    6. Once the tomatoes are soft, add chilly powder to it and mix.
    7. Take the cooked dal and mix it thoroughly. Put the dal and allow to simmer for sometime.Dal with methi is ready to serve.

    I have recently started a You Tube Channel. Do like and subscribe to it. Here is the video recipe.

    Pin it for later:

    dal with methi
    dal with methi

    If you have liked this post, do leave a comment below. It really motivates me to write more. Do share it with your family members.

    If you ever make this, take a picture and share it with us by tagging @foodiejayashree on Instagram or @evergreendishes on Facebook.

    Do check out my e-book, 30 Tasty Dal Recipes for more such recipes.

    Subscribe to get a book of handy hints and all updates in your inbox.


  • Banana Betel Milkshake | No Cook Recipes

    Banana Betel Milkshake | No Cook Recipes

    Banana Betel Milkshake is tasty and healthy. It is ideal for breakfast or as a refreshing summer drink.

    Betel leaves holds a great value in India since ancient times. It is used since 400B.C. Betel leaves are used in auspicious functions as an offering to the Lord. They are also given to guests as a token of respect along with betel nut during ceremonies.

    It is a practice to chew paan especially after a heavy meal. This dates back to the ages; chewing of paan is associated with digestion, betel leaf is smeared with slate lime and arecanut powder is added to it. Betel leaves are used as antiseptic, breath freshener and stimultant while arecanut is aphrodasiac.

    While betel leaf and areca nut powder are the main ingredients in paan, many vibrant varieties are made and relished today. It is a trend to have with chocolate topping or with a smoky touch. Some use katechu, while a few add sweeteners and gulkand to it.

    Pros and Cons of Betel Leaf

    The use of betel leaf aids in the treatment of headache, cuts, abrasions and injuries, itching mastitis and constipation. But one needs to be aware of its downside too and be careful in regular consumption. According to CDC, using of betel leaf, areca nut and betel quid usage causes an increased risk of developing white and reddened lesions in the mouth that may lead to cancer.

    While we do make recipes with betel, it is not a regular feature at home. I rarely buy betel leaves on a daily basis. With this being said, today I present to you Banana Betel Milkshake

    Banana Betel Milkshake

    Ingredients:

    • 1 cup milk
    • 1 banana
    • 2 betel leaves
    • 1/2 teaspoon honey
    • 1 teaspoon soaked chia seed

    Method:

    1. Wash the betel leaf and remove the stalk and strands.
    2. Cut the banana.
    3. Blend milk along with banana and betel leaf. Add honey, give a swirl.
    4. Pour in glass, top with chia seed and serve.

    Take a tip:

    • Sugar may be added instead of sugar.
    • Adding of chia seed is optional.
    • Use the green coloured betel leaf and it is good to use tender leaves.
    • You can alternately make only paan milkshake, blend betel leaf and a spoon of gulkand along with milk.

    Pin it for later:

    glass of banana betel milkshake
    banana betel milkshake


    A few other recipes with chia seed that I keep making are mango jam with chia seed, chocolate chia seed pudding, strawberry and chia souffle

    About the event :

    This post was first published on 13/9/22. On 17/9/22, I have changed the picture of it. Sending this to Foodies_Redoing Old Post 85. It is a fortnightly event, we work on old posts which need a new look either by changing the pictures or the text. Here I have changed the picture only. 


    banana betel milkshake
    Evergreendishesdev

    Banana Betel Milkshake

    Banana Betel Milkshake is tasty and healthy.
    Prep Time 5 minutes
    Total Time 5 minutes
    Servings: 1 glass
    Course: Breakfast
    Cuisine: Indian

    Ingredients
      

    • 1 cup cold milk 1 cup = 240 ml
    • 1 banana
    • 2 betel leaf
    • 1/2 teaspoon honey
    • 1 teaspoon soaked chia seed

    Equipment

    • blender

    Method
     

    1. Wash the betel leaves, remove the stalk and strand.
    2. Cut the banana.
    3. Blend them along with milk.
    4. Add honey and swirl it once again.
    5. Pour in glass, top with chia seed and serve.

    Notes

    • Sugar may be used instead of honey.
    • Using of chia seed is optional.
    • One can make Paan Milkshake, use betel leaves and gulkand along with milk. 
    • It is best served chilled, thus use cold milk. 

    If you have liked this post, do share it with your family and friends. If you ever make it, take a picture and share it with me by tagging @foodiejayashree on Instagram or @evergreendishes on Facebook, I will share it further.

    Subscribe to get all updates and a book of handy hints for free !


  • Rawa kesari with jaggery / bellada sheera

    Rawa Kesari with jaggery is a healthy twist to the usual sweet that is prepared. It is healthier and tasty too.

    Festive days are here and time to prepare a galore of sweets. Kesari is usually prepared using sugar but one can make it using jaggery also. There is a variation in taste, but it is good, it has a different tinge I can say.

    I wanted to make this since a long time and the time has come now. Jaggery is considered to be more healthier than sugar. Before I get to the recipe, here are a few common facts about jaggery.

    How is jaggery made?

    Jaggery is made from unrefined sugar by boiling the raw, concentrated sugarcane juice until it solidifies. The other sources of jaggery are date palm and sap of coconut.

    What does jaggery contain?

    Jaggery consists of anti-oxidants along with minerals like zinc and selenium.

    Why is jaggery considered more healthy than sugar?

    Molasses is a nutritious by-product of the sugar making process, it is retained in jaggery. It is known by the name gur in India.

    How to make Rawa Kesari with jaggery / Bellada Sheera

    Ingredients:

    • 1 cup semolina
    • 1 cup jaggery powdered
    • 2 tablespoon ghee
    • 3 cup water
    • 1/2 teaspoon cardamom powder
    • cashew pieces

    Method:

    1. Add a spoonful of ghee in a thick bottom pan, put the cashew pieces and semolina to it, gradually roast it to a golden colour. Put it aside.
    2. Put water in the pan, add jaggery to it. As jaggery melts and the water boils, slowly stir in the semolina. Put ghee to it.
    3. Let cook on a low flame.
    4. Finally, add cardamom powder to it.
    5. Rawa Kesari with jaggery is ready to serve.

    Take a tip:

    • I have used organic jaggery, thus the solution is not filtered.
    • Roast the semolina on a low flame until golden in colour.

    The other sweets with jaggery that I have are Ragi Halbai, Hayagreeva Maddi, Kadabu

    Do check the video here

    Pin it for later:

    Rawa kesari with jaggery / bellada sheera
    Rawa kesari with jaggery / bellada sheera

    Evergreendishesdev

    Rawa Kesari with jaggery / Bellada Sheera

    Rawa kesari with jaggery is a delectable sweet with a healthy twist. It is ideal for festive days or serve it as a quick breakfast for children.
    Prep Time 10 minutes
    Cook Time 10 minutes
    Total Time 20 minutes
    Servings: 6 people
    Course: Breakfast, lunch
    Cuisine: karnataka

    Ingredients
      

    • 1 cup semolina
    • 2 tablespoon ghee
    • 1 cup jaggery grated
    • 3 cup water
    • 8 cashewnuts broken into pieces
    • 1/2 teaspoon cardamom powder

    Method
     

    1. Take a pan, add a teaspoon of ghee and roast the semolina and cashew pieces, it should be golden in colour. Put it aside.
    2. Take water in a pan, add jaggery to it. Once the jaggery melts and water comes to a boil, slowly stir in the roasted semolina. Put the remaining ghee. Let cook for sometime, the water evaporates and it thickens.
    3. Add cardamom powder.
    4. Rawa kesari with jaggery is ready to serve.

    I am sending this post to the theme”Recipes with Jaggery” for the group “Food for Feast” of which I am a part of. Every month, a few themes are selected, poll is conducted and the highest one is selected as the theme for the month.

    If you have liked this post, do share it further. If you ever make it, take a picture and share it by tagging @foodiejayashree on Instagram or @evergreendishes on Facebook.

    Do leave a comment below, let me know what you feel about the recipes that I have been sharing. Check out my e-books on Amazon.

    Subscribe to get all updates in your inbox and an e-book for free!